crwdns2915892:0crwdne2915892:0
The induction charging coil allows the device to receive power from the supplied charging base. It will need to be replaced if it is damaged by use or by external conditions. This guide describes how to replace the induction charging coil. Some steps in this procedure require desoldering connections. For a review of soldering techniques, check out this How to Solder Guide.
crwdns2942213:0crwdne2942213:0
-
-
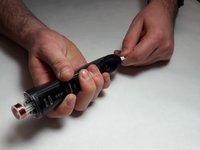
Use the charging station to remove the a small plastic plug from the end of the toothbrush by inserting the charging station into the end insert and twisting counter-clockwise by 90 degrees.
-
-
-
Remove the end cap from the bottom of the toothbrush by prying it off with a spudger.
-
-
-
Remove the top cap by using a spudger to pry the plastic ring off of the toothbrush frame.
-
-
-
-
Use a spudger to loosen the two plastic tabs next to the induction coil that secure the internal assembly to the frame.
-
Push on the rotating head in order to pop the assembly out of the black plastic casing.
-
-
crwdns2935267:0crwdne2935267:0Tweezers$4.99
-
Unwrap the ends of the wires from the white plastic pegs using a pair of tweezers.
-
-
-
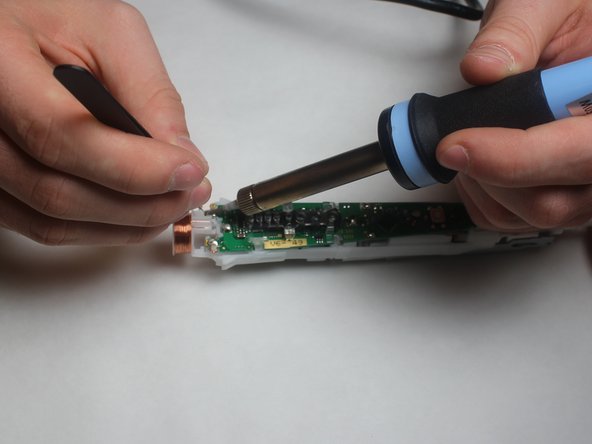
Melt the solder at the two pads on either side of the top of the motherboard. This will require a high heat soldering iron. Remove the wire from the solder pads using tweezers once the solder melts.
-
-
-
Remove the induction coil by pulling the plastic tabs out of their keepers.
-


To reassemble your device, follow these instructions in reverse order.
To reassemble your device, follow these instructions in reverse order.
crwdns2935221:0crwdne2935221:0
crwdns2935229:02crwdne2935229:0

crwdns2915084:0crwdne2915084:0

IUPUI, Team S1-G1, Harley Fall 2017 crwdns2935289:0IUPUI, Team S1-G1, Harley Fall 2017crwdne2935289:0
IUPUI-HARLEY-F17S1G1
crwdns2931471:03crwdne2931471:0
crwdns2935297:016crwdne2935297:0
crwdns2947412:03crwdne2947412:0
bonjour, ou puis je trouver une nouvelle bobine d’induction ou puis je remplacer simplement le fil de cuivre
juste une précision pour sortir l’intérieur de la brosse du manche il faut appuyez sur les deux pattes plastique en bas près de la boucle d’induction
on voit une des pattes a l’étape 5
Woher bekomme ich denn eine neue ladespule?