crwdns2915892:0crwdne2915892:0
Use this guide to remove the fan from your Optoma HD20.
crwdns2942213:0crwdne2942213:0
-
-
Twist the focal cap clockwise until it is fully extended.
-
Remove the focal cap by pulling it straight out.
-
-
-
Use a Phillips #1 screwdriver to remove the three 7.5mm screws on the bottom of the device.
-
-
-
Use a plastic opening tool to gently pry the top cover off of the device.
-
-
-
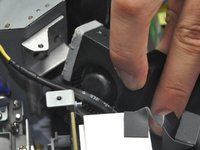
Remove the ribbon by disconnecting it from the main circuit board.
-
Lift up the clip holding it down and pull the ribbon out.
The black part is the clip that lifts up. Then gently tug on the cable.
The instructions are out of order here.
Wish I had read your comment before struggling with it for what seemed like hours.
Any advice for if you rip that ribbon?
Yes… Advice for when you go into this BEFORE consulting the internet and accidentally RIP it out?
I ripped the ribbon. Where can I find it’s replacement?
-
-
-
Peel off the tape that is holding the metal casing down.
-
-
-
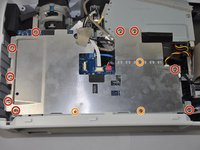
Use a Phillips #1 screwdriver to unscrew the nine 4.5mm screws.
-
Use a Phillips #0 screwdriver to unscrew the three 2.5 mm screws. This will allow you to remove the metal casing.
On mine, the bottom left red screw pictured doesn't hold the case (only circuit board), and there is an additional screw top middle, not pictured here, so still 9 total)
-
-
-
-
Remove the metal casing by lifting it up off of the circuit board.
-
-
-
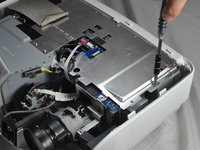
Unplug the six wires stemming from the circuit board.
-
-
-
Use a Philips #1 screwdriver to remove the four 4.5 mm screws
Mine doesn't have the rightmost screw pictured here, instead a screw in the corner of the board just out of top right of photo.
-
-
-
Remove the three 4.5 mm screws using the Philips #1 screwdriver.
The screw between the analogue inputs is longer and coarser pitch on my unit than the other two screws.
-
-
-
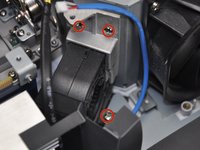
Remove the two 4.5 mm screws located on either side of the VGA/SCART port using a 5 mm nut driver. This will further release the plastic backing from the motherboard.
-
-
-
Slightly rotate the motherboard clockwise. This will prevent ports from getting caught on the plastic backing.
-
Lift the plastic backing to remove it.
Note, board has a connector on the lens side, connecting to a vertical board behind the lens (probably DMD board). This is especially important to remember when reassembling!
-
-
-
Lift up the motherboard and take out the metal container beneath it.
-
-
-
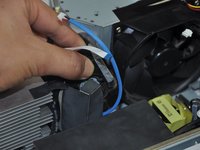
Unplug the white connector underneath the right side of the circuit board.
-
-
-
Use a Phillips #1 screwdriver to remove four 5 mm screws. This will release the fan.
Not sure if it’s necessary to remove any of these screws. None appear to actually secure the fan itself.
-
-
-
Pull the fan away from the metal housing unit.
-
Gently lift the fan up and out of the device. The fan is now removed.
Not mentioned here is that you pretty much need to bend the cardboard airflow director thing out the way, then sortof twist the fan out (can't pull backwards because the large heatsink is in the way).
Putting the new fan in is quite tricky. I managed eventually, but it might be much easier to remove the large heatsink. Not sure how safe that is though.
I replaced the larger lamp fan (KDE1285PTV1) after this, by removing the entire metal cage around the lamp (5 screws), this would have made replacing the small fan (GB1245PKVX-8) trivial, so I highly recommend doing it that way!
My fan had a rubber boot around it (not seen or mentioned here), as well as a bit of foam tape around the front edge (as seen in pic #2). My replacement fan did not have this tape, so I substituted some masking tape. Not sure of its purpose or whether its absence will be a problem. Still piecing the thing back together.
Removal and replacement of the fan was indeed challenging. I used a couple popsicle sticks to help get the boot back over it.
-


To reassemble your device, follow these instructions in reverse order.
To reassemble your device, follow these instructions in reverse order.
crwdns2935221:0crwdne2935221:0
crwdns2935229:06crwdne2935229:0
crwdns2915084:0crwdne2915084:0

Cal Poly, Team 21-23, Maness Winter 2015 crwdns2935289:0Cal Poly, Team 21-23, Maness Winter 2015crwdne2935289:0
CPSU-MANESS-W15S21G23
crwdns2931471:04crwdne2931471:0
crwdns2935297:06crwdne2935297:0
crwdns2947412:06crwdne2947412:0
Very nice set of instructions! Excellent images and identification of items to remove. Thank you!
Do you know where to get this fan for replacement? Having trouble finding a parts list.
Small fan is GB1245PKVX-8, large fan is KDE1285PTV1
I am trying to determine if the fan works or not. Should the fan come on when there is no bulb in the projector? I removed the bulb when it burned up and I am not sure whether it was due to a failed fan or simply the bulb.
Amazing! Thank you!!! Took a bit of effort to get the fan but in the end it worked like a charm!! Thank you for saving money!!!!
So I have an HD25, which is nearly identical. However, I ordered a replacement GB1245PKVX-8 fan and the cable for it is at least an inch shorter, making it impossible to reach the main board. Any ideas here?
The pictures don't really do justice to how hard it is to pop the focal cap off. One actually has to pull pretty hard, I was afraid of breaking something, but it all worked out.
eislerzoltan - crwdns2934203:0crwdne2934203:0
you da best <3 ty for comment
Weyland Chiang - crwdns2934203:0crwdne2934203:0