-
-
Remove the water tank and drainage tray.
-
Remove the side cover and remove the brewing unit.
-
Remove all coffee beans.
-
-
-
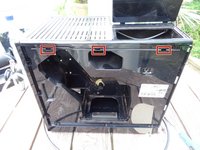
Unscrew and remove six Torx T10 on the rear.
-
Lever the rear cover off. It will most likely be quite stuck and you will need to apply some force. You must use plastic lever tools to prevent damaging the cover.
-
-
-
-
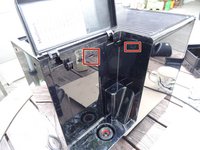
Press carefully into the slits on the sides using a minus screwdriver or a flat metal spatula, to release the clasps on the upper surface. These may be well tight and you have to use some force.
-
You should have created a separation between the upper surface and side panels. Now lever the upper covering away using a plastic tool. This may be quite stuck and you may apply some force.
-
-
-
Place a plastic tool in the crack between front panel and left side panel and widen it. Then push the side panel to the back. The side panel will be quite stuck and you may apply some force to do this.
-
Remove the hose from the water tank to the pump.
-
Remove the side panel.
-
-
-
Place a plastic tool into the crack between the front panel and the right side panel and widen it. Then push the side panel to the back. This may be quite stuck and you may need to apply some force.
-
Remove the side panel.
-


Follow the steps in reverse order to reassemble the device.
Follow the steps in reverse order to reassemble the device.
crwdns2935221:0crwdne2935221:0
crwdns2935229:012crwdne2935229:0
crwdns2934873:0crwdne2934873:0
100%


crwdns2934885:0crwdne2934885:0 crwdns2934875:0crwdne2934875:0
crwdns2934877:0crwdne2934877:0 ›
crwdns2947412:02crwdne2947412:0
Many thanks for this, the procedure turned out to be exactly the same for my Melitta Avanza Series 600.
Merci beaucoup.