crwdns2915892:0crwdne2915892:0
If your Oontz Angle 3 ULTRA speaker is not charging or connecting to external devices, you may need to replace your speaker’s Micro USB port. This replacement guide will walk you through replacing the Micro USB port of your Oontz Angle 3 ULTRA Bluetooth speaker. For this guide, you will need a spudger, a Soldering Iron with Solder Wick or a Solder Sucker, and tweezers. Follow this guide to learn how to solder and de-solder connections. How To Solder and Desolder Connections
crwdns2942213:0crwdne2942213:0
-
crwdns2935267:0crwdne2935267:0Tweezers$4.99
-
Remove the two black rubber sheaths around the edges of the speaker.
-
Under the symbol-marked sheath there is a white rubber covering for the buttons. Peel this away to reveal the panel underneath.
-
On two corners of its triangular face there is a small divot, which allows you to use your fingernails or a pair of tweezers to grip and peel away the covering.
-
-
-
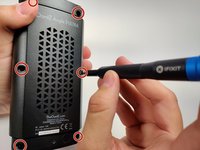
Use a JIS #0 screwdriver to remove the six screws to expose the motherboard.
-
-
-
-
Using a pair of tweezers, pinch and pull the rubber fillings obstructing the screws.
-
-
-
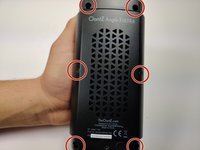
Using a JIS #0 screwdriver, remove the 6 screws holding the backplate in.
-
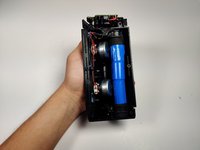
Remove the back panel off of the device.
-
-
-
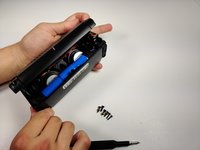
Gently push the ports away from the speaker enclosure with the spudger to free the motherboard.
-
-
crwdns2935267:0crwdne2935267:0Tweezers$4.99
-
With your solderwick and soldering iron, remove the solder at each point, and gently pull the micro USB port away from the motherboard with the tweezers.
-


To reassemble your device, follow these instructions in reverse order.
To reassemble your device, follow these instructions in reverse order.
crwdns2915084:0crwdne2915084:0

Embry-Riddle Aeronautical University, Team S6-G9, Rauch Spring 2020 crwdns2935289:0Embry-Riddle Aeronautical University, Team S6-G9, Rauch Spring 2020crwdne2935289:0
ERAU-RAUCH-S20S6G9
crwdns2931471:03crwdne2931471:0
crwdns2935297:06crwdne2935297:0
crwdns2947412:03crwdne2947412:0
These instructions are great, but they're useless unless you can find a replacement micro USB port… Any suggestions? Because I couldn't find one online that indicated it was compatible with the OontZ…
Couldn't find proper exact port... so just removed old port from board with dykes, used a junk usb cable and directly soldered the + and - leads of cable to circuit board. ( removed mic at top ( didn't use it )) and fed cable thru mic hole out ( hot glue on inside so cable doesn't pull ).... now speaker has a 6" tail for charging.
Works as good as new, no issue charging.
TJ Mac -
They are on ebay, just have to take time and have tools to install, im gonna do it soon to mine...