crwdns2915892:0crwdne2915892:0
This guide shows the steps used to replace the laser module in the CD player. New units can be sourced on the Internet for under 50 Euro. I decided to write this after searching in vain for specific instructions or videos on how to change the laser for this model. It isn't obvious how to do this when one first opens the upper case, because the laser module is encased in a plastic housing which doesn't allow easy access to the laser.
crwdns2942213:0crwdne2942213:0
-
-
To remove the top case, there are 4 Phillips screws on the top back of the case, and 2 screws on each side. Pull off the case toward the rear of the unit.
-
-
-
This step can also be done as the first step. Plug in the CD player and push the eject button. Pop off the front bezel. Then unplug the CD player again. While the unit is plugged in do not look into the laser, although it is very protected in this CD model and relatively difficult to do.
-
-
-
Carefully turn the CD player over so the bottom side is up. Remove the 4 Phillips head screws that hold the housing to the base plate (photo on left).
-
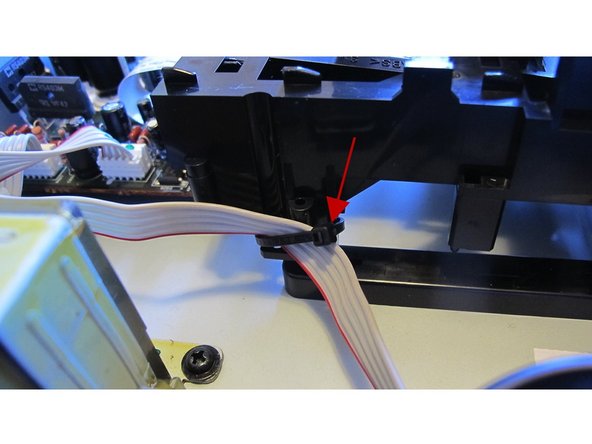
Now, turn the unit back on its feet. Looking from the front of the player, there is a ribbon cable held to the side of the housing with a cable tie (see red arrow). This should be cut off with scissors. Replacement of this tie is not needed on reassembly (center photo).
-
On the right side of the housing, lift the ribbon cable and the wires from the connector near the front of the housing out of the white cable guide mounted on the base plate (green circle). It isn't necessary to remove the connectors (photo on right).
-
-
-
-
Remove the wide ribbon cable from the rear of the laser module (red oval). Pull the ribbon straight out, gently but firmly, holding it on the blue coloured zone near the connector.
-
-
-
Now the housing can be removed. I left the cable connectors on the right side of the housing connected, as they are long enough to leave them attached. It is necessary to partially close the CD tray, then carefully move the entire housing back, guiding the CD tray through the opening in the front panel.
-
This shows the housing immediately after removal, you can see the tray has been partially closed in order to remove it from the CD player case. At this point, the connectors on the housing and on the laser module are still attached. Only the wide ribbon cable from the rear of laser module in the housing has been removed.
-
-
-
Now turn the housing over to expose the laser module plate. With the housing connectors attached I rested the unit on the edge of the CD player case to work on it. There is now easy access to remove the connector on the laser module (yellow rectangle by taking a spudger and lifting first one end then the other end until the connector pops free.
-
There are four spring-mounted screws (Phillips head), as marked on the photo on the left. Remove the screws, then the springs underneath, noting the direction of the cone taper of the springs for reassembly. The laser module can now be lifted up and removed from the housing.
-
Below the springs are rubber gaskets (indicated by arrows in the right-hand photo). These must be removed and transferred to the new laser module. Remember to insert them in the holes of the new unit in the same way as they are on the old module.
-
-
-
Before inserting your new module back in the housing, a blob of sauter that is used to protect the module during transport must be removed. Photo 1 shows this blob, in the yellow rectangle, marked red by the nice fellow who sold me the new laser so I would easily recognise it easily. Without removing this, the CD player will not function.
-
Heat the blob with a sautering iron and either flick it off or suck it up with a "sauter sucker" when it liquifies. After that the contact should look similar to photo 2.
-
-
-
To reassemble after preparing the new laser module, follow the instructions in reverse order.
-


To reassemble your device, follow these instructions in reverse order.
crwdns2935221:0crwdne2935221:0
crwdns2935229:04crwdne2935229:0
crwdns2947412:022crwdne2947412:0
thank you very much for your post.
However, is it easy to insert the ribbon cable to the chase/laser head again? thanks.
It seems there is no "lock" for the flat cable. thx
Hi aabman, I was also a bit nervous about re-inserting the cable again, but it actually was easy to put back it. I had to take the unit out again because after the first time I reassembled everything the unit was making a bit of noise - I think that I had not tightened the four screws with the conical springs enough the first time. So I actually had the cable off twice. The blue part of the cable near where it inserts is a bit stiffer so you can get hold of it better there.
Hi Lami. Interesting that you say had a noise and put it down to the springs. After replacing the module in my girlfriend Onkyo I got a noise too. Not only that, although I was no longer getting 'no disc' on the display, it wasn't reading the disc 100% properly and wouldn't play. Then I noticed if I tilted the player at 45 degrees the noise went away and discs loaded 100% and played. Weird! Anyway I figured it must be something to with the the way the module is suspended on springs and started examining it closely. After removing the springs again what I noticed was that the springs are in pairs - a stiffer pair and lighter more 'squashy' pair. I took a guess that the stiffer pair should go at the heavier end of the module where the motors are and the lighter pair at the other end and that seems to have fixed it. No more noise and discs load properly. Cheers
FiloB -