crwdns2915892:0crwdne2915892:0
If your OnePlus 6T is scratched, cracked, or malfunctioning, it may be time to replace it! This is a very detailed guide on how to fix the OnePlus 6T. When fixing your OnePlus 6T, you will need to acquire some tools before fixing the device, so make sure to use the links given on the right-hand side under “What you need” to ensure that the OnePlus 6T is properly fixed. From physical damage to unresponsiveness in the device, following the steps below will tell you exactly how to replace your device's AMOLED touch screen.
crwdns2942213:0crwdne2942213:0
-
-
Make sure the phone is powered off and placed with the back cover facing towards you on a stable surface.
-
-
-
Pop open the SIM card tray by inserting a SIM card removal tool into a small hole on the upper-left side of the phone.
-
Carefully remove the SIM card from its tray.
Remove the SIM card tray from the phone. Don't need to remove the actual card from the tray, just be careful you don't lose it…
-
-
-
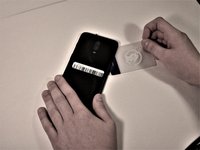
Loosen the binding glue within the phone using a hairdryer or an iOpener.
-
-
crwdns2935267:0crwdne2935267:0Plastic Cards$2.99
-
Insert a Jimmy under one of the heated corners of the phone to lift it slightly.
-
Insert a plastic card underneath the slightly lifted lip on the back cover and gently glide the card under the lifted phone casing.
-
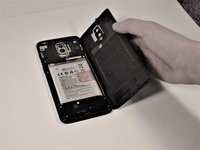
Remove the back cover from the phone.
Do you need to replace the glue when reassembling?
It was sufficient for me to re-heat the adhesive from the phone.
Also, I used a pair of tweezers to lift the initial corner, which was a breeze compared to the Jimmy’s as suggested by the guide.
The gaps were very tight. After warming the adhesive, it was helpful to have a helper use a suction cup to tug on the back to enlarge the gap for the jimmy.
Theres a big patch of glue on the right side of the camera. Be careful with this part, cuz ure proabably under the curved side trying to get inbetween and in my case this shattered the coating of the backside of my phone. It still works, but it has a spider skin on the back now.
-
-
-
-
Remove seven 3mm Phillips #00 screws from the speaker.
Can you guys confirm that these screws are Phillips #00? I tried using a #000 bit and it worked, while using a #00 bit I couldn't take them out.
-
-
-
Use a spudger to lift and remove the speaker.
-
-
-
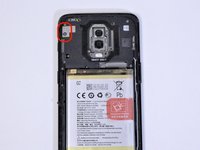
Remove all visible screws securing the housing above the battery
-
Insert a pick or a spudger by the silver slot on the left. Along the phone's edge, gently pry up until the housing is released.
-
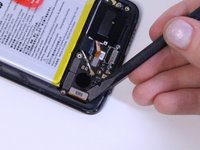
Disconnect the battery from the phone by lifting the battery connector from the phone with a spudger.
-
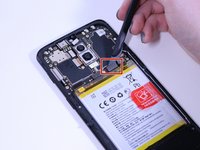
Using a spudger, disconnect the screen by carefully lifting the screen connector.
you skipped a step removing the plate around the camera
The battery connector is actually the smaller connector to the right of the one highlighted.
There is no need to remove all the visible screws as described in the first bullet point. The only screw that needs to be removed is the one holding the bracket that secures the battery connector (image 2 in Step 7)
-
-
-
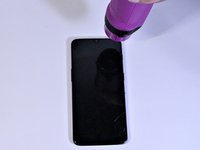
With a swab or q-tip, apply alcohol to the sides of the broken screen to soften the adhesive that holds the screen on the phone.
-
-
-
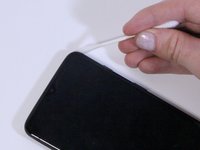
Press a suction cup against the display.
-
Glide a spudger around the screen edge until all of the adhesive glue is broken.
-
-
-
Remove the display from the phone.
-
ALWAYS remember to thoroughly and gently clean the surfaces and remove any and all remaining or leftover old adhesive. this is a crucial step in assuring that your new adhesives "bond" properly and securely to provide adequate adhering, as well as to keep any dust or dirt and other undesired subjects from entering the device.
-


To reassemble your device, follow these instructions in reverse order.
To reassemble your device, follow these instructions in reverse order.
crwdns2935221:0crwdne2935221:0
crwdns2935229:025crwdne2935229:0
crwdns2915084:0crwdne2915084:0

Grand Valley State University, Team S4-G6, DeVasto Fall 2019 crwdns2935289:0Grand Valley State University, Team S4-G6, DeVasto Fall 2019crwdne2935289:0
GVSU-DEVASTO-F19S4G6
crwdns2931471:04crwdne2931471:0
crwdns2935297:021crwdne2935297:0
crwdns2947412:06crwdne2947412:0
skipped a step removing the plate around the camera. It should be after step 6 and before step 7.
otherwise this guide is meh. its okay. it gets the job done, I guess.
I only have a broken front glass on my 1+6t the screen seems ok what differences are there and where do I get a good quality front glass for it. I have never disassembled a phone before but I know a bit about electronics and know how to put computers together and I don't think it is worth me paying a third of the phon's cost for a whole screen and/or pay someone to repair it
Step 7 is too complicated. Just remove the metal thingy above the battery connector and pull it up carefully.
Else its a good guide
step 9 was kinda implossible for me, even though i used alcohol and heat before.. had to dig my Jimmy under the broken corner (top left), cracked some of my screen and was somehow able to lift the screen far enough to get under it.. im also missing some detailed instructions of the reassembly, had to watch a video for this
My phone fell down and has a black screen. The screen has no cracks at all. And the phone is working too as I am able to hear the notifications and incoming calls. So any idea how much it would cost to repair it?
I replaced my cracked screen (just the screen without frame). It works fine most of the time but ghost touches and dead spots came up after a few days. But restarting the device 3-4 times fixes the issue. Then this issue persists and Restarting the phone has become a ritual now.
Can I try replacing the screen (with frame screen replacement) again or it could be something else at fault here?
It will cost a lot to check if a new display will fix it but what if it doesn’t. there is some other underlying issue here? Please advice