crwdns2915892:0crwdne2915892:0
Follow this guide to remove and replace a defective earpiece speaker for the OnePlus 3. This requires removing the motherboard in order to access the earpiece. The hardest part of the guide is getting the frame clips free.
Some guide images will show the battery already removed from the phone. You do not need to remove the battery for the earpiece speaker procedure.
crwdns2942213:0crwdne2942213:0
-
-
Insert a SIM eject tool, bit, or straightened paperclip into the hole located between the SIM card slot and the power button.
-
Press firmly to eject the SIM card tray.
-
-
-
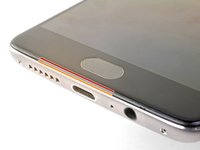
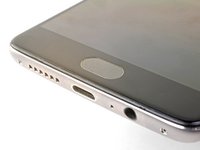
Remove the two 2.6 mm T2 screws from the bottom edge of the phone.
-
-
-
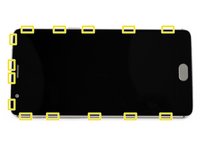
Display panel seam: This seam is part of the display assembly. Do not pry at this seam, or you will separate and damage the display panel.
-
Frame seam: This is where the plastic frame meets the back cover. It is recessed into the back cover. Only pry at this seam.
-
There are fourteen clips that hold the frame against the rear case. Be aware of their location as you pry the back cover off in the following steps.
This picture is a bit misleading, the frame seam is actually sunk into the metal frame, and is not visible at first.
With an older phone, it’s more likely to separate the display panel itself than to separate the displaypanel from the frame. If the top of the screen comes off first, before the part with the touch sensor, then you’re separating the wrong thing (ie displaypanel).
Mind that the displaypanel itself seems as if it has two seams (the panel itself and the board).
Thanks for the helpful tip! I re-worded the step slightly to hopefully clarify where the frame seam is.
-
-
-
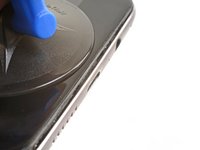
Place a suction cup near the bottom edge of the display.
-
Pull on the suction cup with strong steady force.
-
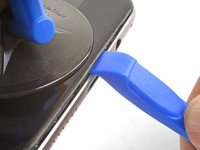
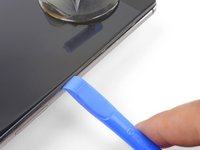
Press the edge of an opening tool straight into the frame seam near the suction cup until the edge wedges between the plastic frame and the back cover's lip.
To get maximum leverage and make this step possible with my weaker suction cup, I held down the phone with a plastic pick/tool pressed down onto the metal back. As the suction cup pulled up the plastic frame, the plastic pick holding down the metal back naturally was pushed further and further into the gap between the frame and back.
-
-
-
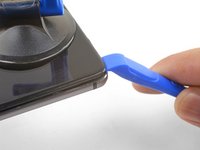
Once the opening tool's edge is wedged in position, carefully slide the tool along the bottom edge of the phone.
-
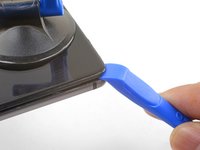
Carefully guide the opening tool around the left corner of the phone while keeping the tool's edge within the seam.
-
-
-
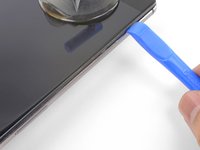
Continue sliding the opening tool along the long edge, releasing the clips along the way.
I found I had to use a couple of those “guitar picks” to get the screen off, left the first one inserted on the bottom and then went around the side of the phone with the second.
I couldn’t get the last clip easily, so I also went around the other side, and then the last two clips left and right went out togther much more easily.
Yep, thanks for your note. It was far more easy to go round the other side.
-
-
-
-
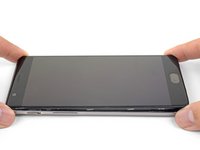
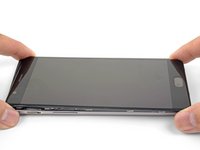
With the bottom and left edge of the phone freed, gently wiggle the frame to release the top and right edge clips.
-
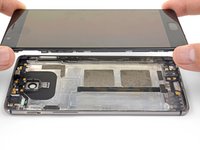
Lift the screen up and remove it.
-
Align the top edge of the frame to the back cover and ensure that the top clips slip into place.
-
Squeeze along the long edges of the phone to snap the remaining clips into place.
I’m having trouble putting on the back cover, anyone else had this issue?
Hello.
From this Step on I directly jumped to Step 13. Removing the 7 Screws. NOT removing the Mainboard. It is easy possible to remove the camera just like this if you loosen the Camera-cable and pull carefull on it. Because the 7 Screws are removed there is enough space to remove the old camera and bring the new camera in. I tried It various times to verify this.
-
-
-
Use the point of a spudger to pry up and disconnect the battery connector from its socket, located above the top right corner of the battery pack.
-
Bend the connector away from the socket to prevent accidental contact.
Why not removing the camera without removing the mainboard?
Warum wird die rückseitige Kamera nicht ausgebaut, ohne das Mainboard auszubauen?
Hello Ingo,
The rear camera is trapped under the motherboard. You must at least loosen the motherboard to remove the camera.
Die Kamera befindet sich unter dem Motherboard. Sie müssen mindestens das Motherboard lösen, um die Kamera zu entfernen.
During reassembly this part was tricky for me: the new battery couldn’t clip into place the way the old one did, resulting in a loose connection and “battery does not match “ message when trying to power the phone up. The new battery probably had a slightly different connector that than the old one. I even ordered another battery but the same thing happened. I finally managed to connect it by applying much more pressure on the press connector than needed for the other ones. it did not make any clip sound though.
-
-
-
Remove the 3 mm Phillips screw securing the cable bracket.
-
Remove the cable bracket.
-
-
-
Use the point of a spudger to pry up and disconnect the interconnect flex cable from the motherboard, which is located above the battery.
-
Repeat the process to disconnect the daughterboard flex cable from the motherboard.
-
-
-
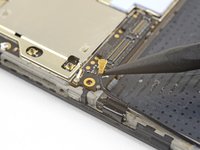
Slide the point of a spudger underneath the antenna interconnect cable located at the bottom left corner of the motherboard.
-
Pry up and disconnect the antenna interconnect cable.
Connector may go oval, push with spudger to make circular again
-
-
-
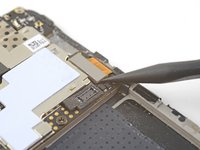
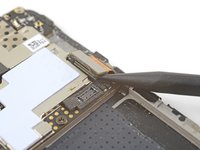
Use the point of a spudger to pry up and disconnect the display connector from its socket on the motherboard.
-
-
-
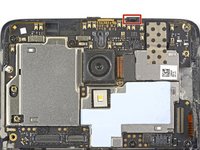
Remove the seven Phillips screws securing the motherboard to the frame:
-
Four 3 mm black screws
-
Three 2.9 mm silver screws
-
-
-
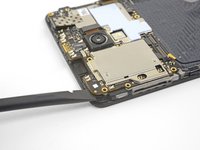
The motherboard is still held in place near the top by clips.
-
Slide the flat end of a spudger underneath the top left corner of the motherboard.
-
Twist the spudger and pry up to release the motherboard from its recess.
I find it easier to pry from the opposite side, where the antenna cable connector are as it required less force to release the motherboard.
-
-
-
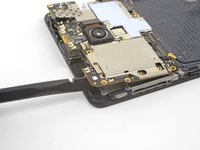
Remove the motherboard.
When removing the motherboard, the front camera module's connector on the backside of the board tried to be retained by its recess in the frame. I had to peel the tape off the back of the front camera, then remove the motherboard, and finally prise the connector away from the frame before reinstalling it on the motherboard.
-
-
crwdns2935267:0crwdne2935267:0Tweezers$4.99
-
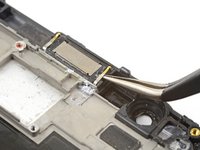
Squeeze the tweezer tips together and insert the point under one of the earpiece speaker clips.
-
Pull the tweezer point up slowly to pry the earpiece speaker out of its recess.
-
-
-
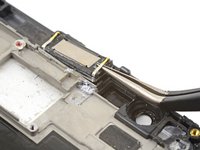
Remove the earpiece speaker.
-
To reinstall the earpiece speaker:
-
Place the earpiece speaker into its recess and firmly press it into place with your finger.
-


To reassemble your device, follow these instructions in reverse order.
Repair didn’t go as planned? Check out our OnePlus 3 Answers community for troubleshooting help.
To reassemble your device, follow these instructions in reverse order.
Repair didn’t go as planned? Check out our OnePlus 3 Answers community for troubleshooting help.
crwdns2935221:0crwdne2935221:0
crwdns2935229:09crwdne2935229:0


crwdns2947412:03crwdne2947412:0
Had a bunch of crap / dirt between the outer grid (visible from the front) and the fine piece of cloth. Cleaned it, but this was the reason why I couldn’t hear.
Thank you! Very detailed!
Thank you ! Super detailed and very nice pictures !
Vorsicht an alle Nachahmer: Mein Display ist einfach mehrfach gerissen, während ich versucht habe, es zu lösen. Keine Chance. Das war so fest verankert, dass ich mit keinem der Werkzeuge richtig was erreichen konnte. Dabei wollte ich nur mal die Ohrmuschel reinigen :-(