crwdns2933423:0crwdne2933423:0

Olympus Stylus Tough TG-2 iHS Display Assembly Replacement

crwdns2862623:0crwdne2862623:0
crwdns2942641:0crwdne2942641:0

crwdns2942213:0crwdne2942213:0

  1. Olympus Stylus Tough TG-2 iHS Display Assembly Replacement, Display Assembly: crwdns2935265:01crwdnd2935265:01crwdnd2935265:03crwdne2935265:0 Olympus Stylus Tough TG-2 iHS Display Assembly Replacement, Display Assembly: crwdns2935265:01crwdnd2935265:02crwdnd2935265:03crwdne2935265:0 Olympus Stylus Tough TG-2 iHS Display Assembly Replacement, Display Assembly: crwdns2935265:01crwdnd2935265:03crwdnd2935265:03crwdne2935265:0
    • To detach the monitor screen, remove the following 7 screws:

    • Locate the flash and remove the 2 Phillips #00 9.23mm & 14.87mm screws.

    • Locate the battery door and remove the single Phillips #00 3.37mm screw.

    • On the bottom of the camera, remove the single Phillips 3.58mm screw near the tripod socket.

  2. Olympus Stylus Tough TG-2 iHS Display Assembly Replacement: crwdns2935265:02crwdnd2935265:01crwdnd2935265:03crwdne2935265:0 Olympus Stylus Tough TG-2 iHS Display Assembly Replacement: crwdns2935265:02crwdnd2935265:02crwdnd2935265:03crwdne2935265:0 Olympus Stylus Tough TG-2 iHS Display Assembly Replacement: crwdns2935265:02crwdnd2935265:03crwdnd2935265:03crwdne2935265:0
    • On the face plate, locate and remove the 2 eyelet strap side Phillips #00 9.2mm corner screws and the lower battery corner Phillips #00 14.87mm screw.

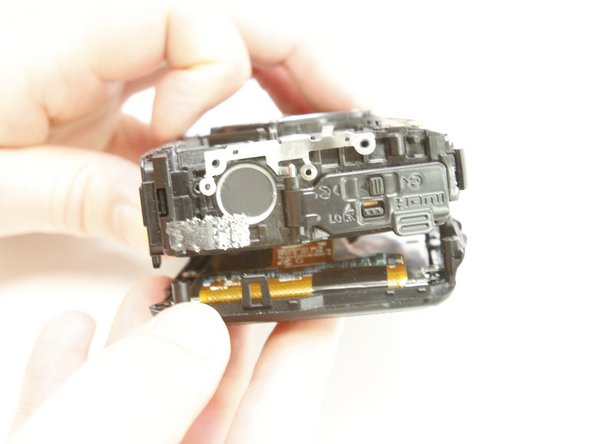
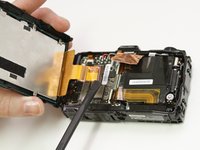
    • Use your fingers to unclasp the casing clips on either side of the camera and pull down the monitor casing.

    • Using the spudger to gently pry the screen away from the body of the camera.

  3. Olympus Stylus Tough TG-2 iHS Display Assembly Replacement: crwdns2935265:03crwdnd2935265:01crwdnd2935265:02crwdne2935265:0 Olympus Stylus Tough TG-2 iHS Display Assembly Replacement: crwdns2935265:03crwdnd2935265:02crwdnd2935265:02crwdne2935265:0
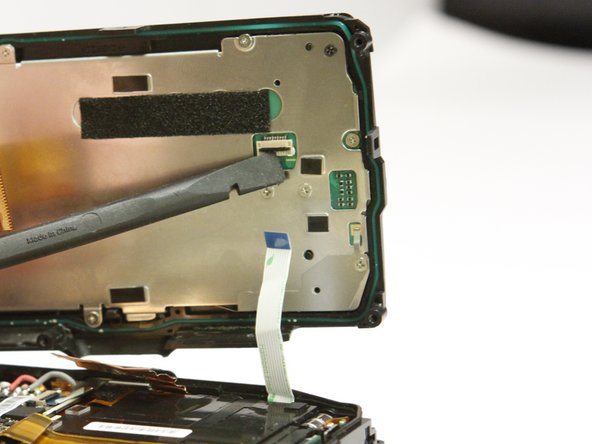
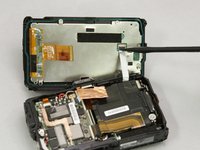
    • Locate the clasp for the white ribbon.

    • Use the spudger to lift the clasp releasing the ribbon

  4. Olympus Stylus Tough TG-2 iHS Display Assembly Replacement: crwdns2935265:04crwdnd2935265:01crwdnd2935265:02crwdne2935265:0 Olympus Stylus Tough TG-2 iHS Display Assembly Replacement: crwdns2935265:04crwdnd2935265:02crwdnd2935265:02crwdne2935265:0
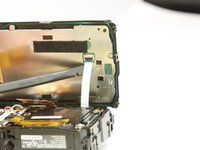
    • Locate the clasp for the orange ribbon in between the motherboard and lens box.

    • Use the spudger to lift the clasp releasing the ribbon.

  5. Olympus Stylus Tough TG-2 iHS Display Assembly Replacement: crwdns2935265:05crwdnd2935265:01crwdnd2935265:02crwdne2935265:0 Olympus Stylus Tough TG-2 iHS Display Assembly Replacement: crwdns2935265:05crwdnd2935265:02crwdnd2935265:02crwdne2935265:0
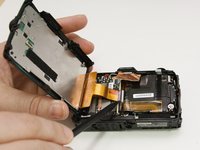
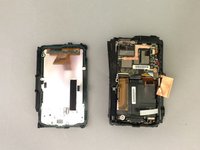
    • Next pry up on the white connector using the spudger to free the screen from the device.

    • The housing and monitor will be separated.

crwdns2915888:0crwdne2915888:0

To reassemble your device, follow these instructions in reverse order.

Amanda

crwdns2935283:007/20/15crwdne2935283:0

933 crwdns2915208:0crwdne2915208:0

crwdns2935297:08crwdne2935297:0

crwdns2947412:00crwdne2947412:0

crwdns2917038:0crwdne2917038:0

crwdns2936625:0crwdne2936625:0:

crwdns2936751:024crwdne2936751:0 0

crwdns2936753:07crwdne2936753:0 2

crwdns2936753:030crwdne2936753:0 3

crwdns2942667:0crwdne2942667:0 85