crwdns2915892:0crwdne2915892:0
You will need a clean, well-lit area, an iFixit repair kit including the specialized screw driver, along with the Phillips #000 bit. We also recommend you have an organization tray in order to keep track of all the screws you will be taking out.
crwdns2942213:0crwdne2942213:0
-
-
Remove nine 4.45mm Phillips #000 screws from the outside of the case.
-
-
-
There are four screws to take out on the bottom of the camera.
-
-
-
There are three screws to take out on this side.
-
-
-
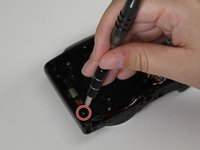
There is one screw to take out on this side.
-
-
-
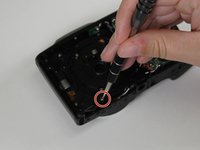
There is one hidden screw inside the HDMI port.
-
-
-
-
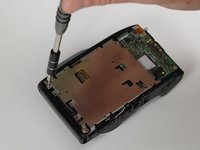
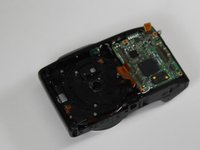
Using the blue plastic opening tool, wedge open and remove the case.
-
-
-
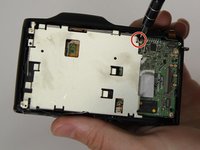
Once you have the back case off, remove the LCD Screen.
-
-
-
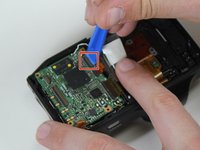
Using a plastic opening tool, gently lift the retaining flap on the display cable ZIF connector.
-
Pull the display cable from its socket on the motherboard.
-
-
-
Remove the LCD screen from the device.
-
-
-
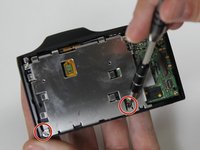
Remove the four 3.8mm Phillips #000 screws from the LCD frame.
-
-
-
Remove the top left screw, top right screw, bottom left screw, and bottom right screw from LCD frame.
-
-
-
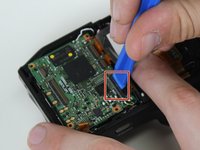
Lift the retaining flaps on the three remaining ZIF connectors connected to the motherboard.
-
-
-
Remove the five 4.3mm Phillips #000 screws from the lens frame to access the lens.
-
Remove the lens frame.
-
-
-
Remove two 4.3mm Phillips #000 screws from black plastic piece surrounding the lens.
-
Remove the lens.
-


To reassemble your device, follow these instructions in reverse order.
To reassemble your device, follow these instructions in reverse order.
crwdns2935221:0crwdne2935221:0
crwdns2935229:03crwdne2935229:0
crwdns2915084:0crwdne2915084:0

Carson-Newman University, Team S1-G1, Sobiech Spring 2017 crwdns2935289:0Carson-Newman University, Team S1-G1, Sobiech Spring 2017crwdne2935289:0
CNU-SOBIECH-S17S1G1
crwdns2931471:04crwdne2931471:0
crwdns2935297:08crwdne2935297:0
crwdns2947410:01crwdne2947410:0
Is her anything in the lens assembly that I could look for which may have dislodged showing up as a shadow on the bottom of the display screen