crwdns2915892:0crwdne2915892:0
In this guide will be looking at how to replace a motherboard in an Olympus OM-D E-M10 Mark II Camera. For this procedure you will the following set of items: a 00 Philips head screwdriver, needle nose pliers (recommended but not required) and your own replacement motherboard. This procedure is not particularly hazardous so no protective gear should be required. This process can be a little tedious so make sure to set aside around 30 min to an hour to replace the motherboard. It would have a medium level of difficulty due to the overall size of the parts and delicacy. The motherboard is an essential component to having a functioning camera.
crwdns2942213:0crwdne2942213:0
-
-
Lay the camera on its back as shown. Using the button located to the right of the lens, hold it down while rotating the lens to release it from the camera.
-
-
-
Remove eight screws using a Phillips #00 screwdriver.
-
There are 3 different screws, (2x) 3 mm, (3x) 2.5 mm, (3x) 4 mm.
-
-
-
Lift and remove the bottom cover off the camera.
-
-
-
-
Using the Phillips #00 remove two 5.0 mm screws, one from each side of the base of the camera.
-
-
-
Turn the camera over until it is laying on its backside. Open the screen until it fully extended and perpendicular as shown below. Remove the three screws located there with the Phillips #00.
-
There are two different types of screws. (2x) 2.7 mm, (1x) 3.5 mm.
-
-
-
Turn the camera over on its side as shown. There is a small compartment door that has a screw located underneath it. Remove the 2.5 mm screw with a Phillips #00 screwdriver.
-
-
-
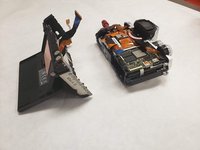
Take the front and back of the camera apart.
-
-
-
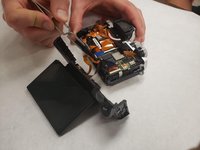
Position the front half as depicted below. The motherboard is the green computer chip on the right half the picture below. You will need to disconnect everything from the motherboard. Gently pull out all orange connectors.
-
-
-
Using a Phillips #00 remove the three 3.0 mm screws while holding the motherboard in place. You should then be able to gently remove the motherboard.
-


To reassemble your device, follow these instructions in reverse order.
crwdns2935221:0crwdne2935221:0
crwdns2935229:04crwdne2935229:0
crwdns2935287:0crwdne2935287:0

IUPUI, Team S1-G5, Hovde Fall 2019 crwdns2935289:0IUPUI, Team S1-G5, Hovde Fall 2019crwdne2935289:0
IUPUI-HOVDE-F19S1G5
crwdns2931471:03crwdne2931471:0
crwdns2935297:08crwdne2935297:0
crwdns2947412:02crwdne2947412:0
Good work! My anode selector does not work, I am stuck in AUTO, mines mark iii but looks very similar. Anyone else has this issue?
This is what Olympus had to say about me replacing the mother board- what are your thoughts. The issue is indeed in the mainboard. However, we don't sell that part and even if you buy it elsewhere, for it to work properly, it will have to be configured with specific codes that only we have and that, as you must understand, are confidential, so, in this case, we suggest that you proceed with the repair.