crwdns2915892:0crwdne2915892:0
The vent engine is the key mechanical assembly that controls airflow in the ventilator. This guide will show you how to replace the vent engine if your current ventilator has a faulty one.
For more information on removing the vent engine, please refer to page 9-5 (section 9.3.2) in the technical manual.
crwdns2942213:0crwdne2942213:0
-
-
With the main chassis separated from the cart, position the device upright with the monitor centered to prevent any tipping.
-
Disconnect any external connectors as well as the display connector.
-
-
-
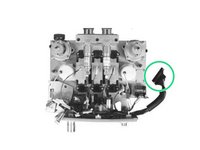
Push down on the small grey tab below the exhalation valve.
-
While holding the tab down, you should be able to pull and extract the exhalation valve from the device.
-
-
-
There are four Phillips screws to be removed at each corner of the back of the device.
-
Once the screws are removed, slide the housing along with display to reveal the main chassis.
-
-
-
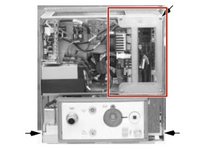
Remove the circuit board retainer in the upper right by unscrewing the four screws (M4-0.7 x 12mm Phillips) that hold it in place.
-
Disconnect the connectors coming from the vent engine to the circuitry.
-
-
-
The vent engine is held in place by two screws on each side of the device. Unscrew all four and remove the vent engine.
-
Install the new vent engine and screw into place.
-
Connect the vent engine connectors to the circuit board and reinstall the circuit board retainer.
-


To reassemble your device, follow these instructions in reverse order.
To reassemble your device, follow these instructions in reverse order.

crwdns2915084:0crwdne2915084:0

Cal Poly, Team S7-G6, Paton Spring 2020 crwdns2935289:0Cal Poly, Team S7-G6, Paton Spring 2020crwdne2935289:0
CPSU-PATON-S20S7G6
crwdns2931471:03crwdne2931471:0
crwdns2935297:03crwdne2935297:0