
Oculus Quest 2 Disassembly
crwdns2944107:0crwdnd2944107:0sctanfcrwdnd2944107:0crwdnd2944107:0crwdnd2944107:020crwdnd2944107:0crwdne2944107:0
crwdns2944111:0Mha 6, 2025crwdne2944111:0
crwdns2915892:0crwdne2915892:0
crwdns2942287:0crwdne2942287:0The Oculus Quest 2, also known as the Meta Quest 2, is a VR headset developed by Facebook (formerly Oculus) and is the 2nd iteration of the original Quest. The Quest 2 can run as a standalone headset, or in tandem with a computer when it's connected with either a USB cable or over Wi-Fi. The headset also features a Qualcomm XR2 processor, 6 GB of RAM, and a resolution of 1823 x 1920 per eye.
Also, be sure to keep track of all the screws, this headset has a lot of them.
Consult the Recognizing & Disconnecting Cable Connectors (RDCC) guide for information about the connectors.
For step-by-step repair guides, click here.
crwdns2942213:0crwdne2942213:0
crwdns2943215:0crwdne2943215:0


crwdns2944105:0crwdne2944105:0

-
-
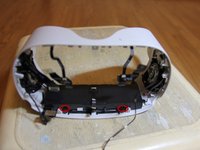
Start by removing the six T2 screws that hold the inner lining of the headset to the front.
-
-
-
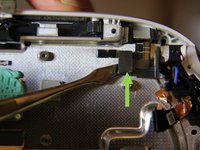
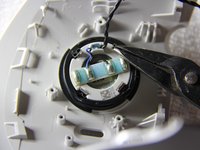
One side at a time, insert a pick next to the nosepiece, slide it to the edge and pry.
-
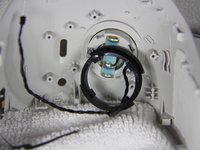
When both sides are loose, carefully lift the cover out, and fold it so that the nose piece is on the outer perimeter of the device, as shown in the second image.
-
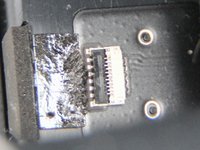
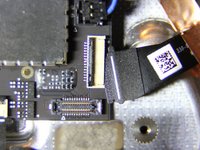
Lift the small black clip on the ZIF connecter up, and pull the flex cable out.
-
-
-
The ribbon cable is lightly attached to the headset with adhesive and the cable is connected with a ZIF connector. Consult Step 1 of the Recognizing & Disconnecting Cable Connectors guide (RDCC guide) for ZIF connector info.
-
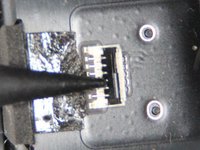
Use the tip of a spudger to flip up the locking flap to release the cable. See pictures 2 and 3 to understand how the flap operates.
-
-
-
Remove the three P000 screws.
-
Remove the two P000 screws
-
-
-
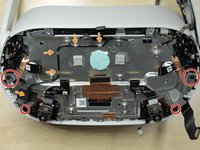
Insert a pick and pry at these four spots to release the clips.
-
Lift the front cover away from the headset.
-
-
crwdns2935267:0crwdne2935267:0Tweezers$4.99
-
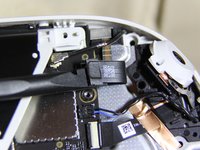
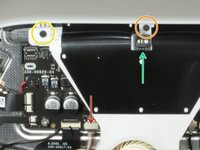
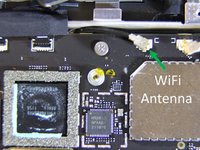
Unplug the side WiFi antenna. See step 5 of the RDCC guide. To disconnect the cable, slide a thin, ESD-safe pry tool or tweezers under the metal neck of the connector and lift straight up from the board.
-
Remove the 4.4 mm P000 screw
-
Remove the two 2.3 mm P000 screws
-
-
-
Unplug the battery. See Step 4 of the RDCC Guide. Use the spudger to pry the connector straight up.
-
Remember to put part of the battery ribbon cable under the logic board when reassembling.
-
-
-
Remove two P000, 4.8 mm long screws.
-
Remove four P000, 4.8 mm long screws.
-
Remove two P000, 10.7 mm long screws.
-
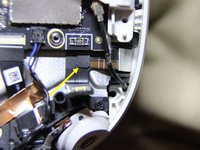
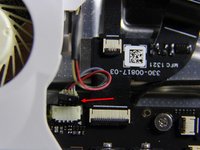
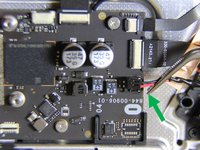
The arrow points to the Bluetooth antenna. To disconnect see step 5 of the Guide. Go to picture 2. To disconnect the cable, slide a thin, ESD-safe pry tool or tweezers under the metal neck of the connector and lift straight up from the board.
-
Picture 3. Remove the antenna from the headset.
-
-
-
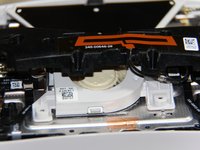
Unplug the fan.
-
Remove the T2 screw
-
Remove the P000 screw
-
Lift the front LED away from the headset.
-
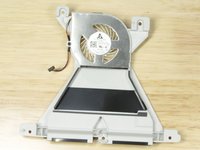
Lift the fan away from the headset.
-
-
-
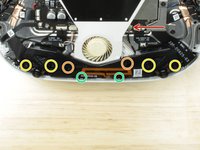
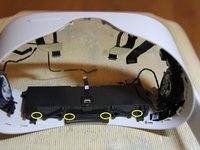
Remove the four P000 screws
-
Remove the heatsink.
-
-
-
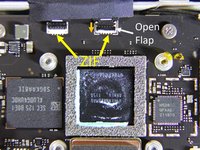
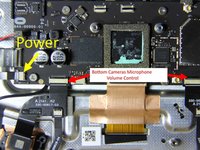
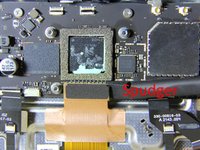
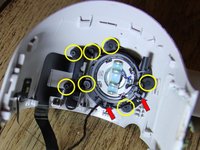
There are 2 ZIF connectors near the top of the mainboard. The ZIF flap on the right has been opened. The ZIF flap is opened by pushing down in the direction of the orange arrow.
-
Unlatch both ZIF connectors and disconnect the cables. These cables lead to the front LED and IPD sensor, and proximity sensor.
-
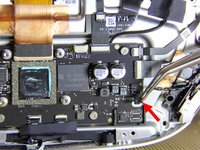
Unplug the side WiFi antenna connector. See step 5 of the RDCC guide. To disconnect the cable, slide a thin, ESD-safe pry tool or tweezers under the metal neck of the connector and lift straight up from the board.
-
Unplug the cable leading to the USB Type-C port and headphone jack. See Step 4 of the RDCC Guide. Use the spudger to pry the press connector straight up.
-
-
-
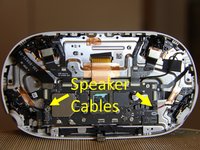
Two sets of speaker cables are connected to the main board.
-
Grab the wires and pull out to disconnect the speaker cables.
-
-
-
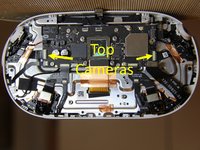
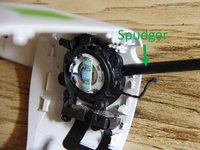
Disconnect the ZIF connectors for the top cameras
-
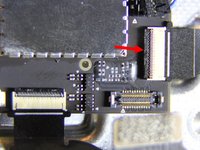
The ZIF connector is shown in the second picture. A spudger should be used to push up the locking flap as shown by the red arrow.
-
When the flap is open the ribbon cable may be pulled from the connector.
-
-
-
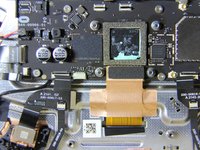
Open the flaps on the three ZIF connectors and detach the ribbon cables.
-
-
-
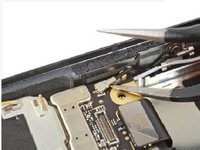
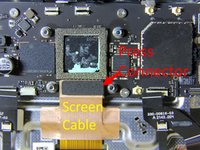
The screen cable is attached with a press connector.
-
Use the spudger to pry the press connector straight up. See Step 4 of the RDCC Guide.
-
-
-
Remove the following screws:
-
One 3.5mm hex screw
-
Four P000 screws
-
Remove the mainboard.
-
-
-
Remove the four P000 screws
-
Unroute the side WiFi antenna.
-
The battery power comes to the midframe through this cable. The cable has a metal pad on the bottom and is attached to the midframe with glue. Separate the metal plate on the bottom of the connector from the midframe.
-
-
-
The midframe is removed giving access to the battery.
-
-
-
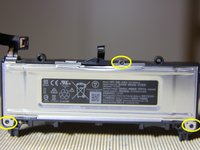
Remove the two P000 screws, which hold the battery to the front of the case.
-
Remove the four P000, which hold the battery to the back of the case.
-
-
-
Remove the three T2 screws, which hold the cover on the battery case.
-
After the cover is removed.
-
-
-
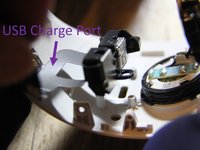
Release the speaker wire from the speaker retainer.
-
Remove the seven P000 screws from the speaker retainer and USB port.
-
Use the spudger to free the speaker retainer.
-
Remove the USB charge port and the speaker retainer.
-
-
-
Use a small screwdriver to tip up the tabs on the springs.
-
Remove the springs using needle nose pliers.
-
-
-
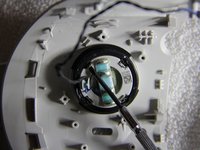
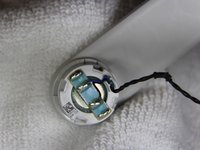
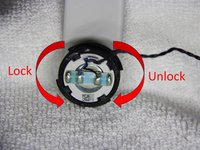
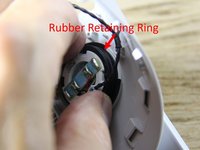
The arm and speaker are passed through the headset and locked in place with the rubber retaining ring.
-
Tabs in the rubber retaining ring pass through the slots in the arm. These are the slots that previously held the springs. the ring is turned to lock or unlock the arm.
-
-
-
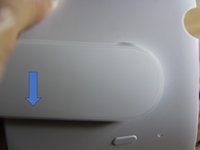
When you are working on the arm located near the on/off button, you must put your hand through the part of the headset that is normally towards your face to grasp the retaining ring. You then push the arm down in the direction shown in the second picture.
-
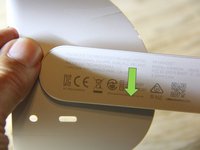
When working on the arm located near the USB port you must put your hand through the front of the headset to grasp the retaining ring. You then push the arm down as shown in the third picture.
-
-
-
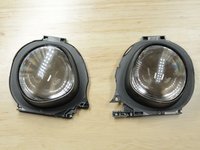
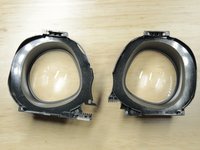
Small metal tabs hold the guide rails that the lenses slide on. Removing the rails reveals the display.
-


crwdns2935221:0crwdne2935221:0
crwdns2935229:0134crwdne2935229:0
crwdns2947821:0crwdne2947821:0
crwdns2947823:0crwdne2947823:0


crwdns2947412:087crwdne2947412:0
Thank you so much to me for making this guide. Helped me a lot!
It is worth emphasizing that this device has 2! WIFI antennas.
Anyone who wants to disconnect WIFI from their device must disconnect both.
Their connection to the motherboard, is right next to each other, but the right connection is immediately revealed while the left connection next to it is hidden under the black cover and requires a number of additional disassembly steps.
Alternatively, anyone who wants to disconnect WIFI from their device can disconnect the wires in the area where they connect to the antenna stickers on the right and left sides of the eyepieces of the glasses, thus saving all the disassembly of the front cover.
Thanks!! this really helped me, I have already customized mine with an official custom filter, but this will add an additional layer of Kashrus.
If you just need to replace a camera… it’s 14 screws. You need a T2 and a PH0 (not a P0…) Pretty easy once you get the front cover off and not covered here. It’s pretty easy to see what you do once you get in there though. Good luck!
PH0 and P0 are the same :)
Lylo -
Bravo pour ces informations. Un grand merci
где запчасти то покупать на данное устройство. выломали порт usb, а заменить нечем.
вы можете купить это на FixMyOculus.com
Kmic -
Un grand merci pour ce tuto qui m’a permis de sauver mon casque suite à une grande rasade de vin blanc .
Gérard leroy
This guide is overall great however just as some feedback some of the clour lables are not taged to anything as well as it would be great to see some images of where the battery is located as well as how to get it out.
Where is the hard drive located? Is it possible to upgrade the hard drive if you disassemble it far enough?
Can’t say for sure, but it’s VERY likely that the SSD is soldered to the main board and not replaceable without considerable skill and expensive tools
The storage device is the large flash chip on the main board labeled “SanDisk.” It is not user-upgradable (well, without considerable effort and maybe a little software hacking).
I’m trying to replace the Aux/power port on the mid frame part on the oculus, is it necessary to remove the mainboard in order to gain access to the part I’m trying to replace?
I’m wondering if you had any luck with this as the brand new headset I got was damaged over Christmas and now the charge port is incredibly loose.
Yes, the port is hidden by the lense/screen assembly
Kmic -
Has anyone confirmed whether or not the Quest 2 has an internal SD card reader? Someone on Facebook claims there is one, but I can’t find anything online that backs it up.
Is a full disassembly necessary to remove the lens assembly, or is it simple as just removing the rear cover and swapping it out?
Thank you for this guide, I would like to replace the microphone with an output from a hardware vocoder would this be possible?
Were you able to determine where the microphone is located? I'm replacing the LCD that went bad, but I'd like to fix the microphone while I'm in there.
Drew -
how would go about getting to the power button If I just want see if it’s not damaged because that is the only problem I am having. Is to turn it on
Need more detail on how to the clip of the first proximity sensor is removed/replaced.
oh. nice article rellyy hlpdddesbdyf rgoofnv thought hhbdj cbbjhnnsndvxc
any idea where can i get replacement parts?
ebay or fixmyouclus.com, Aliexpress too
Kmic -
what is the weight of battery? it's possibile turn on without battery but with cable connected? i think the best solution for future quest it's battery swapping.
Battery weight is 63g - I tested and you are not able to use the quest 2 with the battery removed and a power cable connected. The meta logo will appear for ~.1 seconds, then a battery with a slash through it image will appear on the screen.
d__g -
Agradezco mucho la información es una gran ayuda ya que tengo que desarmar totalmente el aparato que es de mi sobrino y lo dejo en el suelo y se le metieron hormigas sin está ayuda no creo haber podido hacerlo gracias
Hay in step 2 removing the rear cover I accidentally cut the ribbon connecting to the rear cover (proximity ribbon) does any1 know where I can get a replacement?
Id try eBay to find a used one as i doubt if Oculus, Facebook or Meta will just sell you the part outright!
So far so good waiting for my replacement screen dam hope for my girls sake i get it back together .hate to file a missing person report.
Do I need to remove everything to replace the lens and LCD?
The LCD screen shouldn't need changing just change the lens. But if you need both just by a new unit as the Lens is about $80 and the LCD is about the same so for the cost of the parts its probably just easier to buy new!
Is it possible to remove the lenses on early stages?
No you have to remove the screen assembly
Kmic -
I just swapped the mainboard into a new headset piece (speakers power button etc) and the unit works for about 2 minutes and then goes to a black screen. I can hit the power button again and get the device to display three dots, then the screen goes dark again.
Anyone have any ideas? This repair went very smoothly so Im not sure if its overheating now or what.... I did try disabling the prox sensor as well and that did not help.
Probably needed to replace the thermal past that was compromised when your disassembled it.
You Might have damaged your proximity sensor ribbon cable or connector as it wont work if it cannot detect if its on your face or not. Disabling the prox sensor will for SURE cause that error 100%! It cannot be disabled. That's why I think its the prox sensor ribbon cable or a bad connector that the cable goes into. Try replacing both the sensor and its connector ribbon cable if thats thats possible.
Hi has anyone try swapping a 64gb mainboard for a 128 gb or 256gb to increase the storage?
I did and it worked great, but the teardown to swap the board is tedious and very very delicate work!!
I don’t know why people are praising this guide. It is terrible, incomplete. Lacks detail. Hand waives critical steps and instructions.
It is a terrible guide, one of the worst on this site.
I have been trying to figure out how to “life the front led away from the headset” for two hours. Each gentle attempt risks destroying it. Worst and most clear instruction I have ever seen.
And that is after trying to deduce what the OP meant multiple times, each with an intuitive leap of faith; rather than clear instructions.
if you are still trying a year later, the front LED is held to the fan assembly with some adhesive below the LED, you can just either pull it off or use a pry tool to get it off
It would have been nice of the OP had mentioned that you don’t need to take the %#*@ motherboard and heat sink off to dissemble the main body.
And mentioned that you will need to have thermal paste available to replace the thermal paste you ruined by removing a motherboard and heat sink you’d hit even need to remove.
Does replacing the mainboard is plug and play ?
Do i need to do something on the software side to get it to work ?
Asking before ordering part , answer will be very appreciated.
Yes you can swap motherboards! I did it in mine to get better memory, but if you have a warranty I wouldn't recommend it as this will void your warranty! I replaced my motherboard from a 64GB board to a 128GB one, the Oculus unit booted right up easily, then it gets its updates over the internet so just connect it to your wifi and it will update itself to the newest latest automatically! Now the teardown is tedious and if your not good with electronics I wouldn't attempt it!! As its very easy to damage things!
Hello. After replacing the motherboard, how to pair the old controllers?
Definitely one of the most unnecessarily complex devices I've ever disassembled.
Ended up having to take apart everything just to replace that one fried USB port, even accidentally snapped off the latches from two ribbon cable ports in the process (though the latter is entirely my fault in handling teeny tiny pieces).
But at least my Quest 2 is no longer a paperweight now. Thanks OP.
Can You help me? I try to reject the wifi modules and bluetooth modules but ı dont know which one is the wifi and which one is the bluetooth. Thank you for help.
The wifi is in on the top right of the motherboard (pic 5) and the bluetooth antenna is required for it to work, but is attached to the black piece at the bottom (pic 6)
Kmic -
Where is wifi chip? Can I remove it? if I success to remove it, quest 2 works well without wifi?
Just buy a whole new mainboard, ebay is selling the mainboards really cheap!! Just swap mainboards its easy, but make sure you unpair and factory reset your oculus before you do so, then when you pair the new board to your account its as easy as pie!
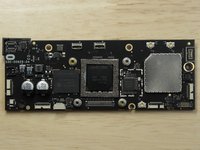
Mainboard image must be fake as SK Hynix doesn't make the Qualcomm Snapdragon CPU for the Oculus Quest 2, where the heck did that image come from??
Hi someone got over excited and dropped my quest now it works for approximately 5 min then the left screen turns off...can this be fixed?
TIA
Si
Sounds like it needs a new screen.
Kmic -
Hola a todos, tengo un problema con mis oculus, no me funciona el Wifi y lo reinicié con los parametros de fabrica pero ahora no puedo completar las opciones de inicio del sistema, hay alguna forma de saltarse la configuración de Wifi ???????
Where would I buy a replacement fan and heatsink
Ebay or a website called fix my oculus
Kmic -
Hola a todos, de casualidad alguno sabe dónde comprar el Flex que va a uno de los sensores superiores de las Oculus quest 2
Where the heck do I buy a Oculus 2 headset battery in Australia?? I have been looking & can't find anything like it???
Thanks for your guidance
Does anyone have any idea how far into the disassembly is necessary to just do a shell swap? The speaker arms are damaged on both sides and it sounds like a shell swap would be easier than replacing the arms.
You have to remove everything, sorry.
Kmic -
Has anyone had to replace a broken speaker arm/headband.
Something worth noting for anyone doing this is first time many of the cables will be held down with adhesive tape, so you will need to remove the tape before some of the steps, mainly removing the midframe.
also my quest didn't have the 3.5mm hex screw for the motherboard in it for some reason.
The left lens on my headset completely stopped working recently. It used to turn back on if I slapped my headset but that has since stopped working. I would assume that it is either a faulty or loose connection to something, but I don't know for sure. How would I go about checking/possible fixing something like that?
It needs a new screen altogether
Kmic -
Any idea why one would stay white with blue lines in on the screen
It means that the screen is broken.
Kmic -
Savez-vous si le port USB peut être changé ? Le mien a grillé. Le casque fonctionne, mais je ne parviens pas à recharger.
Oui, vous pouvez changer le port USB-C, mais cela demande beaucoup de travail
Kmic -
Danke fürs Zeigen.
Mich würde interessieren, ob man die beiden Objektive so montieren kann, dass der Augenabstand nicht symetrisch ist. Eines meiner Augen ist 3,5mm weiter vom Zentrum als das andere Auge.
Gruß
Martin
Es gibt nur drei Anpassungen für die Augen, ohne das Oculus zu verändern, ist das nicht möglich.
Kmic -
Has anyone an idea where to get a spare battery?
You can find one on ebay or there is a website called fix my oculus
Kmic -
used this to mod a vent hole in the front. guide helps quite a lot! thank you!
If i wanted to swap the headset shell can i remove the entire assembly or do i remove everything bit by bit. Thanks.
Everything comes out a little bit at a time because of cables. Hope this helps
Kmic -
Muchas gracias
I accidentally unplug the 3rd sensor! Where do I plug it back it at ????????? And do I need a special cord to charge it? I bought it off a friend of some sort but I cant get it to charge or turn on either they ripped me off or I have the wrong cord please help
Considering it can't charge (I had the same problem) it needs a motherboard replacement. You don't need a specific cord to charge it, but i recommend the one that comes with the headset. As for the sensor is it the top left, top right, bottom left, or bottom right?
Kmic -
I have black screen when turn on it, and I can reboot, and do factory reset but the black screen still. I don´t know if is the proximity sensor. Any idea?
What kind of connector does the display use, is it proprietary or a standardized connector? I want to know i could buy a non working quest 2 and adapt the screen directly to hdmi or display port for use not as a vr headset
Thank you so much for the guide! I was able to fix my noisy broken fan thanks to this guide!
So if anyone is considering doing this, DONT. Because for some reason of malarchy the focal sensor and any zif attachment like it DOES NOT reseal, fun init?
So it need a reseal
A lot of people have stripped their screws because this guide says to use a P0 screwdriver... it's well known in the industry that Meta Quest 2 headsets use P000 screws.
I have corrected this in this guide, but we will need to wait until my changed are verified by somebody who knows this before they will be visible.
Shame the usb replacement needs nearly all these steps
Bonjour
Usine a gaz ! J'ai une tache noire sur mon optique gauche ! je ne sais pas comment elle est apparue ? D'un jour a l'autre !!
C'est une tache ovale irisée sur le bord. Je ne sais pas si je peux l'enlever si j'arrive à démonter mon Quest 2 jusqu’à l'écran ????
Le démontage est tres fastidieux pour un particulier ...... si quelqu'un a des renseignement sur cette tache, Merci