crwdns2933423:0crwdne2933423:0

Nutri Ninja Ninja Blender Duo BL641 Body Disassembly

crwdns2862623:0crwdne2862623:0
crwdns2942641:0crwdne2942641:0

crwdns2942213:0crwdne2942213:0

  1. Nutri Ninja Ninja Blender Duo BL641 Body Disassembly, Nutri Ninja Ninja Blender Duo BL641 Body Disassembly: crwdns2935265:01crwdnd2935265:01crwdnd2935265:01crwdne2935265:0
    • Turn blender upside down

  2. Nutri Ninja Ninja Blender Duo BL641 Body Disassembly: crwdns2935265:02crwdnd2935265:01crwdnd2935265:02crwdne2935265:0 Nutri Ninja Ninja Blender Duo BL641 Body Disassembly: crwdns2935265:02crwdnd2935265:02crwdnd2935265:02crwdne2935265:0
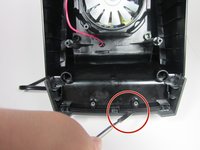
    • Remove these six screws (0.5 inch 5 gauge phillip's head)

    • Note: 2 of the screws will be star shaped circled in blue

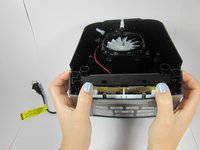
    • Lift the bottom panel off

  3. Nutri Ninja Ninja Blender Duo BL641 Body Disassembly: crwdns2935265:03crwdnd2935265:01crwdnd2935265:01crwdne2935265:0
    • Unscrew and remove these six phillip's screws. (0.5 inch 5 gauge phillips)

    • Note: The screws circled in blue are 1/8" longer and have a slightly different top than the rest. These are the only two screws that are different than the rest.

  4. Nutri Ninja Ninja Blender Duo BL641 Body Disassembly: crwdns2935265:04crwdnd2935265:01crwdnd2935265:03crwdne2935265:0 Nutri Ninja Ninja Blender Duo BL641 Body Disassembly: crwdns2935265:04crwdnd2935265:02crwdnd2935265:03crwdne2935265:0 Nutri Ninja Ninja Blender Duo BL641 Body Disassembly: crwdns2935265:04crwdnd2935265:03crwdnd2935265:03crwdne2935265:0
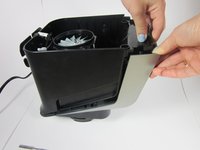
    • Insert pry tool in between the two plastic pieces to separate them

    • Move pry tool back and forth from right to left until the two pieces begin to separate as shown.

    • Pry the two pieces apart with your hands as shown in the picture to finish separating the pieces.

  5. Nutri Ninja Ninja Blender Duo BL641 Body Disassembly: crwdns2935265:05crwdnd2935265:01crwdnd2935265:01crwdne2935265:0
    • This completes the disassembly of the main body of the blender so you can continue to perform replacements on the internal parts.

crwdns2915888:0crwdne2915888:0

To reassemble your device, follow these instructions in reverse order.

Nathan

crwdns2935283:009/26/17crwdne2935283:0

201 crwdns2915208:0crwdne2915208:0

crwdns2935297:02crwdne2935297:0

crwdns2915084:0crwdne2915084:0

Cal Poly, Team S7-G1, Banghart Fall 2017 crwdns2935289:0Cal Poly, Team S7-G1, Banghart Fall 2017crwdne2935289:0

CPSU-BANGHART-F17S7G1

crwdns2931471:05crwdne2931471:0

crwdns2935297:06crwdne2935297:0

crwdns2947412:00crwdne2947412:0

crwdns2917038:0crwdne2917038:0

crwdns2936625:0crwdne2936625:0:

crwdns2936751:024crwdne2936751:0 0

crwdns2936753:07crwdne2936753:0 0

crwdns2936753:030crwdne2936753:0 1

crwdns2942667:0crwdne2942667:0 52