crwdns2933423:0crwdne2933423:0

Nokia Lumia 920 Back panel Replacement

crwdns2942213:0crwdne2942213:0

  1. Nokia Lumia 920 Back panel Replacement, Remove the Bottom Screws: crwdns2935265:01crwdnd2935265:01crwdnd2935265:03crwdne2935265:0 Nokia Lumia 920 Back panel Replacement, Remove the Bottom Screws: crwdns2935265:01crwdnd2935265:02crwdnd2935265:03crwdne2935265:0 Nokia Lumia 920 Back panel Replacement, Remove the Bottom Screws: crwdns2935265:01crwdnd2935265:03crwdnd2935265:03crwdne2935265:0
    • Make sure the phone is off.

    • Use the T5 screwdriver to remove the two 8.6mm long screws, located at the bottom of the phone. (Head size is 2.5mm)

  2. Nokia Lumia 920 Back panel Replacement: crwdns2935265:02crwdnd2935265:01crwdnd2935265:02crwdne2935265:0 Nokia Lumia 920 Back panel Replacement: crwdns2935265:02crwdnd2935265:02crwdnd2935265:02crwdne2935265:0
    • Use the smallest Torx screwdriver or another small poking tool and push into the hole on the SIM card slot. The plastic SIM protective piece should pop out quite easily.

    • Put that plastic piece aside.

  3. Nokia Lumia 920 Back panel Replacement: crwdns2935265:03crwdnd2935265:01crwdnd2935265:02crwdne2935265:0 Nokia Lumia 920 Back panel Replacement: crwdns2935265:03crwdnd2935265:02crwdnd2935265:02crwdne2935265:0
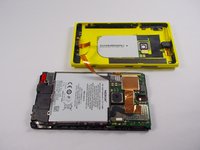
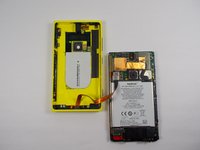
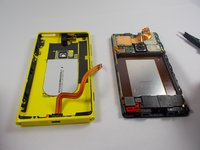
    • Once both screws on the bottom are removed, and the plastic SIM protective piece is removed, gently push on the outside of the screen.

    • The screen should become separated using little force. And should like the pictures shown once complete.

  4. Nokia Lumia 920 Back panel Replacement: crwdns2935265:04crwdnd2935265:01crwdnd2935265:02crwdne2935265:0 Nokia Lumia 920 Back panel Replacement: crwdns2935265:04crwdnd2935265:02crwdnd2935265:02crwdne2935265:0
    • This step may be easier to remove the battery first, but it is not mandatory.

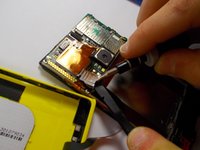
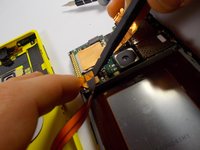
    • Place the spudger tool or flat plastic tool on top of the ribbon cable to avoid damaging it when prying up on the metal clip.

    • Use a plastic opening tool, or gently use a small metal flat-head screwdriver to pry up the metal clip. (It is recommended to use a plastic tool; However, if the opening tool does not work or fit into the small opening underneath the clip, use the flat-head.)

  5. Nokia Lumia 920 Back panel Replacement: crwdns2935265:05crwdnd2935265:01crwdnd2935265:02crwdne2935265:0 Nokia Lumia 920 Back panel Replacement: crwdns2935265:05crwdnd2935265:02crwdnd2935265:02crwdne2935265:0
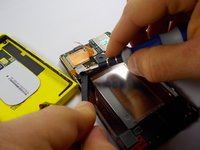
    • Once the metal clip is removed, gently pry up on the ribbon cable connection, located underneath the metal clip you have just removed.

crwdns2915888:0crwdne2915888:0

To reassemble your device, follow these instructions in reverse order.

crwdns2935229:014crwdne2935229:0

Jonathan

crwdns2935283:010/31/14crwdne2935283:0

1,492 crwdns2915208:0crwdne2915208:0

crwdns2935297:04crwdne2935297:0

crwdns2915084:0crwdne2915084:0

UMass Dartmouth, Team 4-2, Miles Fall 2014 crwdns2935289:0UMass Dartmouth, Team 4-2, Miles Fall 2014crwdne2935289:0

UMASSD-MILES-F14S4G2

crwdns2931471:02crwdne2931471:0

crwdns2935297:07crwdne2935297:0

crwdns2917034:0crwdne2917034:0

useless - doesnt show detail

nick - crwdns2934203:0crwdne2934203:0

crwdns2917038:0crwdne2917038:0

crwdns2936625:0crwdne2936625:0:

crwdns2936751:024crwdne2936751:0 1

crwdns2936753:07crwdne2936753:0 3

crwdns2936753:030crwdne2936753:0 5

crwdns2942667:0crwdne2942667:0 9,449