crwdns2933423:0crwdne2933423:0
crwdns2947577:0crwdnd2947577:0crwdne2947577:0

Nokia 6310i Keypad Replacement

crwdns2869540:0crwdne2869540:0: 6.3K

crwdns2959988:0crwdne2959988:0

crwdns2959990:0crwdne2959990:0
3
crwdns2959992:0crwdne2959992:0
22
crwdns2959994:0crwdne2959994:0
94
crwdns2959996:0crwdne2959996:0
6,335
crwdns2955950:0crwdne2955950:0: 2

crwdns2960004:02crwdne2960004:0.

crwdns2959984:0crwdne2959984:0: 1

crwdns2959972:01crwdne2959972:0

crwdns2959986:0crwdne2959986:0: 0

crwdns2959958:0crwdne2959958:0

crwdns2955944:0crwdne2955944:0: 10 - 15 crwdns2931279:0crwdne2931279:0
crwdns2955970:0crwdne2955970:0: crwdns2937801:0crwdne2937801:0
Nokia 6310i Keypad Replacement

crwdns2915892:0crwdne2915892:0

crwdns2959928:0crwdne2959928:0 ↓

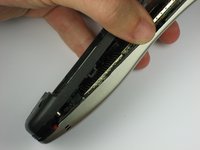
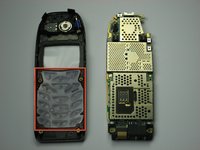
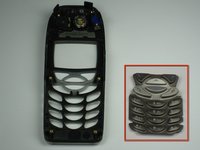
This guide shows the procedures to replace a new keypad and clean metal button contacts for Nokia 6310i cell phone. Refer to the guides for removing the battery and separating the case from the motherboard.

crwdns2959930:0crwdne2959930:0

crwdns2943215:0crwdne2943215:0

    1. Nokia 6310i Keypad Replacement, Battery: crwdns2935265:01crwdnd2935265:01crwdnd2935265:02crwdne2935265:0 Nokia 6310i Keypad Replacement, Battery: crwdns2935265:01crwdnd2935265:02crwdnd2935265:02crwdne2935265:0
      • Press and hold the battery release button and slide the battery away from the Nokia logo

      crwdns2952109:0crwdne2952109:0

      crwdns2917038:0crwdne2917038:0

    1. Nokia 6310i Keypad Replacement, SIM card: crwdns2935265:02crwdnd2935265:01crwdnd2935265:03crwdne2935265:0 Nokia 6310i Keypad Replacement, SIM card: crwdns2935265:02crwdnd2935265:02crwdnd2935265:03crwdne2935265:0 Nokia 6310i Keypad Replacement, SIM card: crwdns2935265:02crwdnd2935265:03crwdnd2935265:03crwdne2935265:0
      • Slide the SIM card lock away from the SIM card.

      • The SIM card pops out. Remove the SIM card.

      crwdns2952109:0crwdne2952109:0

      crwdns2917038:0crwdne2917038:0

    1. Nokia 6310i Keypad Replacement, Back Cover: crwdns2935265:03crwdnd2935265:01crwdnd2935265:01crwdne2935265:0
      • Unscrew and remove the four T6 Torx screws.

      crwdns2952109:0crwdne2952109:0

      crwdns2917038:0crwdne2917038:0

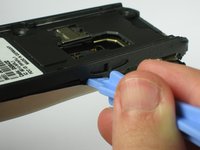
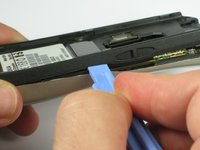
    2. Nokia 6310i Keypad Replacement: crwdns2935265:04crwdnd2935265:01crwdnd2935265:03crwdne2935265:0 Nokia 6310i Keypad Replacement: crwdns2935265:04crwdnd2935265:02crwdnd2935265:03crwdne2935265:0 Nokia 6310i Keypad Replacement: crwdns2935265:04crwdnd2935265:03crwdnd2935265:03crwdne2935265:0
      • Insert a plastic opening tool between the faceplate and the black backplate. Gently pry them apart, working from the lower end to the upper side of the phone.

      crwdns2952109:0crwdne2952109:0

      crwdns2917038:0crwdne2917038:0

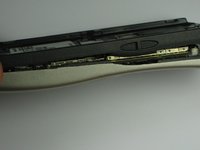
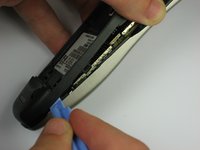
    3. Nokia 6310i Keypad Replacement: crwdns2935265:05crwdnd2935265:01crwdnd2935265:03crwdne2935265:0 Nokia 6310i Keypad Replacement: crwdns2935265:05crwdnd2935265:02crwdnd2935265:03crwdne2935265:0 Nokia 6310i Keypad Replacement: crwdns2935265:05crwdnd2935265:03crwdnd2935265:03crwdne2935265:0
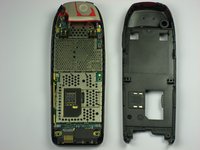
      • Use the plastic opening tool to separate the top part of the backplate.

      • The plastic clips at the top require slightly more force to separate.

      crwdns2952109:0crwdne2952109:0

      crwdns2917038:0crwdne2917038:0

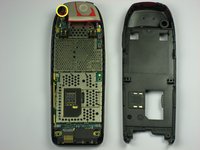
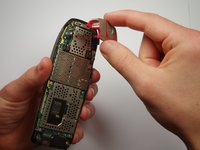
    1. Nokia 6310i Keypad Replacement, Antenna: crwdns2935265:06crwdnd2935265:01crwdnd2935265:02crwdne2935265:0 Nokia 6310i Keypad Replacement, Antenna: crwdns2935265:06crwdnd2935265:02crwdnd2935265:02crwdne2935265:0
      • Remove the screw holding the antenna to the circuit board.

      • Carefully lift off the antenna from the circuit board.

      crwdns2952109:0crwdne2952109:0

      crwdns2917038:0crwdne2917038:0

    1. Nokia 6310i Keypad Replacement, Motherboard: crwdns2935265:07crwdnd2935265:01crwdnd2935265:01crwdne2935265:0
      • Lift off the motherboard from the faceplate.

      crwdns2952109:0crwdne2952109:0

      crwdns2917038:0crwdne2917038:0

    1. Nokia 6310i Keypad Replacement, Keypad: crwdns2935265:08crwdnd2935265:01crwdnd2935265:02crwdne2935265:0 Nokia 6310i Keypad Replacement, Keypad: crwdns2935265:08crwdnd2935265:02crwdnd2935265:02crwdne2935265:0
      • Remove the plastic keypad from the faceplate.

      crwdns2952109:0crwdne2952109:0

      crwdns2917038:0crwdne2917038:0

crwdns2915888:0crwdne2915888:0

To reassemble your device, follow these instructions in reverse order.

crwdns2935221:0crwdne2935221:0

crwdns2935227:0crwdne2935227:0

Ka Siu

crwdns2935283:009/30/10crwdne2935283:0

84 crwdns2915208:0crwdne2915208:0

crwdns2935295:0crwdne2935295:0

crwdns2935287:0crwdne2935287:0

Cal Poly, Team 14-41, Forte Fall 2010 crwdns2935289:0Cal Poly, Team 14-41, Forte Fall 2010crwdne2935289:0

CPSU-FORTE-F10S14G41

crwdns2931471:05crwdne2931471:0

crwdns2935297:096crwdne2935297:0

crwdns2947412:00crwdne2947412:0

crwdns2917038:0crwdne2917038:0

crwdns2936625:0crwdne2936625:0:

crwdns2936751:024crwdne2936751:0 3

crwdns2936753:07crwdne2936753:0 22

crwdns2936753:030crwdne2936753:0 94

crwdns2959996:0crwdne2959996:0 6,335