crwdns2933423:0crwdne2933423:0

Nokia 6085h Front LCD Display

crwdns2942213:0crwdne2942213:0

  1. Nokia 6085h Front LCD Display, Battery: crwdns2935265:01crwdnd2935265:01crwdnd2935265:01crwdne2935265:0
    • Flip over the phone so that the back is facing up.

    • Pressing your thumb against the back cover, slide the cover off of the phone.

  2. Nokia 6085h Front LCD Display: crwdns2935265:02crwdnd2935265:01crwdnd2935265:01crwdne2935265:0
    • Remove the phone's battery.

  3. Nokia 6085h Front LCD Display, Front LCD Display: crwdns2935265:03crwdnd2935265:01crwdnd2935265:03crwdne2935265:0 Nokia 6085h Front LCD Display, Front LCD Display: crwdns2935265:03crwdnd2935265:02crwdnd2935265:03crwdne2935265:0 Nokia 6085h Front LCD Display, Front LCD Display: crwdns2935265:03crwdnd2935265:03crwdnd2935265:03crwdne2935265:0
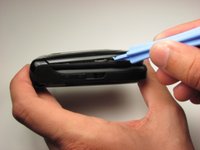
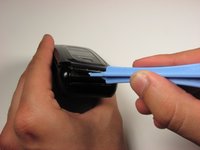
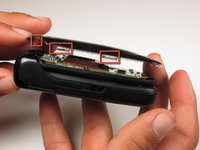
    • With the phone closed, run a plastic opening tool along the seam of the top half of the phone.

    • Make sure to disconnect each of the five clips before proceeding to the next step.

    • There are two clips on each side of the phone and one on the top.

  4. Nokia 6085h Front LCD Display: crwdns2935265:04crwdnd2935265:01crwdnd2935265:02crwdne2935265:0 Nokia 6085h Front LCD Display: crwdns2935265:04crwdnd2935265:02crwdnd2935265:02crwdne2935265:0
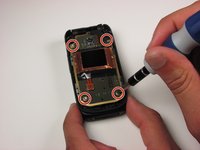
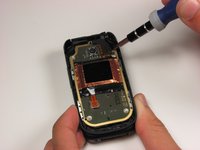
    • Remove the four 3.2 mm screws from the front panel using a T6 Torx screwdriver.

    • The fourth screw is located under a fold in the ribbon cable.

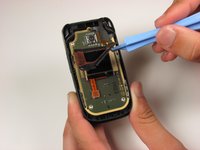
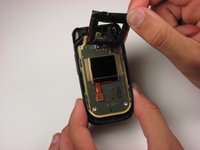
  5. Nokia 6085h Front LCD Display: crwdns2935265:05crwdnd2935265:01crwdnd2935265:03crwdne2935265:0 Nokia 6085h Front LCD Display: crwdns2935265:05crwdnd2935265:02crwdnd2935265:03crwdne2935265:0 Nokia 6085h Front LCD Display: crwdns2935265:05crwdnd2935265:03crwdnd2935265:03crwdne2935265:0
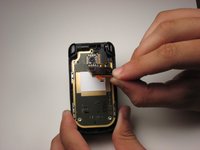
    • Starting in the lower right corner, slowly begin to lift the tape that is holding down the front LCD and cables.

    • Be careful around the two ribbon cables attached to the tape. These cables are fragile.

    • Lift the tape from the board.

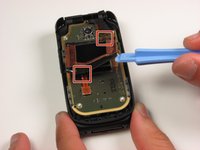
  6. Nokia 6085h Front LCD Display: crwdns2935265:06crwdnd2935265:01crwdnd2935265:01crwdne2935265:0
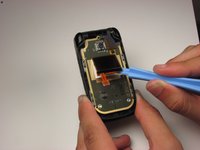
    • Using a plastic opening tool, lift the ribbon cable connection below the front LCD.

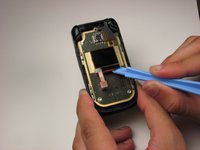
  7. Nokia 6085h Front LCD Display: crwdns2935265:07crwdnd2935265:01crwdnd2935265:03crwdne2935265:0 Nokia 6085h Front LCD Display: crwdns2935265:07crwdnd2935265:02crwdnd2935265:03crwdne2935265:0 Nokia 6085h Front LCD Display: crwdns2935265:07crwdnd2935265:03crwdnd2935265:03crwdne2935265:0
    • Using a plastic opening tool, slowly pry the LCD display from the bottom, releasing it from the glue that is holding it to the board.

crwdns2915888:0crwdne2915888:0

To reassemble your device, follow these instructions in reverse order.

crwdns2935229:02crwdne2935229:0
Brett Balcer

crwdns2935283:010/04/10crwdne2935283:0

240 crwdns2915208:0crwdne2915208:0

crwdns2935297:02crwdne2935297:0

crwdns2915084:0crwdne2915084:0

Cal Poly, Team 4-46, Amido Fall 2010 crwdns2935289:0Cal Poly, Team 4-46, Amido Fall 2010crwdne2935289:0

CPSU-AMIDO-F10S4G46

crwdns2931471:04crwdne2931471:0

crwdns2935297:014crwdne2935297:0

crwdns2944067:00crwdne2944067:0

crwdns2917038:0crwdne2917038:0

crwdns2936625:0crwdne2936625:0:

crwdns2936751:024crwdne2936751:0 0

crwdns2936753:07crwdne2936753:0 2

crwdns2936753:030crwdne2936753:0 6

crwdns2942667:0crwdne2942667:0 1,100