crwdns2933423:0crwdne2933423:0

Nokia 6 Display Assembly Replacement

crwdns2942213:0crwdne2942213:0

  1. Nokia 6 Display Assembly Replacement, Display Assembly: crwdns2935265:01crwdnd2935265:01crwdnd2935265:03crwdne2935265:0 Nokia 6 Display Assembly Replacement, Display Assembly: crwdns2935265:01crwdnd2935265:02crwdnd2935265:03crwdne2935265:0 Nokia 6 Display Assembly Replacement, Display Assembly: crwdns2935265:01crwdnd2935265:03crwdnd2935265:03crwdne2935265:0
    • Power off your Nokia 6 before beginning disassembly.

    • Insert the SIM card ejection tool into the hole on the left side of the phone.

    • Remove the SIM card and microSD card.

  2. Nokia 6 Display Assembly Replacement: crwdns2935265:02crwdnd2935265:01crwdnd2935265:01crwdne2935265:0
    • If your display glass is cracked, take precaution by taping over the display to prevent further breakage and harm.

    • Lay overlapping strips of clear packing tape over the Nokia 6's display until the whole screen is covered.

  3. Nokia 6 Display Assembly Replacement: crwdns2935265:03crwdnd2935265:01crwdnd2935265:01crwdne2935265:0
    • To soften the adhesive, use a heat gun and heat one edge of the phone for five minutes.

    • To use the heat gun, plug it into an outlet.

    • When the heat gun is plugged in, the heat gun automatically turns on and will start blowing hot air.

  4. Nokia 6 Display Assembly Replacement: crwdns2935265:04crwdnd2935265:01crwdnd2935265:01crwdne2935265:0
    • Take a Jimmy and slide it under the glass after the adhesive has been softened.

    • Place a pick under the glass after lifting with the pry tool so that the screen won't re-adhere to the frame again.

    • Make sure to not touch the LCD edge underneath the glass layer with the metal pry tool or the cards. This can damage the ribbon cables underneath and compromise the structural integrity of the phone itself.

    • The corners of the screen are the most fragile part of the screen. Make sure that the entire edge of the screen is dislodged from the frame before prying at the corners.

  5. Nokia 6 Display Assembly Replacement: crwdns2935265:05crwdnd2935265:01crwdnd2935265:01crwdne2935265:0
    • Lift the screen off of the phone.

  6. Nokia 6 Display Assembly Replacement: crwdns2935265:06crwdnd2935265:01crwdnd2935265:02crwdne2935265:0 Nokia 6 Display Assembly Replacement: crwdns2935265:06crwdnd2935265:02crwdnd2935265:02crwdne2935265:0
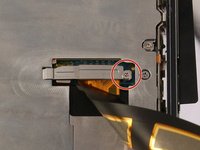
    • Use a Phillips #000 screwdriver to remove the 1 mm x 1.4 mm screw holding down the metal bracket over the screen ribbon connector.

  7. Nokia 6 Display Assembly Replacement: crwdns2935265:07crwdnd2935265:01crwdnd2935265:01crwdne2935265:0
    • Remove the metal bracket with a tweezer.

  8. Nokia 6 Display Assembly Replacement: crwdns2935265:08crwdnd2935265:01crwdnd2935265:01crwdne2935265:0
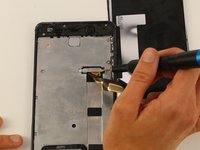
    • Use a spudger to disconnect the screen ribbon connector and free the display assembly.

    • The corners and edge of the LCD are fragile. Be careful attaching it to the back of the phone.

    • Carefully remove the screen from the device.

crwdns2915888:0crwdne2915888:0

To reassemble your device, follow these instructions in reverse order.

crwdns2935229:06crwdne2935229:0

Chrissy Robins

crwdns2935283:004/15/19crwdne2935283:0

1,510 crwdns2915208:0crwdne2915208:0

crwdns2935297:010crwdne2935297:0

crwdns2915084:0crwdne2915084:0

Cal Poly, Team S9-G15, Maness Spring 2019 crwdns2935289:0Cal Poly, Team S9-G15, Maness Spring 2019crwdne2935289:0

CPSU-MANESS-S19S9G15

crwdns2931471:04crwdne2931471:0

crwdns2935297:014crwdne2935297:0

crwdns2944067:02crwdne2944067:0

completed the guide. thx. my iphone claimed the screen is not original. anyway, seems to work correct. io games online

Soo Espinal - crwdns2934203:0crwdne2934203:0

I want original display for nokia 6 mobile

SURIBABU SARAKANAM - crwdns2934203:0crwdne2934203:0

crwdns2917038:0crwdne2917038:0

crwdns2936625:0crwdne2936625:0:

crwdns2936751:024crwdne2936751:0 5

crwdns2936753:07crwdne2936753:0 19

crwdns2936753:030crwdne2936753:0 58

crwdns2942667:0crwdne2942667:0 6,613