crwdns2915892:0crwdne2915892:0
This repair is for removing and replacing the motherboard of a Nokia 5310b Xpress Music device. This replacement may be needed if the motherboard has failed or is damaged. No special skills are required for this fix.
crwdns2942213:0crwdne2942213:0
-
-
Slide the black battery cover down and off the phone with your thumb to remove it.
-
-
-
Gently lift the battery with a fingernail to remove it from the back of the phone.
-
-
-
On some models, the front case is screwed down from the back. Follow steps 5 and 6 first to remove the camera cover and two T6 screws, BEFORE removing the faceplate.
-
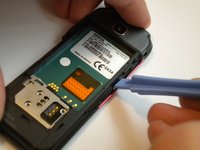
Find a small latch under the music keys and in the middle of each side of the faceplate.
-
Gently lift the edges of the front faceplate off the phone using a spudger.
-
-
-
-
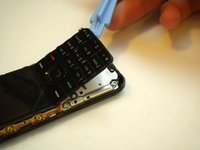
Flip the phone over to the front side.
-
Lift up the keypad from the bottom with either a spudger or your finger.
-
-
-
Flip the phone over to the back side.
-
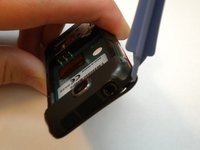
Unsnap the back camera cover from the phone.
-
Lift to remove the back camera cover from the phone after it has been unsnapped.
-
-
-
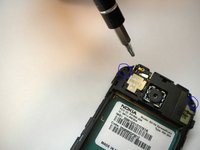
Unscrew and remove the two screws on either side of the camera with the T6 Torx Screwdriver head.
-
Flip the phone over to the front side.
-
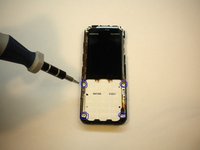
Unscrew and remove the 4 screws located at each corner of the white keypad base using the T6 Torx Screwdriver head.
-
-
-
Flip the phone over to the back side.
-
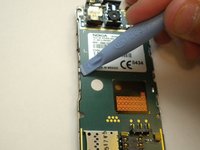
Unclip the faceplate plug (ribbon) located in the lower left corner of the motherboard.
-
-
-
Find the 2 metal clips located in the middle of the left and right sides of the motherboard.
-
Pry the 2 metal clips open up by using a spudger.
-
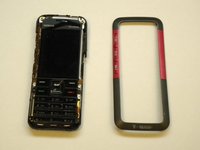
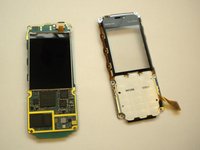
At this point the phone should come apart into 2 pieces (the motherboard/LCD screen and the faceplate).
-


To reassemble your device, follow these instructions in reverse order.
To reassemble your device, follow these instructions in reverse order.
crwdns2935221:0crwdne2935221:0
crwdns2935229:04crwdne2935229:0

crwdns2915084:0crwdne2915084:0

Cal Poly, Team 15-14, Regan Spring 2011 crwdns2935289:0Cal Poly, Team 15-14, Regan Spring 2011crwdne2935289:0
CPSU-REGAN-S11S15G14
crwdns2931471:03crwdne2931471:0
crwdns2935297:08crwdne2935297:0
crwdns2947410:01crwdne2947410:0
Step 5 and 6 must be performed before step 3, otherwise, you will dislodge the thread from the front plate. so you have to remove the camera cover first, remove the 2 screws then you can remove the front plate without breaking anything.