crwdns2915892:0crwdne2915892:0
This repair will be going through removing and replacing the motherboard of a Nokia 5310b Xpress Music device. It is important to have a working motherboard in the device because it connects and controls the most essential electronic pieces of the device. A damaged or flawed motherboard will result in the device failing to turn on, not charging, not displaying clearly, having random freezes, or showing error messages. This can be caused by harsh handling of the phone, excessive water damage or simply a defective piece of the electronic.
Before using this guide, you can ensure that the problem is a resultant of the motherboard by replacing the battery or trying a different charger to see if that fixes the issue first.
To complete this guide you must be able to remove a screw with a screwdriver and use a spudger properly.
Before removing and replacing the motherboard, make sure that the phone is powered off and not connected to a power source (for example: charging).
crwdns2942213:0crwdne2942213:0
-
-
Slide the black battery cover down and off the phone with your thumb to remove it.
-
-
-
Gently lift the battery with a fingernail to remove it from the back of the phone.
-
-
-
On some models, the front case is screwed down from the back. Follow steps 5 and 6 first to remove the camera cover and two T6 screws, BEFORE removing the faceplate.
-
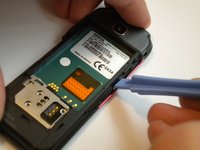
Find a small latch under the music keys and in the middle of each side of the faceplate.
-
Gently lift the edges of the front faceplate off the phone using a spudger.
-
-
-
-
Flip the phone over to the front side.
-
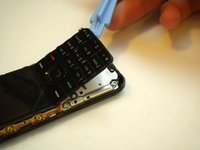
Lift up the keypad from the bottom with either a spudger or your finger.
-
-
-
Flip the phone over to the back side.
-
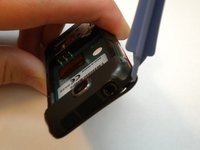
Unsnap the back camera cover from the phone.
-
Lift to remove the back camera cover from the phone after it has been unsnapped.
-
-
-
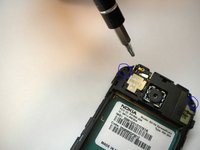
Unscrew and remove the two screws on either side of the camera with the T6 Torx Screwdriver head.
-
Flip the phone over to the front side.
-
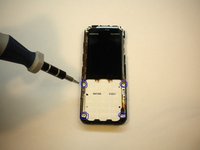
Unscrew and remove the 4 screws located at each corner of the white keypad base using the T6 Torx Screwdriver head.
-
-
-
Flip the phone over to the back side.
-
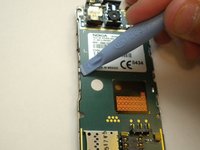
Unclip the faceplate plug (ribbon) located in the lower left corner of the motherboard.
-
-
-
Find the 2 metal clips located in the middle of the left and right sides of the motherboard.
-
Pry the 2 metal clips open up by using a spudger.
-
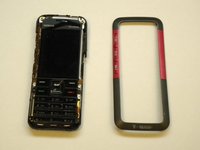
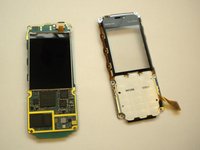
At this point the phone should come apart into 2 pieces (the motherboard/LCD screen and the faceplate).
-


To reassemble your device, follow these instructions in reverse order.
crwdns2935221:0crwdne2935221:0
crwdns2935229:04crwdne2935229:0

crwdns2935287:0crwdne2935287:0

Cal Poly, Team 15-14, Regan Spring 2011 crwdns2935289:0Cal Poly, Team 15-14, Regan Spring 2011crwdne2935289:0
CPSU-REGAN-S11S15G14
crwdns2931471:03crwdne2931471:0
crwdns2935297:08crwdne2935297:0
crwdns2947410:01crwdne2947410:0
Step 5 and 6 must be performed before step 3, otherwise, you will dislodge the thread from the front plate. so you have to remove the camera cover first, remove the 2 screws then you can remove the front plate without breaking anything.