crwdns2933423:0crwdne2933423:0

Nokero N400 LED Panel Replacement

crwdns2942213:0crwdne2942213:0

  1. Nokero N400 LED Panel Replacement, Remove Battery Cover: crwdns2935265:01crwdnd2935265:01crwdnd2935265:03crwdne2935265:0 Nokero N400 LED Panel Replacement, Remove Battery Cover: crwdns2935265:01crwdnd2935265:02crwdnd2935265:03crwdne2935265:0 Nokero N400 LED Panel Replacement, Remove Battery Cover: crwdns2935265:01crwdnd2935265:03crwdnd2935265:03crwdne2935265:0
    • Press down firmly to remove the battery cover and display battery.

    • Then remove the battery.

  2. Nokero N400 LED Panel Replacement, Unscrew Back Cover: crwdns2935265:02crwdnd2935265:01crwdnd2935265:02crwdne2935265:0 Nokero N400 LED Panel Replacement, Unscrew Back Cover: crwdns2935265:02crwdnd2935265:02crwdnd2935265:02crwdne2935265:0
    • Remove the 7mm Phillips #1 screw.

  3. Nokero N400 LED Panel Replacement, Pry Open Back Cover: crwdns2935265:03crwdnd2935265:01crwdnd2935265:02crwdne2935265:0 Nokero N400 LED Panel Replacement, Pry Open Back Cover: crwdns2935265:03crwdnd2935265:02crwdnd2935265:02crwdne2935265:0
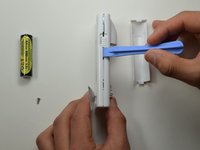
    • Place the plastic opening tool in between the two plastic panels and slowly work your way around the device.

    • Unlatch the clips on the inside and pull device apart.

    • Some clips will break when forced open.

  4. Nokero N400 LED Panel Replacement, Removing the LED Panel: crwdns2935265:04crwdnd2935265:01crwdnd2935265:02crwdne2935265:0 Nokero N400 LED Panel Replacement, Removing the LED Panel: crwdns2935265:04crwdnd2935265:02crwdnd2935265:02crwdne2935265:0
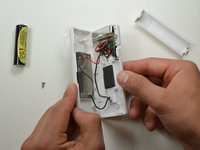
    • With the back cover of the device removed, lightly pull up on the LED assembly to lift it out of its housing.

    • The LED assembly will separate into three components; the light board, outer housing, and plastic lens.

  5. Nokero N400 LED Panel Replacement: crwdns2935265:05crwdnd2935265:01crwdnd2935265:01crwdne2935265:0
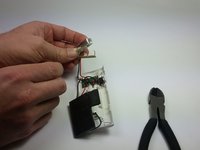
    • Set the outer housing and plastic lens aside.

    • Take a pair of pliers and cut the red and black wires connected to the light board.

    • Make sure to cut just below the light board.

    • To install the new light board, you will need to splice or solder the wires to the new light board.

crwdns2915888:0crwdne2915888:0

To reassemble your device, follow these instructions in reverse order.

crwdns2935227:0crwdne2935227:0

Kyle Burwell

crwdns2935283:001/20/15crwdne2935283:0

173 crwdns2915208:0crwdne2915208:0

crwdns2935295:0crwdne2935295:0

crwdns2915084:0crwdne2915084:0

USF Tampa, Team 19-2, Blackwell Winter 2015 crwdns2935289:0USF Tampa, Team 19-2, Blackwell Winter 2015crwdne2935289:0

USFT-BLACKWELL-W15S19G2

crwdns2931471:04crwdne2931471:0

crwdns2935297:05crwdne2935297:0

crwdns2944067:00crwdne2944067:0

crwdns2917038:0crwdne2917038:0

crwdns2936625:0crwdne2936625:0:

crwdns2936751:024crwdne2936751:0 0

crwdns2936753:07crwdne2936753:0 1

crwdns2936753:030crwdne2936753:0 12

crwdns2942667:0crwdne2942667:0 188