crwdns2933423:0crwdne2933423:0

Nishiki Aero II Front Inner Tube Replacement

crwdns2942213:0crwdne2942213:0

  1. Nishiki Aero II Front Inner Tube Replacement, Removing Road Bike Front Wheel: crwdns2935265:01crwdnd2935265:01crwdnd2935265:01crwdne2935265:0
    • Turn the bike upside down.

  2. Nishiki Aero II Front Inner Tube Replacement: crwdns2935265:02crwdnd2935265:01crwdnd2935265:01crwdne2935265:0
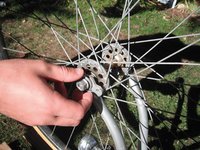
    • Use a wrench to loosen the nut holding the wheel's axle on one side.

    • Once it's loose enough, continue removing the nut with your hand.

  3. Nishiki Aero II Front Inner Tube Replacement: crwdns2935265:03crwdnd2935265:01crwdnd2935265:02crwdne2935265:0 Nishiki Aero II Front Inner Tube Replacement: crwdns2935265:03crwdnd2935265:02crwdnd2935265:02crwdne2935265:0
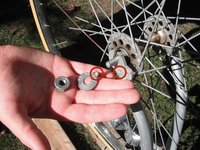
    • After removing the nut, also remove the washer under it.

    • Keep note of how the washer has a small appendage that locks into a slot in the fork.

  4. Nishiki Aero II Front Inner Tube Replacement: crwdns2935265:04crwdnd2935265:01crwdnd2935265:01crwdne2935265:0
    • Follow the previous steps for the opposite side.

  5. Nishiki Aero II Front Inner Tube Replacement: crwdns2935265:05crwdnd2935265:01crwdnd2935265:01crwdne2935265:0
    • Lift the wheel up from the fork.

  6. Nishiki Aero II Front Inner Tube Replacement, Nishiki Aero II Tire Removal: crwdns2935265:06crwdnd2935265:01crwdnd2935265:02crwdne2935265:0 Nishiki Aero II Front Inner Tube Replacement, Nishiki Aero II Tire Removal: crwdns2935265:06crwdnd2935265:02crwdnd2935265:02crwdne2935265:0
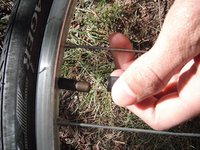
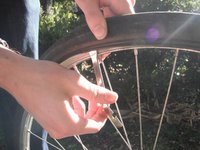
    • Unscrew the cap from the air valve.

    • Release the tire's air by pressing a thin object on the center pin of the valve.

    • A hex wrench or any blunt object can be used.

  7. Nishiki Aero II Front Inner Tube Replacement: crwdns2935265:07crwdnd2935265:01crwdnd2935265:03crwdne2935265:0 Nishiki Aero II Front Inner Tube Replacement: crwdns2935265:07crwdnd2935265:02crwdnd2935265:03crwdne2935265:0 Nishiki Aero II Front Inner Tube Replacement: crwdns2935265:07crwdnd2935265:03crwdnd2935265:03crwdne2935265:0
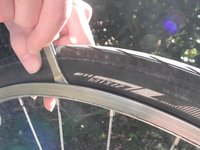
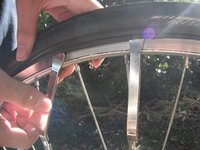
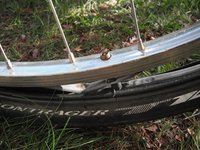
    • Wedge a tire lever between the tire and the rim. Grab the tire with the lever's inward scoop.

    • Grab the tire's edge with the lever and pull it back to scoop the tire from the rim.

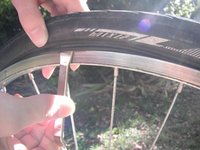
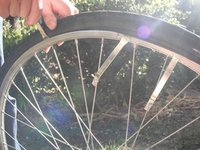
    • Keep the tire lever anchored on a spoke with the notch on the lever's opposite end.

  8. Nishiki Aero II Front Inner Tube Replacement: crwdns2935265:08crwdnd2935265:01crwdnd2935265:02crwdne2935265:0 Nishiki Aero II Front Inner Tube Replacement: crwdns2935265:08crwdnd2935265:02crwdnd2935265:02crwdne2935265:0
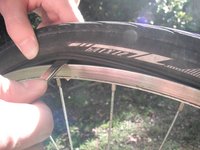
    • Repeat with an additional tire lever five inches away from the other.

  9. Nishiki Aero II Front Inner Tube Replacement: crwdns2935265:09crwdnd2935265:01crwdnd2935265:03crwdne2935265:0 Nishiki Aero II Front Inner Tube Replacement: crwdns2935265:09crwdnd2935265:02crwdnd2935265:03crwdne2935265:0 Nishiki Aero II Front Inner Tube Replacement: crwdns2935265:09crwdnd2935265:03crwdnd2935265:03crwdne2935265:0
    • Repeat with a third tire lever farther around the tire.

    • Alternate lifting the second and third levers until the tire comes partway off.

  10. Nishiki Aero II Front Inner Tube Replacement: crwdns2935265:010crwdnd2935265:01crwdnd2935265:03crwdne2935265:0 Nishiki Aero II Front Inner Tube Replacement: crwdns2935265:010crwdnd2935265:02crwdnd2935265:03crwdne2935265:0 Nishiki Aero II Front Inner Tube Replacement: crwdns2935265:010crwdnd2935265:03crwdnd2935265:03crwdne2935265:0
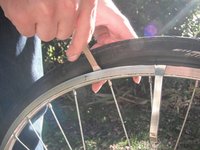
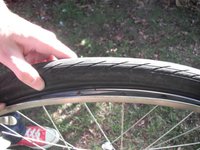
    • Wedge the tire off of the other rim with the tire levers.

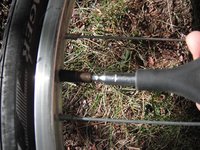
    • Pull the air valve from its hole in the rim to completely remove the tire.

  11. Nishiki Aero II Front Inner Tube Replacement, Front Inner Tube: crwdns2935265:011crwdnd2935265:01crwdnd2935265:01crwdne2935265:0
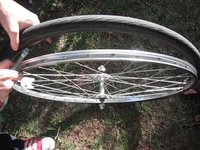
    • Now that the tire and tube are off of the rim, gently pull the tube out of the tire.

    • Be sure to pull gently, as the tube could potentially end up adhered to the inside of the tire.

  12. Nishiki Aero II Front Inner Tube Replacement: crwdns2935265:012crwdnd2935265:01crwdnd2935265:01crwdne2935265:0
    • Now, you've separated your tube, tire and rim.

    • To replace the tube, follow these instructions in reverse order using the new or patched tube.

    • Remember to inflate just a little bit of air into the tube before you try to install it, as that makes the process go much smoother.

crwdns2915888:0crwdne2915888:0

To reassemble your device, follow these instructions in reverse order.

Tobias Elder

crwdns2935283:004/25/13crwdne2935283:0

113 crwdns2915208:0crwdne2915208:0

crwdns2935297:07crwdne2935297:0

crwdns2915084:0crwdne2915084:0

Cal Poly, Team 21-53, Johann Spring 2013 crwdns2935289:0Cal Poly, Team 21-53, Johann Spring 2013crwdne2935289:0

CPSU-JOHANN-S13S21G53

crwdns2931471:04crwdne2931471:0

crwdns2935297:07crwdne2935297:0

crwdns2947412:00crwdne2947412:0

crwdns2917038:0crwdne2917038:0

crwdns2936625:0crwdne2936625:0:

crwdns2936751:024crwdne2936751:0 1

crwdns2936753:07crwdne2936753:0 5

crwdns2936753:030crwdne2936753:0 11

crwdns2942667:0crwdne2942667:0 1,554