crwdns2933423:0crwdne2933423:0

Nintendo WaveBird Wireless Controller Motherboard Replacement

crwdns2942213:0crwdne2942213:0

  1. Nintendo WaveBird Wireless Controller Motherboard Replacement, Batteries: crwdns2935265:01crwdnd2935265:01crwdnd2935265:02crwdne2935265:0 Nintendo WaveBird Wireless Controller Motherboard Replacement, Batteries: crwdns2935265:01crwdnd2935265:02crwdnd2935265:02crwdne2935265:0
    • Pull down on the battery cover release lever and pull back to remove the cover.

  2. Nintendo WaveBird Wireless Controller Motherboard Replacement: crwdns2935265:02crwdnd2935265:01crwdnd2935265:01crwdne2935265:0
    • Remove both batteries from the device.

  3. Nintendo WaveBird Wireless Controller Motherboard Replacement, Front Panel: crwdns2935265:03crwdnd2935265:01crwdnd2935265:02crwdne2935265:0 Nintendo WaveBird Wireless Controller Motherboard Replacement, Front Panel: crwdns2935265:03crwdnd2935265:02crwdnd2935265:02crwdne2935265:0
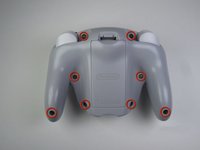
    • Remove the eight 9 mm screws from the back panel using the Tri-point Y1 screwdriver.

    • During reassembly, firmly hold the panels of the controller together while replacing the screws so the panels do not separate.

  4. Nintendo WaveBird Wireless Controller Motherboard Replacement: crwdns2935265:04crwdnd2935265:01crwdnd2935265:02crwdne2935265:0 Nintendo WaveBird Wireless Controller Motherboard Replacement: crwdns2935265:04crwdnd2935265:02crwdnd2935265:02crwdne2935265:0
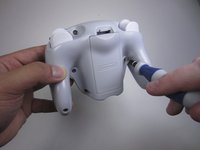
    • Carefully turn over the controller and place it on a flat surface.

    • Slowly separate the top panel from the bottom panel.

    • The buttons are loose and may fall off the motherboard.

    • Once separated, set aside the top panel.

    • During reassembly, make sure the front panel lines up with the buttons so they slide back into place.

  5. Nintendo WaveBird Wireless Controller Motherboard Replacement, Buttons: crwdns2935265:05crwdnd2935265:01crwdnd2935265:03crwdne2935265:0 Nintendo WaveBird Wireless Controller Motherboard Replacement, Buttons: crwdns2935265:05crwdnd2935265:02crwdnd2935265:03crwdne2935265:0 Nintendo WaveBird Wireless Controller Motherboard Replacement, Buttons: crwdns2935265:05crwdnd2935265:03crwdnd2935265:03crwdne2935265:0
    crwdns2935267:0crwdne2935267:0
    Tweezers
    $4.99
    crwdns2942207:0crwdne2942207:0
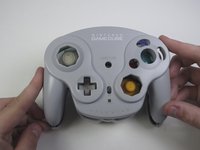
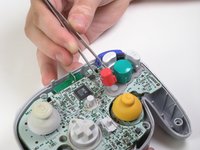
    • Use tweezers to remove the buttons.

    • It may be easier to remove the A button off of the pad by lifting it with your fingers.

    • During reassembly, make sure all buttons are in their respective sockets so they match up with the front panel.

  6. Nintendo WaveBird Wireless Controller Motherboard Replacement, Motherboard: crwdns2935265:06crwdnd2935265:01crwdnd2935265:01crwdne2935265:0
    crwdns2935267:0crwdne2935267:0
    Tweezers
    $4.99
    crwdns2942207:0crwdne2942207:0
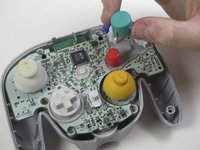
    • Using tweezers remove the three grey button pads from the motherboard.

  7. Nintendo WaveBird Wireless Controller Motherboard Replacement: crwdns2935265:07crwdnd2935265:01crwdnd2935265:01crwdne2935265:0
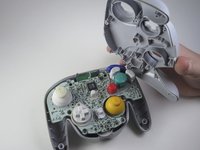
    • With your fingers gently grip the motherboard on both sides and lift it away from the back panel.

    • To put the motherboard back into place, align the two metal clips under the motherboard with the slots in the back panel. The motherboard should fall into place.

crwdns2915888:0crwdne2915888:0

To reassemble your device, follow these instructions in reverse order.

crwdns2935229:06crwdne2935229:0

Travis Taylor

crwdns2935283:004/12/13crwdne2935283:0

464 crwdns2915208:0crwdne2915208:0

crwdns2935297:05crwdne2935297:0

crwdns2915084:0crwdne2915084:0

Cal Poly, Team 10-40, Amido Spring 2013 crwdns2935289:0Cal Poly, Team 10-40, Amido Spring 2013crwdne2935289:0

CPSU-AMIDO-S13S10G40

crwdns2931471:04crwdne2931471:0

crwdns2935297:037crwdne2935297:0

crwdns2944067:00crwdne2944067:0

crwdns2917038:0crwdne2917038:0

crwdns2936625:0crwdne2936625:0:

crwdns2936751:024crwdne2936751:0 2

crwdns2936753:07crwdne2936753:0 10

crwdns2936753:030crwdne2936753:0 50

crwdns2942667:0crwdne2942667:0 8,151