crwdns2942213:0crwdne2942213:0
crwdns2936621:0crwdne2936621:0
-
crwdns2935201:0crwdne2935201:0 crwdns2935203:0crwdne2935203:0
-
Press and hold down the small round button on the back of the Joy Con controller.
-
While you hold down the button, slide the controller upward.
-
-
crwdns2935201:0crwdne2935201:0 crwdns2935203:0crwdne2935203:0
-
Continue sliding the Joy Con upward until it's completely removed from the console.
-
-
crwdns2935201:0crwdne2935201:0 crwdns2935203:0crwdne2935203:0
crwdns2935267:0crwdne2935267:0Magnetic Project Mat$19.95-
Use a Y00 screwdriver to remove the four 6.3 mm-long screws securing the rear panel.
-
-
crwdns2935201:0crwdne2935201:0 crwdns2935203:0crwdne2935203:0
-
Use a JIS 00 driver to remove the following screws securing the rear panel:
-
One 2.5 mm-long screw on the top edge of the device
-
Two 2.5 mm-long screws on the bottom edge of the device
-
-
crwdns2935201:0crwdne2935201:0 crwdns2935203:0crwdne2935203:0
-
Use a JIS 00 driver to remove the two 3.8 mm center screws on the sides of the device (one on each side).
-
-
crwdns2935201:0crwdne2935201:0 crwdns2935203:0crwdne2935203:0
-
Use your finger to flip up the kickstand on the back of the device.
-
-
crwdns2935201:0crwdne2935201:0 crwdns2935203:0crwdne2935203:0
-
Use a JIS 00 driver to remove the 1.6 mm screw in the kickstand well.
-
Close the kickstand.
-
-
-
crwdns2935201:0crwdne2935201:0 crwdns2935203:0crwdne2935203:0
-
Open the game card cartridge flap.
-
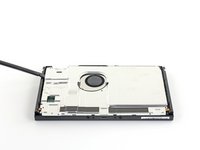
Lift the rear panel up from the bottom of the device and remove it.
-
-
crwdns2935201:0crwdne2935201:0 crwdns2935203:0crwdne2935203:0
-
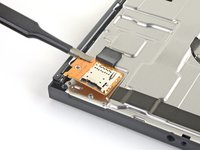
Use a JIS 00 driver to remove the 3.1 mm screw securing the microSD card reader to the device.
-
-
crwdns2935201:0crwdne2935201:0 crwdns2935203:0crwdne2935203:0
crwdns2935267:0crwdne2935267:0Tweezers$4.99-
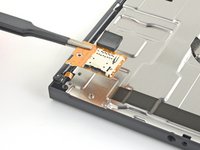
Use your fingers or a pair of tweezers to lift the microSD card reader straight up from the device to disconnect and remove it.
-
-
crwdns2935201:0crwdne2935201:0 crwdns2935203:0crwdne2935203:0
-
Use a JIS 00 driver to remove the six 3 mm screws securing the shield plate to the device.
-
-
crwdns2935201:0crwdne2935201:0 crwdns2935203:0crwdne2935203:0
crwdns2935267:0crwdne2935267:0Tweezers$4.99-
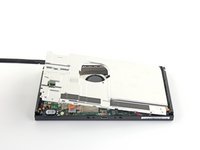
Use your fingers or a pair of tweezers to peel back the piece of foam on the top edge of the device near the fan exhaust port.
-
-
crwdns2935201:0crwdne2935201:0 crwdns2935203:0crwdne2935203:0
-
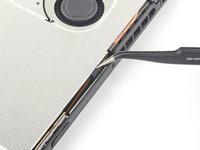
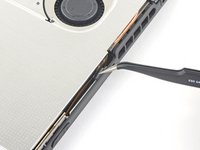
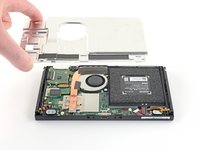
Insert a spudger underneath the shield plate along the edge of the device.
-
Pry up to lift the shield plate and remove it from the device.
-
You can reuse the pink thermal compound if you're careful. Keep the compound clean and make sure it makes solid contact between the heat sink and the shield during reassembly.
-
If you need to replace it, refer to our thermal paste guide to remove the old thermal compound and replace it with an appropriate compound, such as K5 Pro, during reassembly.
-
-
crwdns2935201:0crwdne2935201:0 crwdns2935203:0crwdne2935203:0
-
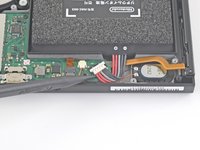
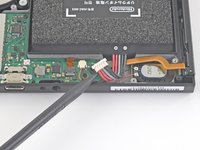
Use the point of a spudger to pry the battery connector straight up and out of its socket on the motherboard.
-
-
crwdns2935201:0crwdne2935201:0 crwdns2935203:0crwdne2935203:0
crwdns2935267:0crwdne2935267:0iFixit Adhesive Remover$19.99-
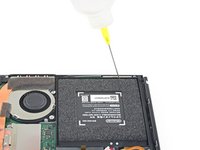
Apply a few drops of adhesive remover or high-concentration (90% or higher) isopropyl alcohol inside the battery well along the top edge to weaken the adhesive.
-
-
crwdns2935201:0crwdne2935201:0 crwdns2935203:0crwdne2935203:0
-
Tilt the top edge of the device upward to allow the isopropyl alcohol to work its way underneath the battery.
-
Hold for 1-2 minutes to allow time for the isopropyl alcohol to weaken the adhesive.
-
-
crwdns2935201:0crwdne2935201:0 crwdns2935203:0crwdne2935203:0
-
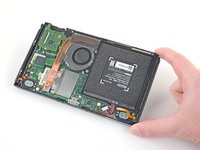
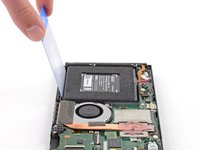
Insert an opening pick into the gap between the battery and the wall of the battery well.
-
Carefully dig the tip of the opening pick underneath the battery and slide it along the edge to begin slicing the adhesive.
-
-
crwdns2935201:0crwdne2935201:0 crwdns2935203:0crwdne2935203:0
-
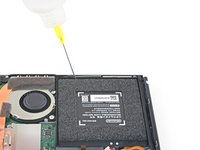
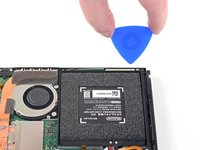
Leave the opening pick in place and apply a few more drops of adhesive remover or isopropyl alcohol inside the battery well.
-
Tilt the top edge of the device upward and wait 1-2 minutes for the isopropyl alcohol to weaken the adhesive.
-
-
crwdns2935201:0crwdne2935201:0 crwdns2935203:0crwdne2935203:0
-
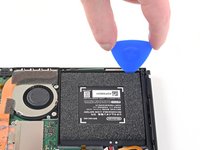
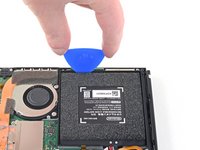
Continue sliding the opening pick deeper along the top edge of the battery, slicing more of the adhesive underneath.
-
-
crwdns2935201:0crwdne2935201:0 crwdns2935203:0crwdne2935203:0
crwdns2935267:0crwdne2935267:0Plastic Cards$2.99-
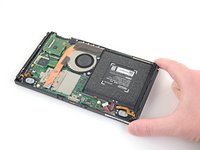
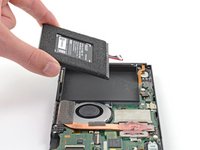
Once there's enough room, insert a plastic card underneath the battery and slowly pry the battery up.
-
Remove the battery.
-
-
crwdns2935201:0crwdne2935201:0 crwdns2935203:0crwdne2935203:0
crwdns2935267:0crwdne2935267:0Microfiber Cleaning Cloths$3.99-
Use adhesive remover or isopropyl alcohol and a microfiber cloth to clean up any remaining adhesive left behind in the battery well before you install the new battery.
-


crwdns2935221:0crwdne2935221:0
crwdns2935229:0208crwdne2935229:0

crwdns2947412:061crwdne2947412:0
Can anyone confirm that Switch will NOT work with the battery removed or dead (dead as in once it’s totally non-functional as all lithium batteries eventually are, not dead as in just discharged but the battery works).
PSP works with the battery dead or pulled, as far as I know DS, 3DS, Vita and Switch do NOT, which is a gigantic design flaw.
Yes. The battery of my Switch has been wearing down over some time, to the point where I had to charhe the device for some hours to even activate it - it isn't functional without a working battery.
I would highly recommend against keeping dead batteries in any system, as this can cause damage to the motherboard of the device. If you experience your Switch randomly turning off while its battery is dead, immediately seek to get the battery removed or replaced.
While it is considered rare, dead batteries can sometimes reverse in polarity when its voltage is too low. This can damage the motherboard or other components unexpectedly.
Reboot -
Why can't you reuse the switch's battery?, if I'm just replacing the shell of the switch and have to move the battery why can't I reuse the battery in the new shell?
Good question!
For safety reasons, we strongly discourage people from reusing a battery once it has been removed. Bending a lithium-ion battery even slightly can create uneven spots between the thin layers inside the battery. The battery may function fine for awhile, but over time and charge cycles, the uneven area can wear down faster, eventually resulting in an electrical short. The battery would fail, swell up, and possibly catch on fire.