
Nintendo GameCube Top Case Replacement

crwdns2959932:0crwdnd2959932:0dcarlincrwdnd2959932:0crwdnd2959932:0crwdnd2959932:022crwdnd2959932:0crwdne2959932:0
crwdns2959936:0Sun 5, 2024crwdne2959936:0
crwdns2869540:0crwdne2869540:0: 31K
crwdns2959988:0crwdne2959988:0
- crwdns2959990:0crwdne2959990:0
- 7
- crwdns2959992:0crwdne2959992:0
- 57
- crwdns2959994:0crwdne2959994:0
- 246
- crwdns2959996:0crwdne2959996:0
- 31,236
crwdns2955950:0crwdne2955950:0: 2
crwdns2960002:01crwdne2960002:0, crwdns2960006:01crwdne2960006:0
crwdns2960000:0crwdne2960000:0crwdns2959984:0crwdne2959984:0: 18 19
crwdns2959974:018crwdne2959974:0
crwdns2959970:019crwdne2959970:0
crwdns2959986:0crwdne2959986:0: 8 9
crwdns2959982:08crwdne2959982:0
crwdns2959978:09crwdne2959978:0
crwdns2915892:0crwdne2915892:0
crwdns2959928:0crwdne2959928:0 ↓Removing the top case will allow you access to the GameCube's internal parts.
crwdns2959930:0crwdne2959930:0
crwdns2943215:0crwdne2943215:0

-
-
-
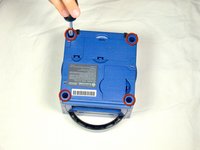
Turn over the Gamecube so that the bottom side is facing up.
-
Use the 4.5 mm Gamebit screwdriver to remove all four screws.
 crwdns2952109:0crwdne2952109:0
-
-
-
-
With the bottom side of the GameCube facing upward and the screws removed, carefully pull the outer shell of the unit away from the top half.
-
Move the GameCube so that the inside is facing upwards.
-
-




To reassemble your device, follow these instructions in reverse order.
crwdns2935221:0crwdne2935221:0
crwdns2935229:018crwdne2935229:0

crwdns2935287:0crwdne2935287:0

Cal Poly, Team 6-2, Maness Fall 2009 crwdns2935289:0Cal Poly, Team 6-2, Maness Fall 2009crwdne2935289:0
CPSU-MANESS-F09S6G2
crwdns2931471:04crwdne2931471:0
crwdns2935297:096crwdne2935297:0
crwdns2947410:01crwdne2947410:0
Can you do a more in-depth version of the top cover? I had to clean each piece and need help figuring out where all the pieces go. Thanks
JJ Jackson - crwdns2934203:0crwdne2934203:0 crwdns2950251:0crwdne2950251:0
