crwdns2915892:0crwdne2915892:0
The circuit board connects all the components within the controller and provides structural support for buttons, sticks, and chips.
crwdns2942213:0crwdne2942213:0
-
-
Place the controller (buttons down) on a solid surface.
-
Remove the six 9.2mm Tri-wing Y0 screws that hold the back panel in place.
-
-
-
Gently lift the back panel up, separating it from the front panel.
-
-
-
-
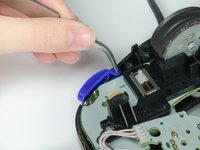
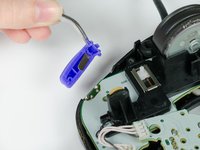
Grab the Z-button by the peg with tweezers and lift it out of the controller.
-
-
-
Carefully unhook the cable that is looped around the peg.
-
-
-
Lift the circuit board out of the controller.
-
To reassemble your device, follow these instructions in reverse order.
To reassemble your device, follow these instructions in reverse order.
crwdns2935221:0crwdne2935221:0
crwdns2935229:05crwdne2935229:0
crwdns2947412:02crwdne2947412:0
Yeah this isn't very in-depth, I was hoping for a little more. I need to desolder and rewire the buttons to use for another project and I was hoping this might be a nice guide to help me do that... it's not.
You left out the fun facts about every part and components so we know what the are and what they do. Well for me that would have been ideal as I'm fixing 2 controls that don't do anything and I already have to fix a game cube as I got 2 and one works and one don't lol


