crwdns2933423:0crwdne2933423:0

Nintendo DSi XL Volume Buttons Replacement

crwdns2942213:0crwdne2942213:0

  1. Nintendo DSi XL Volume Buttons Replacement, Battery: crwdns2935265:01crwdnd2935265:01crwdnd2935265:02crwdne2935265:0 Nintendo DSi XL Volume Buttons Replacement, Battery: crwdns2935265:01crwdnd2935265:02crwdnd2935265:02crwdne2935265:0
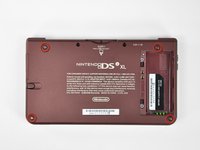
    • Remove the two Phillips screws securing the battery cover to the back of the handheld console.

    • Lift the battery cover off the back of the DSi XL.

  2. Nintendo DSi XL Volume Buttons Replacement: crwdns2935265:02crwdnd2935265:01crwdnd2935265:01crwdne2935265:0
    • Lift the battery from the DSi XL.

  3. Nintendo DSi XL Volume Buttons Replacement, Lower Case: crwdns2935265:03crwdnd2935265:01crwdnd2935265:03crwdne2935265:0 Nintendo DSi XL Volume Buttons Replacement, Lower Case: crwdns2935265:03crwdnd2935265:02crwdnd2935265:03crwdne2935265:0 Nintendo DSi XL Volume Buttons Replacement, Lower Case: crwdns2935265:03crwdnd2935265:03crwdnd2935265:03crwdne2935265:0
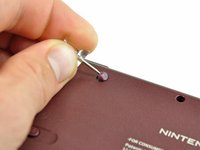
    • Remove the four rubber screw covers on the lower case by prying them up with a push pin.

  4. Nintendo DSi XL Volume Buttons Replacement: crwdns2935265:04crwdnd2935265:01crwdnd2935265:01crwdne2935265:0
    • Remove the following seven Phillips screws that secure the lower case to the rest of the DSi XL:

    • Four silver 5.3 mm screws

    • Two black 5.3 mm screws

    • One black 2.5 mm screw

  5. Nintendo DSi XL Volume Buttons Replacement: crwdns2935265:05crwdnd2935265:01crwdnd2935265:03crwdne2935265:0 Nintendo DSi XL Volume Buttons Replacement: crwdns2935265:05crwdnd2935265:02crwdnd2935265:03crwdne2935265:0 Nintendo DSi XL Volume Buttons Replacement: crwdns2935265:05crwdnd2935265:03crwdnd2935265:03crwdne2935265:0
    • Turn the DSi XL over, and open the display.

    • Insert a spudger between the upper and lower case at the bottom left corner of the DSi.

    • Slide the spudger along the bottom edge of the upper case to release the latches securing the upper case to the lower case.

  6. Nintendo DSi XL Volume Buttons Replacement: crwdns2935265:06crwdnd2935265:01crwdnd2935265:02crwdne2935265:0 Nintendo DSi XL Volume Buttons Replacement: crwdns2935265:06crwdnd2935265:02crwdnd2935265:02crwdne2935265:0
    • Close the display and turn the DSi XL over.

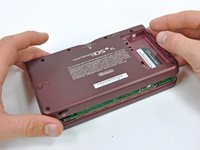
    • Lift the lower case from the front edge.

    • Rotate the lower case away from the DSi.

    • The lower case cannot be completely removed yet, since it is still connected to the motherboard.

  7. Nintendo DSi XL Volume Buttons Replacement: crwdns2935265:07crwdnd2935265:01crwdnd2935265:02crwdne2935265:0 Nintendo DSi XL Volume Buttons Replacement: crwdns2935265:07crwdnd2935265:02crwdnd2935265:02crwdne2935265:0
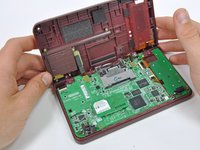
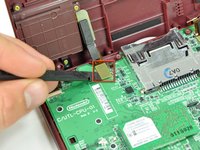
    • Using a spudger, pry the SD card/right shoulder button connector off its socket.

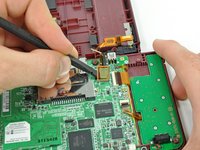
    • Pry the volume button/left shoulder button connector off its socket on the motherboard with a spudger.

  8. Nintendo DSi XL Volume Buttons Replacement, Volume Control Switch: crwdns2935265:08crwdnd2935265:01crwdnd2935265:01crwdne2935265:0
    • On the inside of the battery compartment, use the tip of a spudger to detach the metal latch securing the volume control switch in place.

    • The latch will only move about 1 mm.

  9. Nintendo DSi XL Volume Buttons Replacement: crwdns2935265:09crwdnd2935265:01crwdnd2935265:03crwdne2935265:0 Nintendo DSi XL Volume Buttons Replacement: crwdns2935265:09crwdnd2935265:02crwdnd2935265:03crwdne2935265:0 Nintendo DSi XL Volume Buttons Replacement: crwdns2935265:09crwdnd2935265:03crwdnd2935265:03crwdne2935265:0
    • Using the flat end of a spudger, remove the adhesive securing the volume control switch ribbon cable to the back of the battery compartment.

    • Using the flat of a spudger, pry the volume control switch straight up out of the lower case.

    • Remove the volume control switch from the DSi XL.

  10. Nintendo DSi XL Volume Buttons Replacement: crwdns2935265:010crwdnd2935265:01crwdnd2935265:01crwdne2935265:0
    • Using the flat end of a spudger, remove the volume control buttons from the metal backing bracket.

    • The bracket is attached by a strong adhesive. Work slowly and carefully, being sure to not damage the ribbon cable.

    • Volume control switch remains.

  11. Nintendo DSi XL Volume Buttons Replacement, Volume Buttons: crwdns2935265:011crwdnd2935265:01crwdnd2935265:03crwdne2935265:0 Nintendo DSi XL Volume Buttons Replacement, Volume Buttons: crwdns2935265:011crwdnd2935265:02crwdnd2935265:03crwdne2935265:0 Nintendo DSi XL Volume Buttons Replacement, Volume Buttons: crwdns2935265:011crwdnd2935265:03crwdnd2935265:03crwdne2935265:0
    • While pushing the volume buttons through their holes in the lower case, remove the buttons and their silicone pads with a pair of tweezers.

    • Work patiently and carefully as the silicone pad is easily torn.

    • Remove the buttons from the silicone pad.

crwdns2915888:0crwdne2915888:0

To reassemble your device, follow these instructions in reverse order.

crwdns2935227:0crwdne2935227:0

Brett Hartt

crwdns2935283:004/12/10crwdne2935283:0

127,897 crwdns2915208:0crwdne2915208:0

crwdns2935297:0143crwdne2935297:0

crwdns2915084:0crwdne2915084:0

iFixit crwdns2935289:0iFixitcrwdne2935289:0

Staff

crwdns2931471:0135crwdne2931471:0

crwdns2935297:016,820crwdne2935297:0

crwdns2944067:00crwdne2944067:0

crwdns2917038:0crwdne2917038:0

crwdns2936625:0crwdne2936625:0:

crwdns2936751:024crwdne2936751:0 3

crwdns2936753:07crwdne2936753:0 10

crwdns2936753:030crwdne2936753:0 48

crwdns2942667:0crwdne2942667:0 6,719