crwdns2933423:0crwdne2933423:0
crwdns2947577:0crwdnd2947577:0crwdne2947577:0

Nintendo DS Lite Trigger Buttons Replacement

crwdns2942213:0crwdne2942213:0

    1. Nintendo DS Lite Trigger Buttons Replacement, Battery: crwdns2935265:01crwdnd2935265:01crwdnd2935265:02crwdne2935265:0 Nintendo DS Lite Trigger Buttons Replacement, Battery: crwdns2935265:01crwdnd2935265:02crwdnd2935265:02crwdne2935265:0
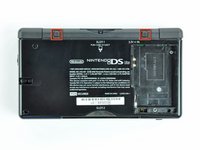
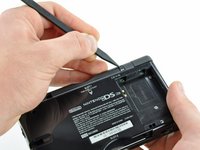
      • Unscrew the Phillips screw securing the battery cover to the lower case.

      • The screw remains captive to the battery cover.

      • Pry the battery cover upward with a spudger or fingernail, and lift out of the lower case.

      crwdns2952109:0crwdne2952109:0

      crwdns2917038:0crwdne2917038:0

    2. Nintendo DS Lite Trigger Buttons Replacement: crwdns2935265:02crwdnd2935265:01crwdnd2935265:01crwdne2935265:0
      • Wedge the edge of a spudger in between the side of the battery and the lower case housing and pry upward to dislodge the battery.

      • Remove the battery from the DS Lite.

      crwdns2952109:0crwdne2952109:0

      crwdns2917038:0crwdne2917038:0

    1. Nintendo DS Lite Trigger Buttons Replacement, Lower Case: crwdns2935265:03crwdnd2935265:01crwdnd2935265:02crwdne2935265:0 Nintendo DS Lite Trigger Buttons Replacement, Lower Case: crwdns2935265:03crwdnd2935265:02crwdnd2935265:02crwdne2935265:0
      • Use the tip of a spudger to pry both rubber feet off the DS Lite.

      crwdns2952109:0crwdne2952109:0

      crwdns2917038:0crwdne2917038:0

    2. Nintendo DS Lite Trigger Buttons Replacement: crwdns2935265:04crwdnd2935265:01crwdnd2935265:01crwdne2935265:0
      • Remove the following screws securing the lower case to the body of the DS Lite:

      • Two 4.3 mm gold Phillips screws

      • One 3.9 mm black Tri-point screw

      • One 3.3 mm silver Phillips screw

      • Three 5.5 mm silver Tri-point screws

      crwdns2952109:0crwdne2952109:0

      crwdns2917038:0crwdne2917038:0

    3. Nintendo DS Lite Trigger Buttons Replacement: crwdns2935265:05crwdnd2935265:01crwdnd2935265:03crwdne2935265:0 Nintendo DS Lite Trigger Buttons Replacement: crwdns2935265:05crwdnd2935265:02crwdnd2935265:03crwdne2935265:0 Nintendo DS Lite Trigger Buttons Replacement: crwdns2935265:05crwdnd2935265:03crwdnd2935265:03crwdne2935265:0
      • Remove the cover from the Game Pak slot before continuing.

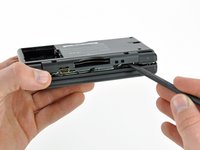
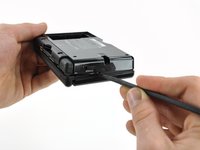
      • Insert the edge of a spudger in between the lower and upper case near the top right corner of the DS Lite.

      • Carefully run the spudger along the right edge of the DS Lite, creating an opening in the process.

      • Continue running the spudger along the backside of the DS Lite until the majority of the lower case has been separated from the upper case.

      crwdns2952109:0crwdne2952109:0

      crwdns2917038:0crwdne2917038:0

    4. Nintendo DS Lite Trigger Buttons Replacement: crwdns2935265:06crwdnd2935265:01crwdnd2935265:01crwdne2935265:0
      • Lift the lower case away from the rest of the DS Lite.

      • Pull carefully. Some units are sealed with adhesive, and pulling too hard can damage the power switch.

      • When re-assembling, make sure that power switch and volume sliders are properly aligned with the switches on the motherboard.

      crwdns2952109:0crwdne2952109:0

      crwdns2917038:0crwdne2917038:0

    1. Nintendo DS Lite Trigger Buttons Replacement, Trigger Buttons: crwdns2935265:07crwdnd2935265:01crwdnd2935265:02crwdne2935265:0 Nintendo DS Lite Trigger Buttons Replacement, Trigger Buttons: crwdns2935265:07crwdnd2935265:02crwdnd2935265:02crwdne2935265:0
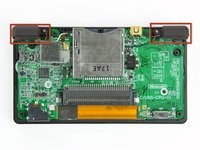
      • Lift both trigger buttons out of the DS Lite.

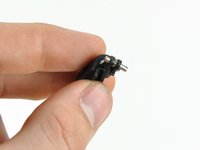
      • The trigger buttons are held in very loosely by small metal pegs and springs. Don't lose track of these pieces.

      • The second picture shows the correct configuration of the trigger assembly for reassembly purposes.

      crwdns2952109:0crwdne2952109:0

      crwdns2917038:0crwdne2917038:0

crwdns2915888:0crwdne2915888:0

To reassemble your device, follow these instructions in reverse order.

crwdns2935221:0crwdne2935221:0

crwdns2935229:039crwdne2935229:0

Matthew Newsom

crwdns2935283:001/05/10crwdne2935283:0

42,952 crwdns2915208:0crwdne2915208:0

crwdns2935297:067crwdne2935297:0

crwdns2947412:08crwdne2947412:0

Thank you this helped a lot I can finnaly play Zelda and Mario Cart now

MattTheGamer 49 - crwdns2934203:0crwdne2934203:0 crwdns2950251:0crwdne2950251:0

Hi! I am attempting a trigger repair, but it seems the console was opened and worked on before I got my hands on it, and the switch for the trigger snapped off the board. I taped it to the board to test, and it still works. Is my best bet soldering the switch back to the motherboard? Or could I get away with superglue? (I've never soldered before, and this looks delicate)

Tamara Girodie - crwdns2934203:0crwdne2934203:0 crwdns2950251:0crwdne2950251:0

I would definitely solder it, usually, these triggers are the ones that get the most stress and dirt around them so superglue might not last that much. If you have a problem with the trigger still. You might want to check the video I uploaded, it is in Spanish, though. https://youtu.be/7GRzZh9ZdNM

spinomagnus - crwdns2934203:0crwdne2934203:0 crwdns2950251:0crwdne2950251:0

I dont get how removing them is supposed to fix it. it says you need no parts. someone explain

ur mom - crwdns2934203:0crwdne2934203:0 crwdns2950251:0crwdne2950251:0

crwdns2917038:0crwdne2917038:0

crwdns2936625:0crwdne2936625:0:

crwdns2936751:024crwdne2936751:0 32

crwdns2936753:07crwdne2936753:0 114

crwdns2936753:030crwdne2936753:0 418

crwdns2942667:0crwdne2942667:0 63,388