crwdns2915892:0crwdne2915892:0
After many hours of stylus use, your Nintendo DS Lite's touchscreen has finally died. We've got you covered with this touchscreen replacement guide!
crwdns2942213:0crwdne2942213:0
-
-
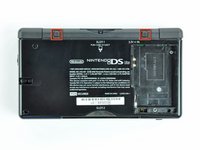
Unscrew the Phillips screw securing the battery cover to the lower case.
-
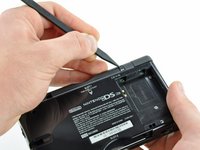
Pry the battery cover upward with a spudger or fingernail, and lift out of the lower case.
-
-
-
Wedge the edge of a spudger in between the side of the battery and the lower case housing and pry upward to dislodge the battery.
-
Remove the battery from the DS Lite.
-
-
-
Use the tip of a spudger to pry both rubber feet off the DS Lite.
-
-
-
Remove the following screws securing the lower case to the body of the DS Lite:
-
Two 4.3 mm gold Phillips screws
-
One 3.9 mm black Tri-point screw
-
One 3.3 mm silver Phillips screw
-
Three 5.5 mm silver Tri-point screws
-
-
-
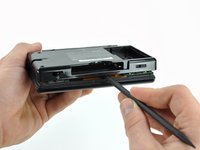
Insert the edge of a spudger in between the lower and upper case near the top right corner of the DS Lite.
-
Carefully run the spudger along the right edge of the DS Lite, creating an opening in the process.
-
Continue running the spudger along the backside of the DS Lite until the majority of the lower case has been separated from the upper case.
-
-
-
Lift the lower case away from the rest of the DS Lite.
-
-
-
Lift both trigger buttons out of the DS Lite.
-
-
-
-
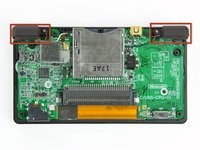
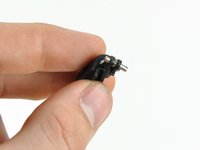
Use the flat edge of a spudger to pry the Wi-Fi antenna connector straight up from its socket on the Wi-Fi board.
-
-
-
Use the flat edge of a spudger to pry the Wi-Fi board connector straight up from its socket on the motherboard.
-
-
-
Use the flat edge of a spudger to separate the right edge of the Wi-Fi board from the motherboard.
-
Remove the Wi-Fi board from the DS Lite.
-
-
-
Use the flat edge of a spudger to pry the microphone connector straight up from its socket on the motherboard.
-
-
-
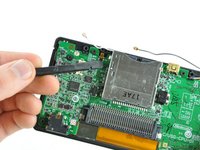
Position the antenna cable with its connector facing up and away from the motherboard using a spudger to hold it down lightly in the gap between chips on the motherboard.
-
Slowly and carefully pull the antenna cable until the cable connector is under the DS Lite game cartridge reader.
-
Continue pulling the cable until the cable connector comes out from under the game cartridge reader on the right side.
-
-
-
Use your fingernail or the edge of a spudger to carefully flip up the touchscreen ribbon cable retaining flap.
-
Use the tip of a spudger to pull the touchscreen ribbon cable straight out of its socket.
-
-
-
Remove the two 3.4 mm Phillips screws securing the motherboard to the upper case.
-
-
-
Open the display enough to use your finger to push the front edge of the motherboard up and away from the upper case.
-
-
-
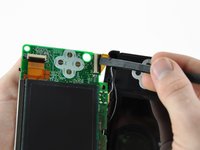
Use your fingernail or the flat edge of a spudger to carefully flip up the upper LCD ribbon cable retaining flap.
-
Pull the motherboard away from the DS Lite to separate the upper LCD ribbon cable from its socket on the motherboard.
-
Remove the motherboard from the DS Lite.
-
Now you may open the retaining flap for the lower LCD screen in the same way and separate the lower LCD screen from the motherboard.
-
-
-
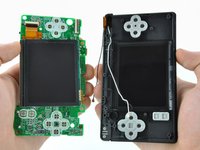
Use your fingernail or the edge of a plastic opening tool to carefully flip up the lower LCD ribbon cable retaining flap.
-
Pull the lower LCD assembly straight away to separate the lower LCD ribbon cable from its socket on the motherboard.
-
Remove the lower LCD assembly from the motherboard.
-
-
-
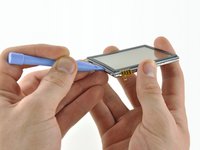
Insert a plastic opening tool between the touchscreen and top right corner of the display.
-
Slide the opening tool down the right side of the display to free the edge of the touchscreen.
-
-
-
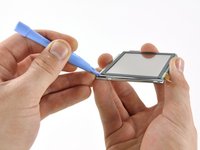
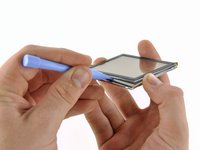
Continue sliding the plastic opening tool along the bottom and up the left edges of the LCD to separate the touchscreen from the LCD.
-
-
-
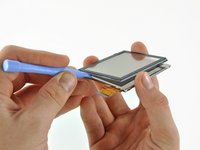
Lift the touchscreen away from the LCD.
-
Touchscreen remains.
-
If your replacement touchscreen doesn't come with the plastic black bezel, peel it off of your old touchscreen using the prying tool and replace it on your new touchscreen.
-


To reassemble your device, follow these instructions in reverse order.
To reassemble your device, follow these instructions in reverse order.
crwdns2935221:0crwdne2935221:0
crwdns2935229:081crwdne2935229:0

crwdns2947412:07crwdne2947412:0
There is really no reason to disconnect the upper display LCD ribbon cable. It is somewhat difficult to re-attach properly. If not attached properly the DS will not boot. The lower LCD/digitizer assembly can be removed without the need for Step 16.
Fixed My Cousins DS lite touch screen using this guide. Thank You.
Excellent directions! Very much appreciated. DS back in full working order. A big thanks to the additional advice in the comments, especially about attaching a thread to the antenna tho I tied it on BEFORE pulling it thru and left it in place thru rest of repair. Pulling back thru was a doddle!
When reassembling I’d suggest to pass the antenna (black wire) between the charging port and the small EM10 chip.
I first put this wire under the EM10, I couldnt close the case of the DS. There was a resistance near this spot. I gues it was the antenna wire.
Although, to put the wire under the cartridge slot, under the EM10 is the best spot. If you look under the catrige slot, you can see there is no obstacle there.
I got this wire stuck under the cartrige slot when reassembling because it was bent upward when I passed it under the slot. So it was bumping against the top of the cartrige underneath sapce. So my advice is to bend it to get it straight before feeding it through the slot. Attach it to a thread before removing it, as advised in other comments, is a good idea too. Just secure the first knot by a second one or it might detach when you pull it.
This guide could have been so much shorter, no need to remove unnecessary components to get to the bottom screen.