crwdns2915892:0crwdne2915892:0
This guide will explain how to replace the shoulder buttons on a DS Lite if they are sticking or not working properly.
The tools you’ll need for this task are:
- Spudger or other flat tool
- Screwdrivers
- Phillips
- Tri-wing
crwdns2942213:0crwdne2942213:0
-
-
-
Use a Phillips #00 screwdriver to remove the screw securing the battery cover.
 crwdns2952109:0crwdne2952109:0
-
-
-
Use a spudger to pry out the battery.
-
Pry off the rubber feet.
-
Remove the seven screws securing the lower case:
-
Three tri-wing screws
-
One Phillips screw
-
Two gold Phillips screws
-
One black tri-wing screw
-
-
-
-
Carefully pry the bottom cover off.
-
Remove the shoulder buttons by pulling out the metal pegs that secure them to DS.
-
-
-
You can now access the micro-button component and replace or repair anything as needed.
-
-


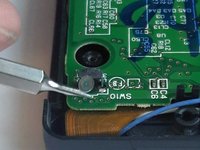
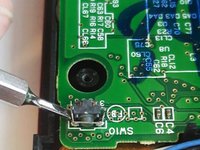
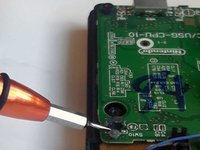
To reassemble your device, follow the steps in reverse order after making your repair.
crwdns2935221:0crwdne2935221:0
crwdns2935229:09crwdne2935229:0

crwdns2935287:0crwdne2935287:0

University of Advancing Technology, Team S1-G8, Beam Spring 2019 crwdns2935289:0University of Advancing Technology, Team S1-G8, Beam Spring 2019crwdne2935289:0
UAT-BEAM-S19S1G8
crwdns2931471:03crwdne2931471:0
crwdns2935297:012crwdne2935297:0
crwdns2947412:05crwdne2947412:0
For anyone dealing with unresponsive shoulder buttons, I highly recommend watching this video guide;
https://www.youtube.com/watch?v=VnWdawXC...
Gabriel Branyiczky - crwdns2934203:0crwdne2934203:0 crwdns2950251:0crwdne2950251:0
たしかにそうですね!!!
kawagoe - crwdns2934203:0crwdne2934203:0 crwdns2950251:0crwdne2950251:0
Thanks, this was very helpful. The ifixit guide doesn't include the needed details of how to clean the button contact. This fixed my issue.
Travis Kirk - crwdns2934203:0crwdne2934203:0 crwdns2950251:0crwdne2950251:0
+1 on this! Didn't need to replace the button at all.
Isak - crwdns2934203:0crwdne2934203:0 crwdns2950251:0crwdne2950251:0
とても、わかりやすくて、しっかり修理できました!
kawagoe - crwdns2934203:0crwdne2934203:0 crwdns2950251:0crwdne2950251:0
