crwdns2933423:0crwdne2933423:0
crwdns2947577:0crwdnd2947577:0crwdne2947577:0

Nintendo 3DS Motherboard Assembly Replacement

crwdns2862623:0crwdne2862623:0
crwdns2948751:0crwdne2948751:0

crwdns2942213:0crwdne2942213:0

    1. Nintendo 3DS Motherboard Assembly Replacement, Motherboard Assembly: crwdns2935265:01crwdnd2935265:01crwdnd2935265:02crwdne2935265:0 Nintendo 3DS Motherboard Assembly Replacement, Motherboard Assembly: crwdns2935265:01crwdnd2935265:02crwdnd2935265:02crwdne2935265:0
      crwdns2935267:0crwdne2935267:0
      Tweezers
      $4.99
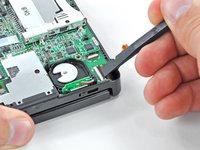
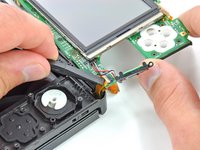
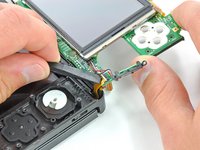
      • Grasp the microphone ribbon cable near the microphone with a pair of tweezers.

      • Pull the microphone straight up out of the upper case.

      crwdns2952109:0crwdne2952109:0

      crwdns2917038:0crwdne2917038:0

    2. Nintendo 3DS Motherboard Assembly Replacement: crwdns2935265:02crwdnd2935265:01crwdnd2935265:03crwdne2935265:0 Nintendo 3DS Motherboard Assembly Replacement: crwdns2935265:02crwdnd2935265:02crwdnd2935265:03crwdne2935265:0 Nintendo 3DS Motherboard Assembly Replacement: crwdns2935265:02crwdnd2935265:03crwdnd2935265:03crwdne2935265:0
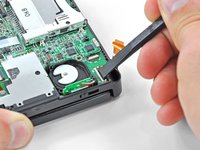
      • Use the flat end of a spudger or your fingernail to flip up the retaining flap on the speaker assembly ribbon cable ZIF socket.

      • Be sure you are prying up on the hinged retaining flap, NOT the socket itself. Damaging the socket or cable will result in a 3DS that will blink its power LED when you press the power button - and do nothing else.

      • Disconnect the speaker assembly ribbon cable with a pair of tweezers.

      crwdns2952109:0crwdne2952109:0

      crwdns2917038:0crwdne2917038:0

    3. Nintendo 3DS Motherboard Assembly Replacement: crwdns2935265:03crwdnd2935265:01crwdnd2935265:02crwdne2935265:0 Nintendo 3DS Motherboard Assembly Replacement: crwdns2935265:03crwdnd2935265:02crwdnd2935265:02crwdne2935265:0
      • Use the flat end of a spudger or your fingernail to flip up the retaining flap on the camera ribbon cable ZIF socket.

      • Be sure you are prying up on the hinged retaining flap, not the socket itself.

      • When reassembling, note that the gold contacts face toward the motherboard (as opposed to the camera cable's gold contacts facing away).

      crwdns2952109:0crwdne2952109:0

      crwdns2917038:0crwdne2917038:0

    4. Nintendo 3DS Motherboard Assembly Replacement: crwdns2935265:04crwdnd2935265:01crwdnd2935265:03crwdne2935265:0 Nintendo 3DS Motherboard Assembly Replacement: crwdns2935265:04crwdnd2935265:02crwdnd2935265:03crwdne2935265:0 Nintendo 3DS Motherboard Assembly Replacement: crwdns2935265:04crwdnd2935265:03crwdnd2935265:03crwdne2935265:0
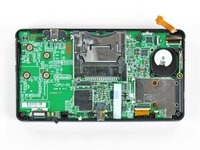
      • Remove seven Phillips screws securing the motherboard to the upper case:

      • Four 2.5 mm gold screws

      • Two 3.5 mm black screws

      • One 2.5 mm silver screw

      • When you remove this screw the volume slider can fall out.

      • Lift the side of the motherboard that sits along the bottom edge of the 3DS.

      crwdns2952109:0crwdne2952109:0

      crwdns2917038:0crwdne2917038:0

    5. Nintendo 3DS Motherboard Assembly Replacement: crwdns2935265:05crwdnd2935265:01crwdnd2935265:03crwdne2935265:0 Nintendo 3DS Motherboard Assembly Replacement: crwdns2935265:05crwdnd2935265:02crwdnd2935265:03crwdne2935265:0 Nintendo 3DS Motherboard Assembly Replacement: crwdns2935265:05crwdnd2935265:03crwdnd2935265:03crwdne2935265:0
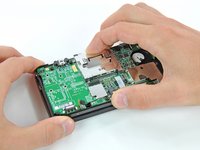
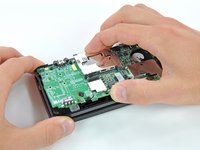
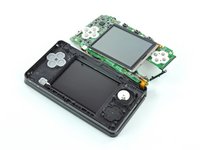
      • Continue lifting the motherboard assembly and rotate it until it is resting next to the rest of the device.

      • Use the flat end of a spudger or your fingernail to flip up the retaining flap on the LCD ribbon cable ZIF socket.

      • Be sure you are prying up on the hinged retaining flap, not the socket itself. Damaging the socket or cable will result in a 3DS that won't have a functional top screen.

      crwdns2952109:0crwdne2952109:0

      crwdns2917038:0crwdne2917038:0

    6. Nintendo 3DS Motherboard Assembly Replacement: crwdns2935265:06crwdnd2935265:01crwdnd2935265:01crwdne2935265:0
      • Remove the motherboard assembly from the rest of the device.

      crwdns2952109:0crwdne2952109:0

      crwdns2917038:0crwdne2917038:0

crwdns2915888:0crwdne2915888:0

To reassemble your device, follow these instructions in reverse order.

crwdns2935221:0crwdne2935221:0

David Hodson

crwdns2935283:004/13/10crwdne2935283:0

157,048 crwdns2915208:0crwdne2915208:0

crwdns2935297:0127crwdne2935297:0

crwdns2947412:00crwdne2947412:0

crwdns2917038:0crwdne2917038:0

crwdns2936625:0crwdne2936625:0:

crwdns2936751:024crwdne2936751:0 2

crwdns2936753:07crwdne2936753:0 14

crwdns2936753:030crwdne2936753:0 22

crwdns2942667:0crwdne2942667:0 2,074