crwdns2933423:0crwdne2933423:0

Nintendo 3DS ABXY Buttons Replacement

crwdns2942213:0crwdne2942213:0

  1. Nintendo 3DS ABXY Buttons Replacement, Back Cover: crwdns2935265:01crwdnd2935265:01crwdnd2935265:01crwdne2935265:0
    • Unscrew the four Phillips #00 screws along the top of the back cover.

    • The screws are held in place by locking washers, and will not come out of the back cover.

    • The comments section is full of unlucky souls who will tell you that the screws here through step 4 will strip incredibly easily. Press down fairly hard, and go slow.

  2. Nintendo 3DS ABXY Buttons Replacement: crwdns2935265:02crwdnd2935265:01crwdnd2935265:02crwdne2935265:0 Nintendo 3DS ABXY Buttons Replacement: crwdns2935265:02crwdnd2935265:02crwdnd2935265:02crwdne2935265:0
    • Hold the device in one hand and turn it over.

    • Grab the top edge of the back cover with your opposite hand so that the cover does not fall back into place.

    • Flip the 3DS over again so that the back cover is facing up.

    • Pull the back cover up and away from the rest of the device to remove it.

  3. Nintendo 3DS ABXY Buttons Replacement, Battery: crwdns2935265:03crwdnd2935265:01crwdnd2935265:03crwdne2935265:0 Nintendo 3DS ABXY Buttons Replacement, Battery: crwdns2935265:03crwdnd2935265:02crwdnd2935265:03crwdne2935265:0 Nintendo 3DS ABXY Buttons Replacement, Battery: crwdns2935265:03crwdnd2935265:03crwdnd2935265:03crwdne2935265:0
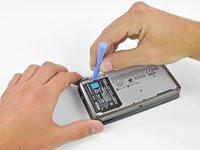
    • Insert a plastic opening tool into the notch in the lower case above the battery.

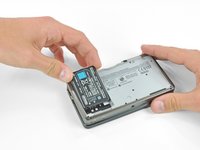
    • Pry the battery up with the plastic opening tool.

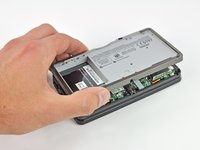
    • Grab the top edge of the battery and lift it out of the lower case.

  4. Nintendo 3DS ABXY Buttons Replacement, Lower Case: crwdns2935265:04crwdnd2935265:01crwdnd2935265:01crwdne2935265:0
    • Remove the nine 6.3 mm black Phillips screws from the lower case.

    • These screws will strip very easily unless you use the correct size bit. Apply pressure to the screws while turning to avoid stripping them.

    • Remove the 2.4 mm silver Phillips screw above the game cartridge slot.

  5. Nintendo 3DS ABXY Buttons Replacement: crwdns2935265:05crwdnd2935265:01crwdnd2935265:03crwdne2935265:0 Nintendo 3DS ABXY Buttons Replacement: crwdns2935265:05crwdnd2935265:02crwdnd2935265:03crwdne2935265:0 Nintendo 3DS ABXY Buttons Replacement: crwdns2935265:05crwdnd2935265:03crwdnd2935265:03crwdne2935265:0
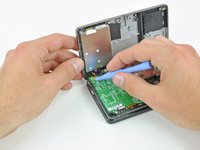
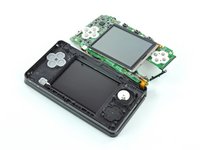
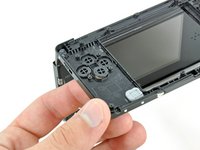
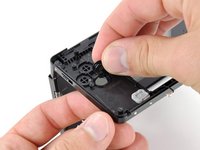
    • Lift the bottom edge of the lower case off the rest of the 3DS.

    • There are still two ribbon cables connecting the mother board to the case, so be sure not to pull the lower case all the way off.

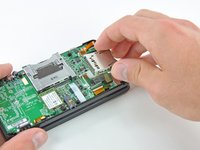
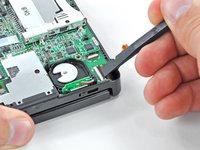
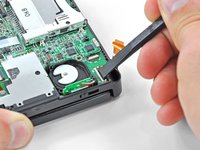
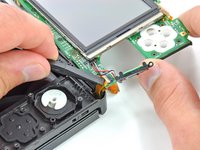
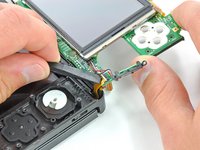
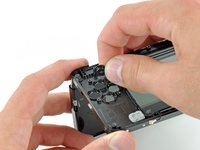
    • Use a plastic opening tool to pry the shoulder button ribbon cables off their sockets on the motherboard.

    • Remove the lower case from the device.

  6. Nintendo 3DS ABXY Buttons Replacement, Circle Pad Joystick: crwdns2935265:06crwdnd2935265:01crwdnd2935265:01crwdne2935265:0
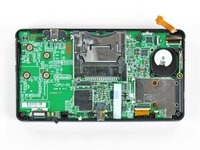
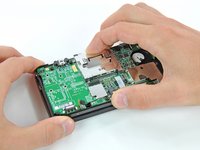
    • Remove the two 7.7 mm Phillips screws securing the back of the Circle Pad to the motherboard.

  7. Nintendo 3DS ABXY Buttons Replacement: crwdns2935265:07crwdnd2935265:01crwdnd2935265:03crwdne2935265:0 Nintendo 3DS ABXY Buttons Replacement: crwdns2935265:07crwdnd2935265:02crwdnd2935265:03crwdne2935265:0 Nintendo 3DS ABXY Buttons Replacement: crwdns2935265:07crwdnd2935265:03crwdnd2935265:03crwdne2935265:0
    • Use the flat end of a spudger to pry the back of the Circle Pad off the motherboard.

    • Lift the Circle Pad joystick off the motherboard and lay it on its back so that the ribbon cable connector is accessible.

  8. Nintendo 3DS ABXY Buttons Replacement: crwdns2935265:08crwdnd2935265:01crwdnd2935265:03crwdne2935265:0 Nintendo 3DS ABXY Buttons Replacement: crwdns2935265:08crwdnd2935265:02crwdnd2935265:03crwdne2935265:0 Nintendo 3DS ABXY Buttons Replacement: crwdns2935265:08crwdnd2935265:03crwdnd2935265:03crwdne2935265:0
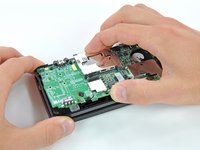
    • Use the flat end of a spudger or your fingernail to flip up the retaining flap on the Circle Pad ribbon cable ZIF socket.

    • Be sure you are prying up on the hinged retaining flap, not the socket itself.

    • Lift the Circle Pad joystick off the motherboard.

  9. Nintendo 3DS ABXY Buttons Replacement: crwdns2935265:09crwdnd2935265:01crwdnd2935265:02crwdne2935265:0 Nintendo 3DS ABXY Buttons Replacement: crwdns2935265:09crwdnd2935265:02crwdnd2935265:02crwdne2935265:0
    • To decrease the chance of losing it during repairs, you may want to remove the two thin pads underneath the Circle Pad joystick.

    • Use a spudger or screwdriver to lift the pads up and remove them from the device.

  10. Nintendo 3DS ABXY Buttons Replacement, SD Board: crwdns2935265:010crwdnd2935265:01crwdnd2935265:01crwdne2935265:0
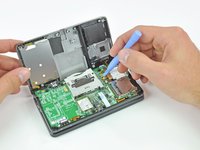
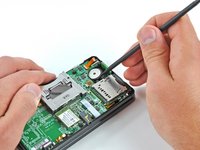
    • Remove the two 4.5 mm Phillips screws securing the SD board to the motherboard.

  11. Nintendo 3DS ABXY Buttons Replacement: crwdns2935265:011crwdnd2935265:01crwdnd2935265:02crwdne2935265:0 Nintendo 3DS ABXY Buttons Replacement: crwdns2935265:011crwdnd2935265:02crwdnd2935265:02crwdne2935265:0
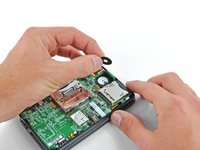
    • Use the flat end of a spudger to pry the SD board ribbon cable connector off its socket on the motherboard.

  12. Nintendo 3DS ABXY Buttons Replacement: crwdns2935265:012crwdnd2935265:01crwdnd2935265:03crwdne2935265:0 Nintendo 3DS ABXY Buttons Replacement: crwdns2935265:012crwdnd2935265:02crwdnd2935265:03crwdne2935265:0 Nintendo 3DS ABXY Buttons Replacement: crwdns2935265:012crwdnd2935265:03crwdnd2935265:03crwdne2935265:0
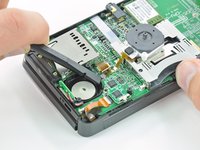
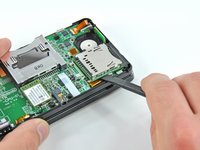
    • Insert the flat end of a spudger between the SD board and the motherboard.

    • Pry up slowly to loosen the SD board from the RF shield underneath it. If you pry too quickly, you may tear the shield or break its solder points.

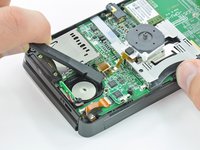
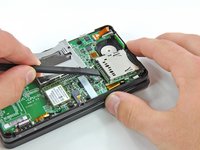
    • Run the spudger along the sides of the SD board to free it from the adhesive holding it in place.

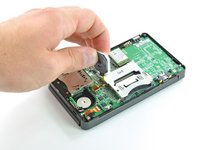
    • Once completely freed, lift the SD board straight off the motherboard.

  13. Nintendo 3DS ABXY Buttons Replacement, Wi-Fi Board: crwdns2935265:013crwdnd2935265:01crwdnd2935265:02crwdne2935265:0 Nintendo 3DS ABXY Buttons Replacement, Wi-Fi Board: crwdns2935265:013crwdnd2935265:02crwdnd2935265:02crwdne2935265:0
    • Slide the flat end of a spudger under the corner of the Wi-Fi board, and lift it away from the motherboard.

    • The Wi-Fi antenna cable is still connected to the Wi-Fi board, so you cannot completely remove the Wi-Fi board yet.

  14. Nintendo 3DS ABXY Buttons Replacement: crwdns2935265:014crwdnd2935265:01crwdnd2935265:03crwdne2935265:0 Nintendo 3DS ABXY Buttons Replacement: crwdns2935265:014crwdnd2935265:02crwdnd2935265:03crwdne2935265:0 Nintendo 3DS ABXY Buttons Replacement: crwdns2935265:014crwdnd2935265:03crwdnd2935265:03crwdne2935265:0
    • Lift the Wi-Fi board off the motherboard and rotate it so that the bottom side is facing up.

    • Use the flat end of a spudger to pry the Wi-Fi antenna cable connector off its socket on the Wi-Fi board.

    • Remove the Wi-Fi board from the device.

  15. Nintendo 3DS ABXY Buttons Replacement, Motherboard Assembly: crwdns2935265:015crwdnd2935265:01crwdnd2935265:02crwdne2935265:0 Nintendo 3DS ABXY Buttons Replacement, Motherboard Assembly: crwdns2935265:015crwdnd2935265:02crwdnd2935265:02crwdne2935265:0
    • Grasp the microphone ribbon cable near the microphone with a pair of tweezers.

    • Pull the microphone straight up out of the upper case.

  16. Nintendo 3DS ABXY Buttons Replacement: crwdns2935265:016crwdnd2935265:01crwdnd2935265:03crwdne2935265:0 Nintendo 3DS ABXY Buttons Replacement: crwdns2935265:016crwdnd2935265:02crwdnd2935265:03crwdne2935265:0 Nintendo 3DS ABXY Buttons Replacement: crwdns2935265:016crwdnd2935265:03crwdnd2935265:03crwdne2935265:0
    • Use the flat end of a spudger or your fingernail to flip up the retaining flap on the speaker assembly ribbon cable ZIF socket.

    • Be sure you are prying up on the hinged retaining flap, NOT the socket itself. Damaging the socket or cable will result in a 3DS that will blink its power LED when you press the power button - and do nothing else.

    • Disconnect the speaker assembly ribbon cable with a pair of tweezers.

  17. Nintendo 3DS ABXY Buttons Replacement: crwdns2935265:017crwdnd2935265:01crwdnd2935265:02crwdne2935265:0 Nintendo 3DS ABXY Buttons Replacement: crwdns2935265:017crwdnd2935265:02crwdnd2935265:02crwdne2935265:0
    • Use the flat end of a spudger or your fingernail to flip up the retaining flap on the camera ribbon cable ZIF socket.

    • Be sure you are prying up on the hinged retaining flap, not the socket itself.

    • When reassembling, note that the gold contacts face toward the motherboard (as opposed to the camera cable's gold contacts facing away).

  18. Nintendo 3DS ABXY Buttons Replacement: crwdns2935265:018crwdnd2935265:01crwdnd2935265:03crwdne2935265:0 Nintendo 3DS ABXY Buttons Replacement: crwdns2935265:018crwdnd2935265:02crwdnd2935265:03crwdne2935265:0 Nintendo 3DS ABXY Buttons Replacement: crwdns2935265:018crwdnd2935265:03crwdnd2935265:03crwdne2935265:0
    • Remove seven Phillips screws securing the motherboard to the upper case:

    • Four 2.5 mm gold screws

    • Two 3.5 mm black screws

    • One 2.5 mm silver screw

    • When you remove this screw the volume slider can fall out.

    • Lift the side of the motherboard that sits along the bottom edge of the 3DS.

  19. Nintendo 3DS ABXY Buttons Replacement: crwdns2935265:019crwdnd2935265:01crwdnd2935265:03crwdne2935265:0 Nintendo 3DS ABXY Buttons Replacement: crwdns2935265:019crwdnd2935265:02crwdnd2935265:03crwdne2935265:0 Nintendo 3DS ABXY Buttons Replacement: crwdns2935265:019crwdnd2935265:03crwdnd2935265:03crwdne2935265:0
    • Continue lifting the motherboard assembly and rotate it until it is resting next to the rest of the device.

    • Use the flat end of a spudger or your fingernail to flip up the retaining flap on the LCD ribbon cable ZIF socket.

    • Be sure you are prying up on the hinged retaining flap, not the socket itself. Damaging the socket or cable will result in a 3DS that won't have a functional top screen.

  20. Nintendo 3DS ABXY Buttons Replacement: crwdns2935265:020crwdnd2935265:01crwdnd2935265:01crwdne2935265:0
    • Remove the motherboard assembly from the rest of the device.

  21. Nintendo 3DS ABXY Buttons Replacement, ABXY Buttons: crwdns2935265:021crwdnd2935265:01crwdnd2935265:01crwdne2935265:0
    • Peel the grey silicone cover off the back of the ABXY buttons.

  22. Nintendo 3DS ABXY Buttons Replacement: crwdns2935265:022crwdnd2935265:01crwdnd2935265:03crwdne2935265:0 Nintendo 3DS ABXY Buttons Replacement: crwdns2935265:022crwdnd2935265:02crwdnd2935265:03crwdne2935265:0 Nintendo 3DS ABXY Buttons Replacement: crwdns2935265:022crwdnd2935265:03crwdnd2935265:03crwdne2935265:0
    • Open the 3DS and orient it so that the back sides of the buttons are facing up.

    • Use your finger to push each button up and lift it out of the upper case.

    • Repeat this procedure for all four ABXY buttons.

    • Each button can only go into one slot in one orientation. Be sure that you are putting each button in the correct slot when reassembling your device.

crwdns2915888:0crwdne2915888:0

To reassemble your device, follow these instructions in reverse order.

crwdns2935229:027crwdne2935229:0

David Hodson

crwdns2935283:004/13/10crwdne2935283:0

150,467 crwdns2915208:0crwdne2915208:0

crwdns2935297:0127crwdne2935297:0

crwdns2944067:014crwdne2944067:0

I completed it. And out of the whole process I only stripped one screw. :D Sooo I just unscrewed everything else and tore off the back. Anyway Mission complete!

dumppermen10 - crwdns2934203:0crwdne2934203:0

I got it apart and put it back together. The A and B still don't work however. I've never done anything to this extent before so it's probably my fault. But the problem may also be beyond my repair capabilities. I will likely try again. Also for some reason my sound doesn't work. I suspect it is not the actual speakers but something else instead. Oh well. I'll get a new XL and take better care of it!

leesr388 - crwdns2934203:0crwdne2934203:0

I've come to the conclusion that my a buttons contact has given out due to the fact I have to force it for a response maybe that is what happened to yours

Jordan Loader -

ok. so i managed the tear down as an experiment in seeing if i could do the process without destroying anything and i had complete success! now the problem is finding a replacement for the "select, home, and start" laminate buttons on the front of my 3ds ctr-001. can anyone provide a link? google and amazon are of no help.

William Scott - crwdns2934203:0crwdne2934203:0

I damaged the part of the socket, is there anything I can do to fix it?

Jaden Malcolm - crwdns2934203:0crwdne2934203:0

crwdns2917038:0crwdne2917038:0

crwdns2936625:0crwdne2936625:0:

crwdns2936751:024crwdne2936751:0 24

crwdns2936753:07crwdne2936753:0 196

crwdns2936753:030crwdne2936753:0 1,140

crwdns2942667:0crwdne2942667:0 108,189