crwdns2933423:0crwdne2933423:0
crwdns2947577:0crwdnd2947577:0crwdne2947577:0

Nintendo 2DS Trigger Button Replacement

crwdns2942213:0crwdne2942213:0

  1. Nintendo 2DS Trigger Button Replacement, Battery: crwdns2935265:01crwdnd2935265:01crwdnd2935265:01crwdne2935265:0
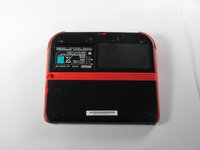
    • Remove the two Phillips captive screws securing the upper rear panel.

    • The captive screws will not completely detach from the back panel.

    crwdns2952109:0crwdne2952109:0

    crwdns2917038:0crwdne2917038:0

  2. Nintendo 2DS Trigger Button Replacement: crwdns2935265:02crwdnd2935265:01crwdnd2935265:02crwdne2935265:0 Nintendo 2DS Trigger Button Replacement: crwdns2935265:02crwdnd2935265:02crwdnd2935265:02crwdne2935265:0
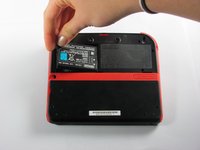
    • Hinge the upper rear panel upwards and outwards to remove it.

    crwdns2952109:0crwdne2952109:0

    crwdns2917038:0crwdne2917038:0

  3. Nintendo 2DS Trigger Button Replacement: crwdns2935265:03crwdnd2935265:01crwdnd2935265:03crwdne2935265:0 Nintendo 2DS Trigger Button Replacement: crwdns2935265:03crwdnd2935265:02crwdnd2935265:03crwdne2935265:0 Nintendo 2DS Trigger Button Replacement: crwdns2935265:03crwdnd2935265:03crwdnd2935265:03crwdne2935265:0
    • Remove the battery from its housing by lifting it up from the side closest to the outside edge.

    crwdns2952109:0crwdne2952109:0

    crwdns2917038:0crwdne2917038:0

  4. Nintendo 2DS Trigger Button Replacement, Rear Panel: crwdns2935265:04crwdnd2935265:01crwdnd2935265:01crwdne2935265:0
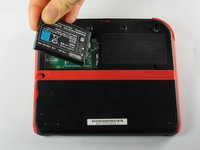
    • Remove the ten Phillips screws attaching the rear panel.

    crwdns2952109:0crwdne2952109:0

    crwdns2917038:0crwdne2917038:0

  5. Nintendo 2DS Trigger Button Replacement: crwdns2935265:05crwdnd2935265:01crwdnd2935265:01crwdne2935265:0
    • The rear panel is attached to the motherboard by a ribbon cable, so be careful not to lift the rear panel too far from the device.

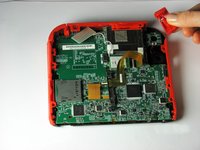
    • Carefully pull the rear panel straight up from the device.

    crwdns2952109:0crwdne2952109:0

    crwdns2917038:0crwdne2917038:0

  6. Nintendo 2DS Trigger Button Replacement: crwdns2935265:06crwdnd2935265:01crwdnd2935265:01crwdne2935265:0
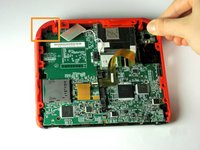
    • Use your fingernail or the flat end of a spudger to flip up the connector securing the ribbon cable to the motherboard

    • Remove the cable from the connector

    • Take the opportunity to remove the Left and Right triggers, they have hinges that may break and springs that may jump away.

    crwdns2952109:0crwdne2952109:0

    crwdns2917038:0crwdne2917038:0

  7. Nintendo 2DS Trigger Button Replacement, Remove trigger button: crwdns2935265:07crwdnd2935265:01crwdnd2935265:02crwdne2935265:0 Nintendo 2DS Trigger Button Replacement, Remove trigger button: crwdns2935265:07crwdnd2935265:02crwdnd2935265:02crwdne2935265:0
    • The trigger buttons have small springs attached to them, so be careful when removing the buttons from the device.

    • Pull the trigger button away from the device to remove it.

    crwdns2952109:0crwdne2952109:0

    crwdns2917038:0crwdne2917038:0

crwdns2915888:0crwdne2915888:0

To reassemble your device, follow these instructions in reverse order.

crwdns2935221:0crwdne2935221:0

crwdns2935229:023crwdne2935229:0

Fina Beauchamp

crwdns2935283:001/12/15crwdne2935283:0

3,377 crwdns2915208:0crwdne2915208:0

crwdns2935297:06crwdne2935297:0

crwdns2935287:0crwdne2935287:0

Cal Poly, Team 70-1, Forte Winter 2015 crwdns2935289:0Cal Poly, Team 70-1, Forte Winter 2015crwdne2935289:0

CPSU-FORTE-W15S70G1

crwdns2931471:04crwdne2931471:0

crwdns2935297:036crwdne2935297:0

crwdns2947412:03crwdne2947412:0

Nice job! My right button was jammed for at least two years. Now I can finally demolish my friends in Mariokart.

Minecrafter Pig - crwdns2934203:0crwdne2934203:0 crwdns2950251:0crwdne2950251:0

Can’t seem to get the second set of screws to budge at all.

Zom baygal - crwdns2934203:0crwdne2934203:0 crwdns2950251:0crwdne2950251:0

crwdns2917038:0crwdne2917038:0

crwdns2936625:0crwdne2936625:0:

crwdns2936751:024crwdne2936751:0 7

crwdns2936753:07crwdne2936753:0 73

crwdns2936753:030crwdne2936753:0 313

crwdns2942667:0crwdne2942667:0 35,322