crwdns2933423:0crwdne2933423:0

Nintendo 2DS Motherboard Replacement

crwdns2942213:0crwdne2942213:0

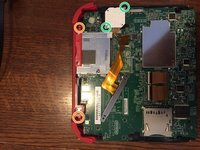
  1. Nintendo 2DS Motherboard Replacement, Battery: crwdns2935265:01crwdnd2935265:01crwdnd2935265:01crwdne2935265:0
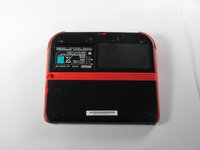
    • Remove the two Phillips captive screws securing the upper rear panel.

    • The captive screws will not completely detach from the back panel.

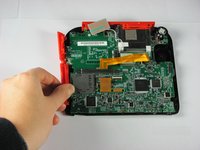
  2. Nintendo 2DS Motherboard Replacement: crwdns2935265:02crwdnd2935265:01crwdnd2935265:02crwdne2935265:0 Nintendo 2DS Motherboard Replacement: crwdns2935265:02crwdnd2935265:02crwdnd2935265:02crwdne2935265:0
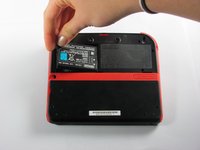
    • Hinge the upper rear panel upwards and outwards to remove it.

  3. Nintendo 2DS Motherboard Replacement: crwdns2935265:03crwdnd2935265:01crwdnd2935265:03crwdne2935265:0 Nintendo 2DS Motherboard Replacement: crwdns2935265:03crwdnd2935265:02crwdnd2935265:03crwdne2935265:0 Nintendo 2DS Motherboard Replacement: crwdns2935265:03crwdnd2935265:03crwdnd2935265:03crwdne2935265:0
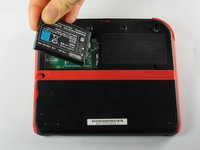
    • Remove the battery from its housing by lifting it up from the side closest to the outside edge.

  4. Nintendo 2DS Motherboard Replacement, Rear Panel: crwdns2935265:04crwdnd2935265:01crwdnd2935265:01crwdne2935265:0
    • Remove the ten Phillips screws attaching the rear panel.

  5. Nintendo 2DS Motherboard Replacement: crwdns2935265:05crwdnd2935265:01crwdnd2935265:01crwdne2935265:0
    • The rear panel is attached to the motherboard by a ribbon cable, so be careful not to lift the rear panel too far from the device.

    • Carefully pull the rear panel straight up from the device.

  6. Nintendo 2DS Motherboard Replacement: crwdns2935265:06crwdnd2935265:01crwdnd2935265:01crwdne2935265:0
    • Use your fingernail or the flat end of a spudger to flip up the connector securing the ribbon cable to the motherboard

    • Remove the cable from the connector

    • Take the opportunity to remove the Left and Right triggers, they have hinges that may break and springs that may jump away.

  7. Nintendo 2DS Motherboard Replacement, Remove Side Panels: crwdns2935265:07crwdnd2935265:01crwdnd2935265:02crwdne2935265:0 Nintendo 2DS Motherboard Replacement, Remove Side Panels: crwdns2935265:07crwdnd2935265:02crwdnd2935265:02crwdne2935265:0
    • Hold the side panels of the device's case with your fingers and pull outward to remove them.

    • The panels should come off easily with little force required.

    • There are three ribbon cables which have already been unplugged in this picture, disconnect these before disassembling the device further.

  8. Nintendo 2DS Motherboard Replacement, Unscrew Motherboard: crwdns2935265:08crwdnd2935265:01crwdnd2935265:01crwdne2935265:0
    • Remove the 12 brass-colored Phillips screws securing the main board.

    • Be very careful not to strip any of these screws. Stripping can occur very easily, and may make replacement of the motherboard impossible.

    • The circle pad has disappeared in this picture. Don't worry, we'll deal with that in the next step

  9. Nintendo 2DS Motherboard Replacement, Remove Top Panel: crwdns2935265:09crwdnd2935265:01crwdnd2935265:03crwdne2935265:0 Nintendo 2DS Motherboard Replacement, Remove Top Panel: crwdns2935265:09crwdnd2935265:02crwdnd2935265:03crwdne2935265:0 Nintendo 2DS Motherboard Replacement, Remove Top Panel: crwdns2935265:09crwdnd2935265:03crwdnd2935265:03crwdne2935265:0
    • The top panel can only be removed when the mother board is not secured.

    • There are two additional screws located on the top rail. Remove these to fully remove the buttons and top rail.

    • There are two screws holding down the joystick base that must be removed. (Be careful of the ribbon cable—it stays connected!)

    • Hold the top panel with your fingers and pull away from the device to remove it.

    • The top panel should come off easily, with very little force applied.

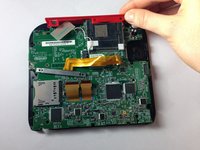
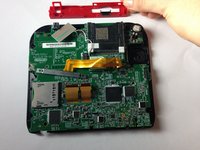
  10. Nintendo 2DS Motherboard Replacement, Remove Motherboard: crwdns2935265:010crwdnd2935265:01crwdnd2935265:02crwdne2935265:0 Nintendo 2DS Motherboard Replacement, Remove Motherboard: crwdns2935265:010crwdnd2935265:02crwdnd2935265:02crwdne2935265:0
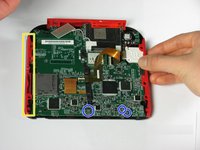
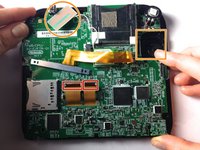
    • Detach the 2 ribbon cables by lifting the black flip connectors that hold them.

    • Lift out the rectangular board seated in the face and lift out the white square which is the joystick motor (takes a little effort). Both stay attached to the motherboard.

    • On some models, you'll need to remove three more tiny ribbon cables at the bottom of the screen. They are secured by flip up connectors. BE GENTLE!

    • Holding the motherboard on either side, lift to remove it.

crwdns2915888:0crwdne2915888:0

To reassemble your device, follow these instructions in reverse order.

crwdns2935229:031crwdne2935229:0

Fina Beauchamp

crwdns2935283:001/12/15crwdne2935283:0

2,988 crwdns2915208:0crwdne2915208:0

crwdns2935297:06crwdne2935297:0

crwdns2915084:0crwdne2915084:0

Cal Poly, Team 70-1, Forte Winter 2015 crwdns2935289:0Cal Poly, Team 70-1, Forte Winter 2015crwdne2935289:0

CPSU-FORTE-W15S70G1

crwdns2931471:04crwdne2931471:0

crwdns2935297:035crwdne2935297:0

crwdns2944067:013crwdne2944067:0

o meu 2ds esta com um defeito que, quando eu aperto o botão de power ele liga e apos alguns segundo desliga e faz um pequeno barulho.

thiagopereira10000 - crwdns2934203:0crwdne2934203:0

Would a jis #000 screw driver work better? As i tried a ph +000 and the gold motherboard screws just dont fit right

Mark Damien English - crwdns2934203:0crwdne2934203:0

I have a question. After I replaced the mother board I have been having issues with it freezing after a couple mins running. Do you know why

briana1987be - crwdns2934203:0crwdne2934203:0

I have a similar problem. After I replaced mine it will not open any app, and it does not show the status bar. Does anyone know why?

Steve David -

Now that I've removed the motherboard, how do I fix it? The instructible is great as far as it goes, but it doesn't go far enough

Danielle Chester - crwdns2934203:0crwdne2934203:0

crwdns2917038:0crwdne2917038:0

crwdns2936625:0crwdne2936625:0:

crwdns2936751:024crwdne2936751:0 12

crwdns2936753:07crwdne2936753:0 69

crwdns2936753:030crwdne2936753:0 424

crwdns2942667:0crwdne2942667:0 52,910