crwdns2933423:0crwdne2933423:0

Ninja Professional Blender BL660 Blender Base Replacement

crwdns2942213:0crwdne2942213:0

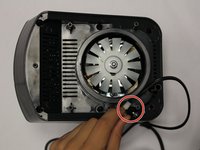
  1. Ninja Professional Blender BL660 Blender Base Replacement, Blender Base: crwdns2935265:01crwdnd2935265:01crwdnd2935265:02crwdne2935265:0 Ninja Professional Blender BL660 Blender Base Replacement, Blender Base: crwdns2935265:01crwdnd2935265:02crwdnd2935265:02crwdne2935265:0
    • Using the Phillips #1 screwdriver, remove the 5 screws (13mm long, 6mm wide) holding the outer base.

    • Lift the base up to remove it.

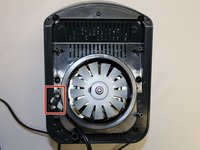
  2. Ninja Professional Blender BL660 Blender Base Replacement: crwdns2935265:02crwdnd2935265:01crwdnd2935265:02crwdne2935265:0 Ninja Professional Blender BL660 Blender Base Replacement: crwdns2935265:02crwdnd2935265:02crwdnd2935265:02crwdne2935265:0
    • Remove the midsection by pulling it up. If the section is stuck, use the iFixit plastic opening tool to pry it off.

    • Pull the power cord through the mid-section opening.

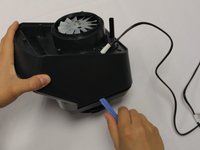
  3. Ninja Professional Blender BL660 Blender Base Replacement: crwdns2935265:03crwdnd2935265:01crwdnd2935265:02crwdne2935265:0 Ninja Professional Blender BL660 Blender Base Replacement: crwdns2935265:03crwdnd2935265:02crwdnd2935265:02crwdne2935265:0
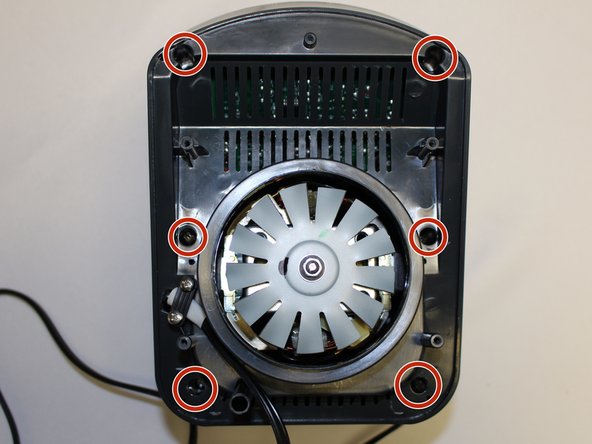
    • Using the Phillips #1 screwdriver, remove the 6 screws (13 mm long, 6 mm wide).

  4. Ninja Professional Blender BL660 Blender Base Replacement: crwdns2935265:04crwdnd2935265:01crwdnd2935265:02crwdne2935265:0 Ninja Professional Blender BL660 Blender Base Replacement: crwdns2935265:04crwdnd2935265:02crwdnd2935265:02crwdne2935265:0
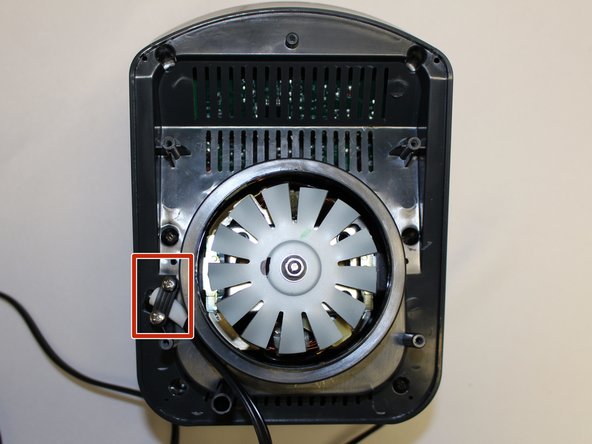
    • Using the Phillips #1 screwdriver, remove the two screws (5 mm long, 3 mm wide) holding the power cord onto the motor cover.

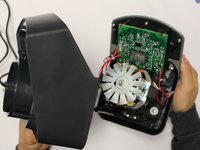
  5. Ninja Professional Blender BL660 Blender Base Replacement: crwdns2935265:05crwdnd2935265:01crwdnd2935265:02crwdne2935265:0 Ninja Professional Blender BL660 Blender Base Replacement: crwdns2935265:05crwdnd2935265:02crwdnd2935265:02crwdne2935265:0
    • Using the iFixit plastic opening tool, pry the motor cover off the general housing. Once it is loose, lift it up to remove it off the base.

    • Slide the cover all the way to the end of the power cord.

    • Please note that the power cord does not completely come off the cover.

crwdns2915888:0crwdne2915888:0

To reassemble your device, follow these instructions in reverse order.

JOHN KIMANI

crwdns2935283:009/22/17crwdne2935283:0

119 crwdns2915208:0crwdne2915208:0

crwdns2935295:0crwdne2935295:0

crwdns2915084:0crwdne2915084:0

Central Washington University, Team S1-G1, Pengilly Fall 2017 crwdns2935289:0Central Washington University, Team S1-G1, Pengilly Fall 2017crwdne2935289:0

CWU-PENGILLY-F17S1G1

crwdns2931471:04crwdne2931471:0

crwdns2935297:09crwdne2935297:0

crwdns2944067:00crwdne2944067:0

crwdns2917038:0crwdne2917038:0

crwdns2936625:0crwdne2936625:0:

crwdns2936751:024crwdne2936751:0 1

crwdns2936753:07crwdne2936753:0 19

crwdns2936753:030crwdne2936753:0 66

crwdns2942667:0crwdne2942667:0 2,702