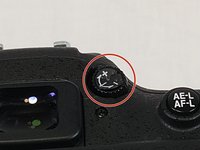
crwdns2915892:0crwdne2915892:0
If your Nikon D71000 Dial Mode Button does not switch the camera mode when twisted, use this guide to replace the Dial Mode Button.
No special skills are required to be able to perform this replacement.
Before beginning with this guide, make sure that the device is turned off and disconnected from any external source.
crwdns2942213:0crwdne2942213:0
-
-
Remove the five screws on the bottom of the camera with a JIS #000 head screwdriver.
 crwdns2952109:0crwdne2952109:0
-
-
-
Remove the 3 screws under the battery flap and remove the bottom cover.
-
-
-
Remove the 2 screws inside the camera on the back corners.
-
-
-
Open the HDMI flap and remove the 2 screws.
-
-
-
Remove the screw next to the camera strap loop.
-
-
-
Remove the 2 screws on each side of the view finder.
-
-
-
Remove the 2 screws above and below the SD card flap.
-
-
-
Peel off the adhesive leather screw cover and remove the 2 screws under it.
-
-
-
-
Remove the Diopter adjustment control sticker and remove the screw under it.
-
-
-
Separate the back panel of the camera from the actual camera.
-
-
-
Disconnect the LCD ribbon cables and power cable from the motherboard.
-
-
-
Unscrew all 16 screws around the back plate of the camera.
-
-
-
Then unscrew the remaining screws holding the back plate to the LCD.
-
Then simply remove the plate with the LCD.
-
-
-
Undo the 5 ribbon cable connectors by flipping the latches up with a plastic spudger.
-
-
-
Remove the black 4 pin connector by pulling it out of the connector.
-
-
-
Remove the 7 screws holding the motherboard in place.
-
-
-
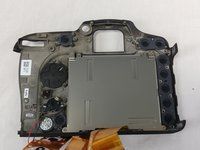
This is what you should see after removing the motherboard.
-
-
-
After following the guide to remove the back LCD screen from the motherboard, remove the 2 marked screws.
-
-
-
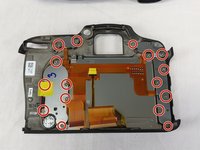
Remove these 5 screws along the top of camera body.
-
-
-
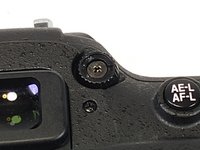
Remove these 2 screws on the top of the camera and pull the top screen, flash, and dial-mode button from the main body of the camera.
-
-
-
Remove the screws holding the dial-mode PCB board down.
-
-
-
Remove the potentiometer and PCB off together.
-
-
-
Remove the large screw in the middle of the dial-mode button. This allows you to replace it.
-


To reassemble your device, follow these instructions in reverse order.
crwdns2935221:0crwdne2935221:0
crwdns2935229:06crwdne2935229:0
crwdns2935287:0crwdne2935287:0

USF Tampa, Team S11-G6, Cheng Spring 2018 crwdns2935289:0USF Tampa, Team S11-G6, Cheng Spring 2018crwdne2935289:0
USFT-CHENG-S18S11G6
crwdns2931471:04crwdne2931471:0
crwdns2935297:06crwdne2935297:0
crwdns2947412:07crwdne2947412:0
Thanks for the write up! I just used it to replace my D7100 mode dial.
One caveat, in step 19, there are no screws under the circles that are drawn. Those screws were removed to get the LCD off, I ended up removing several other screws (some unnecessarily I believe) before I was able to get the top panel to separate from the main body.
There are 2 screws on the sides that definitely need to be removed as they clearly hold the top panel to the body. One of these is visible underneath the strap retainer in photo 18. The other one is the same location on the SD card slot side of the body.
edit - I’m also unsure why this shows how to remove the LCD from the back plate as this is unnecessary for replacing the mode dial.
Matt Hayward - crwdns2934203:0crwdne2934203:0 crwdns2950251:0crwdne2950251:0
Okay write up. I tried this and it took me forever to figure out how to disassemble the camera, in the end it wasn’t worth it. The steps after step 18 are just missing information/wrong.
E H - crwdns2934203:0crwdne2934203:0 crwdns2950251:0crwdne2950251:0
All was going well until taking the top screen off. Pulled the top off and wires pulled out from some where most likely have a pile of parts. In reality a !#^& poor explaintion.
CHEEPER TO SEND IT TO NIKON.
chris - crwdns2934203:0crwdne2934203:0 crwdns2950251:0crwdne2950251:0
Many thanks for a good clear guide! I used steps 1 to 10 to remove the base and back so that I could change out the worn buttons around the display. The only problem I had was reconnecting the ribbon cables. After a bit of research I found that you need to flip up the dark grey tabs on the ribbon cable connectors with your fingernail to release the clamps before removing the cables. When reassembling ensure the cables are fully reinserted then push the tabs back down to lock.
Stephen Lipiec - crwdns2934203:0crwdne2934203:0 crwdns2950251:0crwdne2950251:0
My D7200 plate indicator popped off, I just bought the new switch / replacement switch, gently popped off the indicator plate (to know what mode you’re in) and reglued it onto my old rotating dial.
My rotating switch IS broken though, in the sense that it will rotate from indent to indent and the push down switch doesn’t stop it, but I don’t care. It stays where it’s supposed to and I always check what mode I’m in anyways before starting.
I did NOT want to go through the steps above to disassemble my camera, just for the indicator plate. Not worth it.
William Dayton - crwdns2934203:0crwdne2934203:0 crwdns2950251:0crwdne2950251:0