crwdns2933423:0crwdne2933423:0

Nikon Coolpix S9050 Motherboard Replacement

crwdns2942213:0crwdne2942213:0

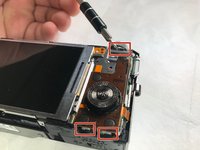
  1. Nikon Coolpix S9050 Motherboard Replacement, Menu Wheel and OK Button: crwdns2935265:01crwdnd2935265:01crwdnd2935265:03crwdne2935265:0 Nikon Coolpix S9050 Motherboard Replacement, Menu Wheel and OK Button: crwdns2935265:01crwdnd2935265:02crwdnd2935265:03crwdne2935265:0 Nikon Coolpix S9050 Motherboard Replacement, Menu Wheel and OK Button: crwdns2935265:01crwdnd2935265:03crwdnd2935265:03crwdne2935265:0
    • Remove the screws. There are two on each side, and four on the bottom. The black screws are 3.2 mm Phillips #000. The silver screws are also 3.2 mm Phillips #000.

  2. Nikon Coolpix S9050 Motherboard Replacement: crwdns2935265:02crwdnd2935265:01crwdnd2935265:01crwdne2935265:0
    • Remove the screen housing and trim piece.

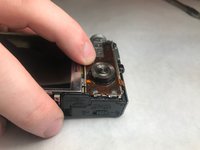
  3. Nikon Coolpix S9050 Motherboard Replacement: crwdns2935265:03crwdnd2935265:01crwdnd2935265:03crwdne2935265:0 Nikon Coolpix S9050 Motherboard Replacement: crwdns2935265:03crwdnd2935265:02crwdnd2935265:03crwdne2935265:0 Nikon Coolpix S9050 Motherboard Replacement: crwdns2935265:03crwdnd2935265:03crwdnd2935265:03crwdne2935265:0
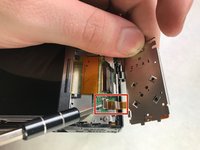
    • Press down and pull the Menu Wheel/OK Button panel towards the screen. This will release the panel from the slots.

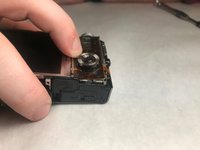
  4. Nikon Coolpix S9050 Motherboard Replacement: crwdns2935265:04crwdnd2935265:01crwdnd2935265:03crwdne2935265:0 Nikon Coolpix S9050 Motherboard Replacement: crwdns2935265:04crwdnd2935265:02crwdnd2935265:03crwdne2935265:0 Nikon Coolpix S9050 Motherboard Replacement: crwdns2935265:04crwdnd2935265:03crwdnd2935265:03crwdne2935265:0
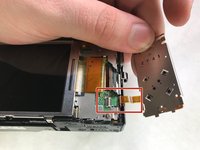
    • Lift up on the black plastic tab(zero insertion force connector-ZIF) and gently pull the panel out to detach the ribbon cable from the camera body.

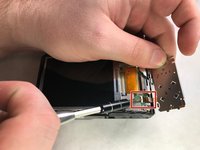
  5. Nikon Coolpix S9050 Motherboard Replacement, Motherboard: crwdns2935265:05crwdnd2935265:01crwdnd2935265:03crwdne2935265:0 Nikon Coolpix S9050 Motherboard Replacement, Motherboard: crwdns2935265:05crwdnd2935265:02crwdnd2935265:03crwdne2935265:0 Nikon Coolpix S9050 Motherboard Replacement, Motherboard: crwdns2935265:05crwdnd2935265:03crwdnd2935265:03crwdne2935265:0
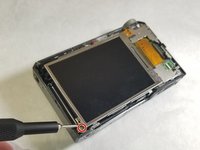
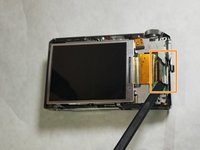
    • Remove the screws surrounding the screen using the Phillips #000 screwdriver.

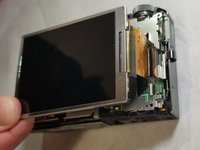
    • Use the spudger to detach the display ribbon cable.

  6. Nikon Coolpix S9050 Motherboard Replacement: crwdns2935265:06crwdnd2935265:01crwdnd2935265:01crwdne2935265:0
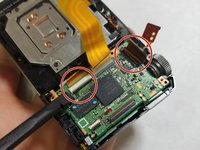
    • Remove the silver 3.2 mm Phillips #000 screws surrounding the metal panel.

  7. Nikon Coolpix S9050 Motherboard Replacement: crwdns2935265:07crwdnd2935265:01crwdnd2935265:01crwdne2935265:0
    • Remove the silver 3.2 mm Phillips #000 screws from the side panel.

  8. Nikon Coolpix S9050 Motherboard Replacement: crwdns2935265:08crwdnd2935265:01crwdnd2935265:03crwdne2935265:0 Nikon Coolpix S9050 Motherboard Replacement: crwdns2935265:08crwdnd2935265:02crwdnd2935265:03crwdne2935265:0 Nikon Coolpix S9050 Motherboard Replacement: crwdns2935265:08crwdnd2935265:03crwdnd2935265:03crwdne2935265:0
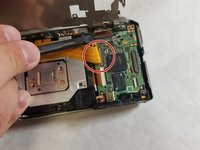
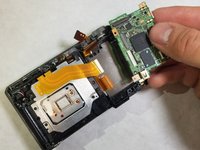
    • After removing metal panel, use the spudger to detach the the 3 ribbon wires attached to the motherboard. Now, remove the silver 3.2 mm Phillips #000 screws holding the motherboard in place. Lastly, lift the board from the top of the camera and pull board upwards, pulling out the AV port with it.

crwdns2915888:0crwdne2915888:0

To reassemble your device, follow these instructions in reverse order.

Kyle Gildner

crwdns2935283:011/05/19crwdne2935283:0

193 crwdns2915208:0crwdne2915208:0

crwdns2935297:02crwdne2935297:0

crwdns2915084:0crwdne2915084:0

IUPUI, Team S1-G5, Stella Fall 2019 crwdns2935289:0IUPUI, Team S1-G5, Stella Fall 2019crwdne2935289:0

IUPUI-STELLA-F19S1G5

crwdns2931471:03crwdne2931471:0

crwdns2935297:05crwdne2935297:0

crwdns2944067:00crwdne2944067:0

crwdns2917038:0crwdne2917038:0

crwdns2936625:0crwdne2936625:0:

crwdns2936751:024crwdne2936751:0 1

crwdns2936753:07crwdne2936753:0 9

crwdns2936753:030crwdne2936753:0 15

crwdns2942667:0crwdne2942667:0 252