crwdns2933423:0crwdne2933423:0

Nikon Coolpix S630 Back Cover Replacement

crwdns2942213:0crwdne2942213:0

  1. Nikon Coolpix S630 Back Cover Replacement, Battery Compartment: crwdns2935265:01crwdnd2935265:01crwdnd2935265:01crwdne2935265:0
    • The battery compartment is located on the bottom of the camera.

    • Place your thumb on the battery door.

    • Slide the door away from the camera in the direction the arrow points to.

  2. Nikon Coolpix S630 Back Cover Replacement, Battery: crwdns2935265:02crwdnd2935265:01crwdnd2935265:01crwdne2935265:0
    • Slide the yellow tab towards the back of the camera.

    • The battery should pop out.

    • Remove the battery.

  3. Nikon Coolpix S630 Back Cover Replacement, Memory Card: crwdns2935265:03crwdnd2935265:01crwdnd2935265:01crwdne2935265:0
    • Press the memory card down into the camera.

    • The memory card should pop out.

    • Remove the memory card.

  4. Nikon Coolpix S630 Back Cover Replacement, Back Cover Removal: crwdns2935265:04crwdnd2935265:01crwdnd2935265:03crwdne2935265:0 Nikon Coolpix S630 Back Cover Replacement, Back Cover Removal: crwdns2935265:04crwdnd2935265:02crwdnd2935265:03crwdne2935265:0 Nikon Coolpix S630 Back Cover Replacement, Back Cover Removal: crwdns2935265:04crwdnd2935265:03crwdnd2935265:03crwdne2935265:0
    • Unscrew the two 3.5mm Phillips screws from the side with the AV outlet.

    • Unscrew the 3.5mm Phillips screw from the opposite side of the camera.

    • Unscrew the six 3.5mm Phillips screws from the bottom of the camera.

  5. Nikon Coolpix S630 Back Cover Replacement: crwdns2935265:05crwdnd2935265:01crwdnd2935265:01crwdne2935265:0
    • Carefully remove the back casing from the camera.

    • Be mindful when removing the back casing as there is a ribbon that still connects the back casing to the motherboard.

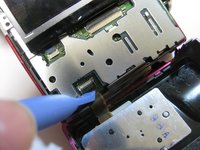
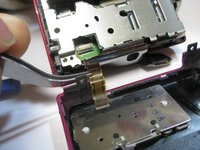
  6. Nikon Coolpix S630 Back Cover Replacement, Detaching Ribbon: crwdns2935265:06crwdnd2935265:01crwdnd2935265:02crwdne2935265:0 Nikon Coolpix S630 Back Cover Replacement, Detaching Ribbon: crwdns2935265:06crwdnd2935265:02crwdnd2935265:02crwdne2935265:0
    crwdns2935267:0crwdne2935267:0
    Tweezers
    $4.99
    crwdns2942207:0crwdne2942207:0
    • Place the plastic opening tool underneath the ribbon tab as shown. Gently lift the tab up.

    • Gently pull the ribbon from the logic board with tweezers.

    • With the ribbon disconnected, the back casing should now be detached from the rest of the camera.

crwdns2915888:0crwdne2915888:0

To reassemble your device, follow these instructions in reverse order.

Anna Katrina

crwdns2935283:004/18/13crwdne2935283:0

28 crwdns2915208:0crwdne2915208:0

crwdns2935297:02crwdne2935297:0

crwdns2915084:0crwdne2915084:0

Cal Poly, Team 8-56, Johann Spring 2013 crwdns2935289:0Cal Poly, Team 8-56, Johann Spring 2013crwdne2935289:0

CPSU-JOHANN-S13S8G56

crwdns2931471:04crwdne2931471:0

crwdns2935297:018crwdne2935297:0

crwdns2944067:00crwdne2944067:0

crwdns2917038:0crwdne2917038:0

crwdns2936625:0crwdne2936625:0:

crwdns2936751:024crwdne2936751:0 0

crwdns2936753:07crwdne2936753:0 0

crwdns2936753:030crwdne2936753:0 15

crwdns2942667:0crwdne2942667:0 481