crwdns2915892:0crwdne2915892:0
This guide will show how to access the motherboard which will give you the ability to remove the lens and flash.
crwdns2942213:0crwdne2942213:0
-
-
Remove the two 2.8 mm screws on the left side of the camera.
-
-
-
Remove the four 2.8 mm screws on the right side of the camera.
-
-
-
Remove the three 4.1 mm screws on the bottom of the camera.
-
-
-
Gently lift the rear cover from the camera.
-
-
-
-
Gently lift the screen out of its place.
-
-
crwdns2935267:0crwdne2935267:0Tweezers$4.99
-
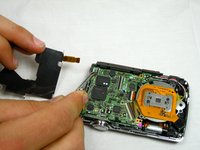
Use the tweezers to lift the ZIF connector which is holding the ribbon cables that connect the LCD screen to the motherboard.
-
-
-
Slowly pull the screen from the camera.
-
-
-
Remove the four 3.8 mm screws located near the bottom right and top left of the LCD base plate.
-
-
crwdns2935267:0crwdne2935267:0Tweezers$4.99
-
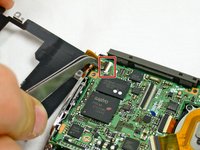
Using tweezers, lift up the retaining flap on the ZIF connector securing the button panel ribbon cable.
-
Slide the button panel ribbon cable out of its socket on the motherboard.
-


To reassemble your device, follow these instructions in reverse order.
To reassemble your device, follow these instructions in reverse order.
crwdns2935221:0crwdne2935221:0
crwdns2935229:02crwdne2935229:0
crwdns2915084:0crwdne2915084:0

Cal Poly, Team 12-32, Maness Spring 2011 crwdns2935289:0Cal Poly, Team 12-32, Maness Spring 2011crwdne2935289:0
CPSU-MANESS-S11S12G32
crwdns2931471:04crwdne2931471:0
crwdns2935297:014crwdne2935297:0
crwdns2947410:01crwdne2947410:0
It would be nice to have a guide for replacing the flash capacitor.