crwdns2933423:0crwdne2933423:0

Nikon Coolpix L320 LCD Replacement

crwdns2942213:0crwdne2942213:0

  1. Nikon Coolpix L320 LCD Replacement, Batteries: crwdns2935265:01crwdnd2935265:01crwdnd2935265:02crwdne2935265:0 Nikon Coolpix L320 LCD Replacement, Batteries: crwdns2935265:01crwdnd2935265:02crwdnd2935265:02crwdne2935265:0
    • Flip the camera over to reveal the card/battery door.

    • Slide the button to the unlocked position and the door should pop open.

  2. Nikon Coolpix L320 LCD Replacement: crwdns2935265:02crwdnd2935265:01crwdnd2935265:02crwdne2935265:0 Nikon Coolpix L320 LCD Replacement: crwdns2935265:02crwdnd2935265:02crwdnd2935265:02crwdne2935265:0
    • Take out the old batteries.

    • Look at the yellow sticker inside of the the battery compartment. You'll see the symbol for the direction the new battery should face when replaced.

    • The “+” means to put the raised end facing up. The “-“ means to put the flat end up.

  3. Nikon Coolpix L320 LCD Replacement, LCD: crwdns2935265:03crwdnd2935265:01crwdnd2935265:03crwdne2935265:0 Nikon Coolpix L320 LCD Replacement, LCD: crwdns2935265:03crwdnd2935265:02crwdnd2935265:03crwdne2935265:0 Nikon Coolpix L320 LCD Replacement, LCD: crwdns2935265:03crwdnd2935265:03crwdnd2935265:03crwdne2935265:0
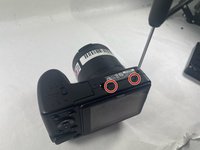
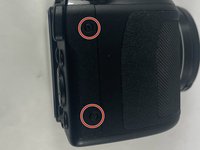
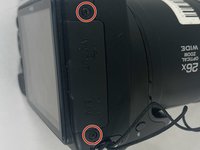
    • Use a JIS screwdriver to remove seven screws from the frame of camera.

  4. Nikon Coolpix L320 LCD Replacement: crwdns2935265:04crwdnd2935265:01crwdnd2935265:01crwdne2935265:0
    • Use an opening tool or spudger to separate the front and back of the camera.

  5. Nikon Coolpix L320 LCD Replacement: crwdns2935265:05crwdnd2935265:01crwdnd2935265:01crwdne2935265:0
    • Use a JIS screwdriver to remove the screws connecting the LCD to the motherboard.

  6. Nikon Coolpix L320 LCD Replacement: crwdns2935265:06crwdnd2935265:01crwdnd2935265:01crwdne2935265:0
    • Gently flip the LCD over to reveal a ribbon cable connected to the motherboard.

    • Use the tip of a spudger or your fingernail to flip up the small locking flap of the ZIF connector. Then, you can safely pull the cable out.

    • Remove the LCD screen from the camera.

crwdns2915888:0crwdne2915888:0

To reassemble your device, follow these instructions in reverse order.

MollyHenderson

crwdns2935283:003/20/23crwdne2935283:0

293 crwdns2915208:0crwdne2915208:0

crwdns2935297:02crwdne2935297:0

crwdns2915084:0crwdne2915084:0

UMass Dartmouth, Team 5-6, Ramos Spring 2023 crwdns2935289:0UMass Dartmouth, Team 5-6, Ramos Spring 2023crwdne2935289:0

UMASSD-RAMOS-S23S5G6

crwdns2931471:03crwdne2931471:0

crwdns2935297:02crwdne2935297:0

crwdns2944067:00crwdne2944067:0

crwdns2917038:0crwdne2917038:0

crwdns2936625:0crwdne2936625:0:

crwdns2936751:024crwdne2936751:0 2

crwdns2936753:07crwdne2936753:0 4

crwdns2936753:030crwdne2936753:0 6

crwdns2942667:0crwdne2942667:0 125