crwdns2933423:0crwdne2933423:0

Nikon Coolpix AW130 Motherboard Replacement

crwdns2942213:0crwdne2942213:0

  1. Nikon Coolpix AW130 Motherboard Replacement, Battery: crwdns2935265:01crwdnd2935265:01crwdnd2935265:02crwdne2935265:0 Nikon Coolpix AW130 Motherboard Replacement, Battery: crwdns2935265:01crwdnd2935265:02crwdnd2935265:02crwdne2935265:0
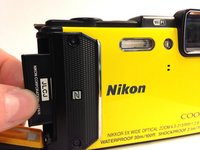
    • Using your thumb and pointer finger, open the card/battery hatch by pressing the center button of the wheel and turning the entire wheel to the left.

    • When reassembling, you must turn this wheel to the right until it clicks.

  2. Nikon Coolpix AW130 Motherboard Replacement: crwdns2935265:02crwdnd2935265:01crwdnd2935265:02crwdne2935265:0 Nikon Coolpix AW130 Motherboard Replacement: crwdns2935265:02crwdnd2935265:02crwdnd2935265:02crwdne2935265:0
    • You should feel the door begin to loosen. Carefully pull the hatch open.

  3. Nikon Coolpix AW130 Motherboard Replacement: crwdns2935265:03crwdnd2935265:01crwdnd2935265:01crwdne2935265:0
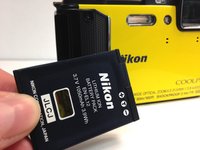
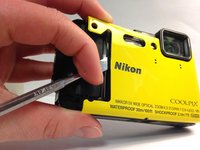
    • Push the yellow battery/charger compartment tab up using your thumb nail.

  4. Nikon Coolpix AW130 Motherboard Replacement: crwdns2935265:04crwdnd2935265:01crwdnd2935265:02crwdne2935265:0 Nikon Coolpix AW130 Motherboard Replacement: crwdns2935265:04crwdnd2935265:02crwdnd2935265:02crwdne2935265:0
    • After pressing the yellow tab, the battery should loosen.

    • Slowly pull the battery completely out.

  5. Nikon Coolpix AW130 Motherboard Replacement, Front Panel: crwdns2935265:05crwdnd2935265:01crwdnd2935265:02crwdne2935265:0 Nikon Coolpix AW130 Motherboard Replacement, Front Panel: crwdns2935265:05crwdnd2935265:02crwdnd2935265:02crwdne2935265:0
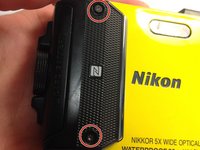
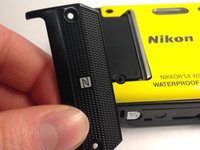
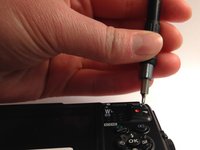
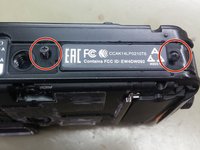
    • Using the T4 Torx Screwdriver, remove the 2, 4mm screws holding the N-Mark plate in place.

    • Carefully pull the plate off of the face.

  6. Nikon Coolpix AW130 Motherboard Replacement: crwdns2935265:06crwdnd2935265:01crwdnd2935265:02crwdne2935265:0 Nikon Coolpix AW130 Motherboard Replacement: crwdns2935265:06crwdnd2935265:02crwdnd2935265:02crwdne2935265:0
    • Using the metal spudger tool, pry the colored face from the camera body.

    • Avoid bending or scratching the front face.

  7. Nikon Coolpix AW130 Motherboard Replacement, Back Panel: crwdns2935265:07crwdnd2935265:01crwdnd2935265:02crwdne2935265:0 Nikon Coolpix AW130 Motherboard Replacement, Back Panel: crwdns2935265:07crwdnd2935265:02crwdnd2935265:02crwdne2935265:0
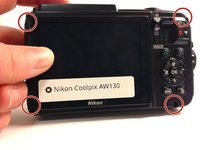
    • Using the T5 Torx screwdriver, remove all four 4mm screws.

  8. Nikon Coolpix AW130 Motherboard Replacement: crwdns2935265:08crwdnd2935265:01crwdnd2935265:01crwdne2935265:0
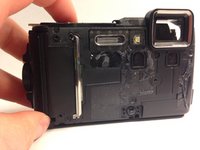
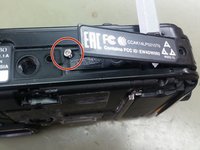
    • Using a Phillips #000 screwdriver, remove the single 3mm screw found inside the battery/charging compartment.

  9. Nikon Coolpix AW130 Motherboard Replacement: crwdns2935265:09crwdnd2935265:01crwdnd2935265:01crwdne2935265:0
    • Remove the upper cover (connected by glue) and unscrew the single Philips screw.

  10. Nikon Coolpix AW130 Motherboard Replacement: crwdns2935265:010crwdnd2935265:01crwdnd2935265:02crwdne2935265:0 Nikon Coolpix AW130 Motherboard Replacement: crwdns2935265:010crwdnd2935265:02crwdnd2935265:02crwdne2935265:0
    • Remove two Philips screws from the bottom cover, lift gently the cover and remove the single Philips screw under it.

  11. Nikon Coolpix AW130 Motherboard Replacement: crwdns2935265:011crwdnd2935265:01crwdnd2935265:01crwdne2935265:0
    • Carefully remove the back cover from the camera body.

  12. Nikon Coolpix AW130 Motherboard Replacement, Motherboard: crwdns2935265:012crwdnd2935265:01crwdnd2935265:02crwdne2935265:0 Nikon Coolpix AW130 Motherboard Replacement, Motherboard: crwdns2935265:012crwdnd2935265:02crwdnd2935265:02crwdne2935265:0
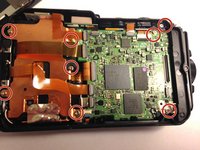
    • Using a Phillips #000 screwdriver, remove all 8, 4mm screws on the motherboard.

  13. Nikon Coolpix AW130 Motherboard Replacement: crwdns2935265:013crwdnd2935265:01crwdnd2935265:01crwdne2935265:0
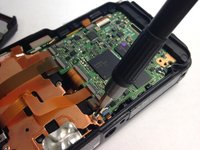
    • Using the nylon spudger tool, peel back the metallic plate.

    • A metal spudger is shown in the photo, but a nylon spudger should be used.

    • Do not rip the gold-colored ribbons.

  14. Nikon Coolpix AW130 Motherboard Replacement: crwdns2935265:014crwdnd2935265:01crwdnd2935265:01crwdne2935265:0
    • Using your fingers, carefully disconnect the connector ribbons.

    • Though various guides suggest using a plastic or metal spudger tool to disconnect the ribbons, this tool is liable to damage the connectors.

  15. Nikon Coolpix AW130 Motherboard Replacement: crwdns2935265:015crwdnd2935265:01crwdnd2935265:01crwdne2935265:0
    • Carefully remove the black piece on the lefthand side.

  16. Nikon Coolpix AW130 Motherboard Replacement: crwdns2935265:016crwdnd2935265:01crwdnd2935265:01crwdne2935265:0
    • On the remaining piece, desolder the labeled soldering points.

    • The soldering tool can get extremely hot. For soldering help, check out iFixit's guide for How to Solder and Desolder Connections.

  17. Nikon Coolpix AW130 Motherboard Replacement: crwdns2935265:017crwdnd2935265:01crwdnd2935265:01crwdne2935265:0
    • Flip the remaining piece over, careful not to rip any of the connecting wires.

  18. Nikon Coolpix AW130 Motherboard Replacement: crwdns2935265:018crwdnd2935265:01crwdnd2935265:01crwdne2935265:0
    • Desolder at the prescribed sites.

    • Remove the motherboard from the camera body.

    • The soldering tool can get extremely hot.

crwdns2915888:0crwdne2915888:0

To reassemble your device, follow these instructions in reverse order.

crwdns2935229:03crwdne2935229:0

Lauren Stepp

crwdns2935283:001/29/16crwdne2935283:0

1.251 crwdns2915208:0crwdne2915208:0

crwdns2935297:08crwdne2935297:0

crwdns2915084:0crwdne2915084:0

Western Carolina University, Team 1-4, Virtue Spring 2016 crwdns2935289:0Western Carolina University, Team 1-4, Virtue Spring 2016crwdne2935289:0

WCU-VIRTUE-S16S1G4

crwdns2931471:05crwdne2931471:0

crwdns2935297:016crwdne2935297:0

crwdns2917034:0crwdne2917034:0

Thanks for this guide.

I managed to open 2 of theses and swap the sensor-unit from one to another.

Unluckily the camera remains broken since one only shows a black picture - even though the sensor is alright an the other has a broken AF from a fall, I suppose...

I am certain with some silicone grease on the orange rubber the camera would still be waterproof.

Daniel Bardua - crwdns2934203:0crwdne2934203:0

crwdns2917038:0crwdne2917038:0

crwdns2936625:0crwdne2936625:0:

crwdns2936751:024crwdne2936751:0 0

crwdns2936753:07crwdne2936753:0 8

crwdns2936753:030crwdne2936753:0 34

crwdns2942667:0crwdne2942667:0 5,066