crwdns2933423:0crwdne2933423:0

Nikon Coolpix 995 LCD Replacement

crwdns2942213:0crwdne2942213:0

  1. Nikon Coolpix 995 LCD Replacement, LCD: crwdns2935265:01crwdnd2935265:01crwdnd2935265:02crwdne2935265:0 Nikon Coolpix 995 LCD Replacement, LCD: crwdns2935265:01crwdnd2935265:02crwdnd2935265:02crwdne2935265:0
    • Turn the lens/flash assembly 90 degrees, until you see the two Phillips #00 screws,

    • Remove the two screws with a Phillips #00 screwdriver.

    • Flip the flash so that you can access the remaining two screws. Remove these screws following the same method as before.

    • Refer to the second image to locate the second set of screws. The relevant screws are highlighted in red.

  2. Nikon Coolpix 995 LCD Replacement: crwdns2935265:02crwdnd2935265:01crwdnd2935265:01crwdne2935265:0
    • Flip the camera up-side down.

    • Remove the two Phillips #00 screws located near the battery compartment.

  3. Nikon Coolpix 995 LCD Replacement: crwdns2935265:03crwdnd2935265:01crwdnd2935265:01crwdne2935265:0
    • Open the memory card compartment cover.

    • You can now see four screws under the cover. Remove all four screws.

    • Refer to the image to locate the four screws. Make sure that you remove only the four screws identified in the image.

  4. Nikon Coolpix 995 LCD Replacement: crwdns2935265:04crwdnd2935265:01crwdnd2935265:02crwdne2935265:0 Nikon Coolpix 995 LCD Replacement: crwdns2935265:04crwdnd2935265:02crwdnd2935265:02crwdne2935265:0
    • Use your thumb to carefully lift the bottom side of the casing near the battery.

    • Pay attention to a cable located at the top of the assembly, as it is prone to breakage. Refer to the second image to locate the cable.

  5. Nikon Coolpix 995 LCD Replacement: crwdns2935265:05crwdnd2935265:01crwdnd2935265:01crwdne2935265:0
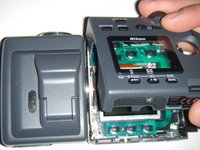
    • Use a spudger to flip the tabs that hold the screen.

    • Refer to the image for more details. The tabs are circled in red.

  6. Nikon Coolpix 995 LCD Replacement: crwdns2935265:06crwdnd2935265:01crwdnd2935265:01crwdne2935265:0
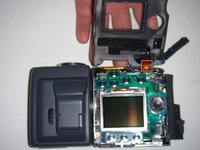
    • Carefully lift the LCD from the bottom. It should come out fairly easily.

crwdns2915888:0crwdne2915888:0

To reassemble your device, follow these instructions in reverse order.

Cory Layman

crwdns2935283:010/04/11crwdne2935283:0

89 crwdns2915208:0crwdne2915208:0

crwdns2935297:03crwdne2935297:0

crwdns2915084:0crwdne2915084:0

UW Stout, Team 1-5, Zhou Fall 2011 crwdns2935289:0UW Stout, Team 1-5, Zhou Fall 2011crwdne2935289:0

UWSTOUT-ZHOU-F11S1G5

crwdns2931471:05crwdne2931471:0

crwdns2935297:06crwdne2935297:0

crwdns2944067:00crwdne2944067:0

crwdns2917038:0crwdne2917038:0

crwdns2936625:0crwdne2936625:0:

crwdns2936751:024crwdne2936751:0 0

crwdns2936753:07crwdne2936753:0 0

crwdns2936753:030crwdne2936753:0 20

crwdns2942667:0crwdne2942667:0 2,305