crwdns2915892:0crwdne2915892:0
This guide showcases how to replace the focusing screen on the Nikon COOLPIX p7700 camera. Follow these 18 steps to ensure proper replacement of the camera's focusing lens.
crwdns2942213:0crwdne2942213:0
-
-
Turn camera to the left side and remove the two 4.3 mm black side screws using the Phillips #00 screwdriver.
-
Remove the side panel.
-
-
-
Open the touch screen, and remove the three 4.3 mm black screws inside using the Phillips #00 screwdriver.
These 3 screws are longer than the others! Store them separately.
If you fix the p7800, the right down screw is different, its not a countersink, its flush.
-
-
-
Remove the 4.3 mm black screw on top of the camera, right above where the screen folds out. Use the Phillips #00 screwdriver.
-
-
-
Remove the two 4.3 mm black screws on the right side of the camera using the Phillips #00 screwdriver.
-
-
-
Remove the 4.3 mm black screws on the bottom of the camera using the Phillips #00 screwdriver.
-
-
-
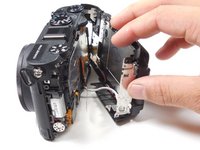
Begin separating the camera into two parts.
a. Remove plastic plate between main body & LCD screen (where the thumb is in the pic).
b. Remove one screw (the only one) found behind the plastic plate.
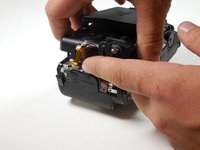
This is the most scary moment as I did not know how to remove the orange flat cable. I would not come off and I broke off a little plastic. Somehow it came off accidentally as I moved the backcover. The cable was later re- inserted with care, from the right towards the left via a very thin slit.
"It is okay to remove the orange ribbon. This will be easily put back into place when re-assembling." Easily put back? Yeah, right (not!). It is actually anything but easy. I managed doing it after several attempts, but it was more by luck than skill. The ribbon is tiny, the contacts even more so and the slot into which the ribbon must be reinserted - I cannot even see it properly. A pair of small tweezers is a must for this step.
-
-
-
-
Remove the back casing.
It would be better to lift the little white adhesive tape so that the backcover could be worked on.
Step 4: I had to remove the blank screw as well..
Hi,
Thank you for your most professional advice.
How can I clean the sensor??
-
-
-
Once the back casing is off, locate the 4.3 mm silver screw near the top of the camera and remove it using the Phillips #00 screwdriver.
-
-
-
Remove the metal sheet from the camera.
-
-
-
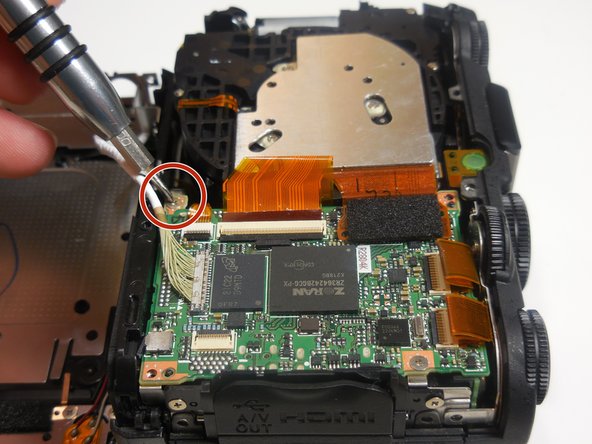
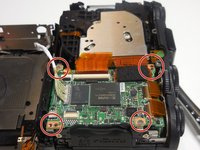
Remove the four 4.3 mm silver screws located on the ends of the chip using the Phillips #00 screwdriver.
-
-
-
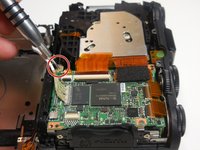
Remove the two 4.3 mm silver screws on the far right side of the camera using the Phillips #00 screwdriver.
-
-
-
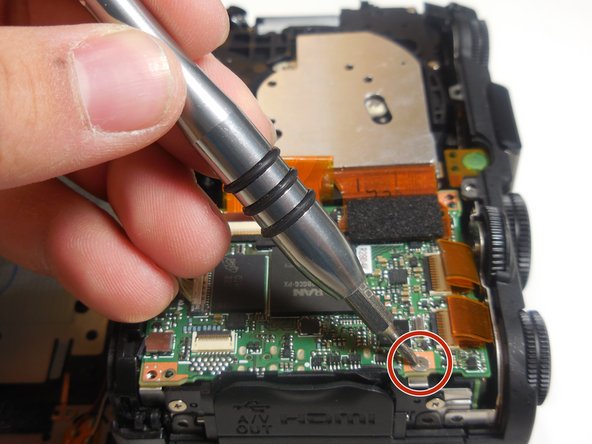
Lift and detach connector from board as shown.
-
-
-
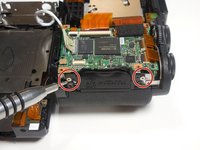
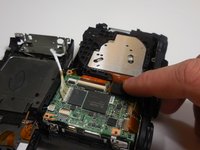
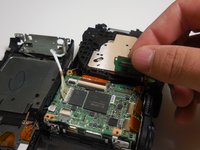
Remove the board from the camera to locate lens opening
-
-
-
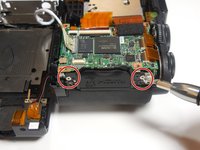
Remove the 4.3 mm screws from the metal sheet using the Phillips #00 screwdriver.
-
-
-
Lift the metal sheet up and out of the camera.
-


To reassemble your device, follow these instructions in reverse order.
To reassemble your device, follow these instructions in reverse order.
crwdns2935221:0crwdne2935221:0
crwdns2935229:02crwdne2935229:0
crwdns2915084:0crwdne2915084:0

Colorado Springs, Team 2-7, Panko Spring 2015 crwdns2935289:0Colorado Springs, Team 2-7, Panko Spring 2015crwdne2935289:0
UCCS-PANKO-S15S2G7
crwdns2931471:03crwdne2931471:0
crwdns2935297:010crwdne2935297:0
crwdns2947412:02crwdne2947412:0
Hey I have a P7700 that shows a lens error and focusing doesn't work.
I took it apart and removed the focus motor and it seems that the focus lens moves as it should but when turning it on the picture will be blurry for a second until the lens error comes up.
What issue is fixed by replacing this focus lens?
Hello.
Do you have a service procedure to fix the exposure dial in this camera?