crwdns2933423:0crwdne2933423:0
crwdns2947577:0crwdnd2947577:0crwdne2947577:0

Nexus S Motherboard Replacement

crwdns2942213:0crwdne2942213:0

    1. Nexus S Motherboard Replacement, Rear Panel: crwdns2935265:01crwdnd2935265:01crwdnd2935265:01crwdne2935265:0
      • Gently insert a plastic opening tool between the rear panel and the inner rear frame near the rear-facing camera.

      • Use your plastic opening tool to pry up the rear case around the perimeter of the Nexus S.

      crwdns2952109:0crwdne2952109:0

      crwdns2917038:0crwdne2917038:0

    2. Nexus S Motherboard Replacement: crwdns2935265:02crwdnd2935265:01crwdnd2935265:01crwdne2935265:0
      • Remove the rear panel from the Nexus S.

      crwdns2952109:0crwdne2952109:0

      crwdns2917038:0crwdne2917038:0

    1. Nexus S Motherboard Replacement, Battery: crwdns2935265:03crwdnd2935265:01crwdnd2935265:01crwdne2935265:0
      • Using the edge of a plastic opening tool, lift the battery from the end closest to the headphone jack.

      • Remove the battery from the Nexus S.

      crwdns2952109:0crwdne2952109:0

      crwdns2917038:0crwdne2917038:0

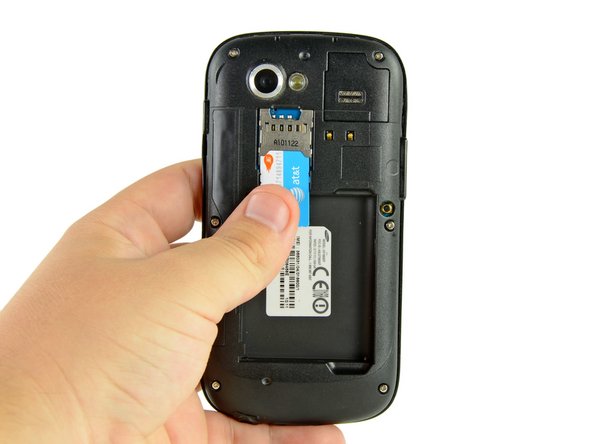
    1. Nexus S Motherboard Replacement, SIM Card: crwdns2935265:04crwdnd2935265:01crwdnd2935265:02crwdne2935265:0 Nexus S Motherboard Replacement, SIM Card: crwdns2935265:04crwdnd2935265:02crwdnd2935265:02crwdne2935265:0
      • Use your thumb to slide the SIM card downwards from the SIM card slot.

      • Remove the SIM card.

      crwdns2952109:0crwdne2952109:0

      crwdns2917038:0crwdne2917038:0

    1. Nexus S Motherboard Replacement, Rear Inner Frame: crwdns2935265:05crwdnd2935265:01crwdnd2935265:01crwdne2935265:0
      • Remove the six Phillips screws securing the rear inner frame to the inner case.

      crwdns2952109:0crwdne2952109:0

      crwdns2917038:0crwdne2917038:0

    2. Nexus S Motherboard Replacement: crwdns2935265:06crwdnd2935265:01crwdnd2935265:01crwdne2935265:0
      • Insert the flat edge of a plastic opening tool in between the rear inner frame and the top left corner of the Nexus S.

      • Pry the opening tool upwards to pop the top right corner from the clips securing it to the inner assembly.

      crwdns2952109:0crwdne2952109:0

      crwdns2917038:0crwdne2917038:0

    3. Nexus S Motherboard Replacement: crwdns2935265:07crwdnd2935265:01crwdnd2935265:02crwdne2935265:0 Nexus S Motherboard Replacement: crwdns2935265:07crwdnd2935265:02crwdnd2935265:02crwdne2935265:0
      • Insert the plastic opening tool to the right of the power button.

      • Slide the plastic opening tool downwards along the perimeter of the Nexus S to release the clips on the right side.

      crwdns2952109:0crwdne2952109:0

      crwdns2917038:0crwdne2917038:0

    4. Nexus S Motherboard Replacement: crwdns2935265:08crwdnd2935265:01crwdnd2935265:02crwdne2935265:0 Nexus S Motherboard Replacement: crwdns2935265:08crwdnd2935265:02crwdnd2935265:02crwdne2935265:0
      • In the same manner as previously described, release the bottom clips located near the bottom of the Nexus S.

      crwdns2952109:0crwdne2952109:0

      crwdns2917038:0crwdne2917038:0

    5. Nexus S Motherboard Replacement: crwdns2935265:09crwdnd2935265:01crwdnd2935265:01crwdne2935265:0
      • Insert and pry the plastic opening tool to release the final clip securing the rear inner frame to the inner assembly.

      crwdns2952109:0crwdne2952109:0

      crwdns2917038:0crwdne2917038:0

    6. Nexus S Motherboard Replacement: crwdns2935265:010crwdnd2935265:01crwdnd2935265:01crwdne2935265:0
      • Lift and remove the rear inner frame from the Nexus S.

      crwdns2952109:0crwdne2952109:0

      crwdns2917038:0crwdne2917038:0

    1. Nexus S Motherboard Replacement, Motherboard: crwdns2935265:011crwdnd2935265:01crwdnd2935265:01crwdne2935265:0
      • Disconnect the following cables from their respective sockets on the motherboard:

      • Headphone jack cable

      • Digitizer cable connector

      • Camera/SIM board connector

      crwdns2952109:0crwdne2952109:0

      crwdns2917038:0crwdne2917038:0

    2. Nexus S Motherboard Replacement: crwdns2935265:012crwdnd2935265:01crwdnd2935265:03crwdne2935265:0 Nexus S Motherboard Replacement: crwdns2935265:012crwdnd2935265:02crwdnd2935265:03crwdne2935265:0 Nexus S Motherboard Replacement: crwdns2935265:012crwdnd2935265:03crwdnd2935265:03crwdne2935265:0
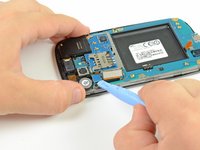
      • Insert the flat edge of a plastic opening tool underneath the headphone jack connector and pry upwards.

      • Make sure to pry on the connector and not the socket itself. Prying the socket may cause severe damage.

      • Repeat the procedure for the digitizer and rear camera/SIM board connectors.

      crwdns2952109:0crwdne2952109:0

      crwdns2917038:0crwdne2917038:0

    3. Nexus S Motherboard Replacement: crwdns2935265:013crwdnd2935265:01crwdnd2935265:01crwdne2935265:0
      • Remove the three Phillips screws securing the motherboard to the front display assembly.

      crwdns2952109:0crwdne2952109:0

      crwdns2917038:0crwdne2917038:0

    4. Nexus S Motherboard Replacement: crwdns2935265:014crwdnd2935265:01crwdnd2935265:02crwdne2935265:0 Nexus S Motherboard Replacement: crwdns2935265:014crwdnd2935265:02crwdnd2935265:02crwdne2935265:0
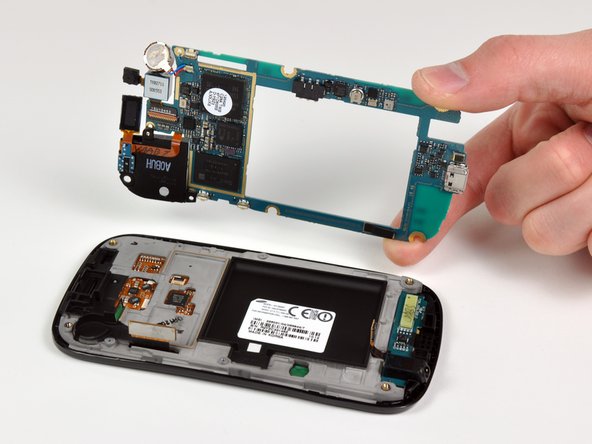
      • Wedge the plastic opening tool near the bottom right corner of the motherboard and pry upwards to dislodge it from its recess.

      • Lift and remove the motherboard.

      crwdns2952109:0crwdne2952109:0

      crwdns2917038:0crwdne2917038:0

crwdns2915888:0crwdne2915888:0

To reassemble your device, follow these instructions in reverse order.

crwdns2935221:0crwdne2935221:0

crwdns2935229:015crwdne2935229:0

Walter Galan

711.026 crwdns2915208:0crwdne2915208:0

crwdns2935297:01.203crwdne2935297:0

crwdns2947412:00crwdne2947412:0

crwdns2917038:0crwdne2917038:0

crwdns2936625:0crwdne2936625:0:

crwdns2936751:024crwdne2936751:0 3

crwdns2936753:07crwdne2936753:0 40

crwdns2936753:030crwdne2936753:0 79

crwdns2942667:0crwdne2942667:0 14,763