crwdns2933423:0crwdne2933423:0

Nexus 7 Rear Panel Replacement

crwdns2942213:0crwdne2942213:0

  1. Nexus 7 Rear Panel Replacement, Rear Panel: crwdns2935265:01crwdnd2935265:01crwdnd2935265:01crwdne2935265:0
    • In the following steps you will release the clips (highlighted in red) along the perimeter of the Nexus 7's rear panel.

    • Do not use excessive force while prying the clips. They can be easily broken.

  2. Nexus 7 Rear Panel Replacement: crwdns2935265:02crwdnd2935265:01crwdnd2935265:02crwdne2935265:0 Nexus 7 Rear Panel Replacement: crwdns2935265:02crwdnd2935265:02crwdnd2935265:02crwdne2935265:0
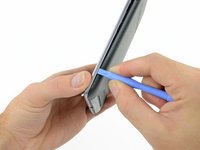
    • Gently insert a plastic opening tool near the top of the Nexus 7 between the rear panel and the front panel assembly.

    • Carefully run the plastic opening tool along the top edge to pry the rear panel away from the front panel assembly of the Nexus 7.

  3. Nexus 7 Rear Panel Replacement: crwdns2935265:03crwdnd2935265:01crwdnd2935265:03crwdne2935265:0 Nexus 7 Rear Panel Replacement: crwdns2935265:03crwdnd2935265:02crwdnd2935265:03crwdne2935265:0 Nexus 7 Rear Panel Replacement: crwdns2935265:03crwdnd2935265:03crwdnd2935265:03crwdne2935265:0
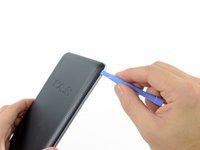
    • Insert the plastic opening tool between the rear panel and the front panel assembly near the power button and pry up at several points along the right edge of the Nexus 7.

  4. Nexus 7 Rear Panel Replacement: crwdns2935265:04crwdnd2935265:01crwdnd2935265:03crwdne2935265:0 Nexus 7 Rear Panel Replacement: crwdns2935265:04crwdnd2935265:02crwdnd2935265:03crwdne2935265:0 Nexus 7 Rear Panel Replacement: crwdns2935265:04crwdnd2935265:03crwdnd2935265:03crwdne2935265:0
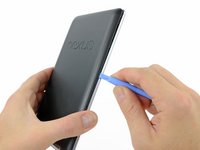
    • Pry up the rear panel along the left edge using the method described in previous steps.

  5. Nexus 7 Rear Panel Replacement: crwdns2935265:05crwdnd2935265:01crwdnd2935265:02crwdne2935265:0 Nexus 7 Rear Panel Replacement: crwdns2935265:05crwdnd2935265:02crwdnd2935265:02crwdne2935265:0
    • Gently lift and remove the rear panel up off the front panel assembly.

crwdns2915888:0crwdne2915888:0

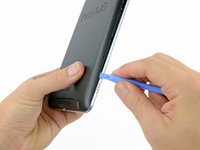
To reassemble your device, follow these instructions in reverse order.

crwdns2935229:020crwdne2935229:0

Walter Galan

694,674 crwdns2915208:0crwdne2915208:0

crwdns2935297:01,203crwdne2935297:0

crwdns2944067:00crwdne2944067:0

crwdns2917038:0crwdne2917038:0

crwdns2936625:0crwdne2936625:0:

crwdns2936751:024crwdne2936751:0 4

crwdns2936753:07crwdne2936753:0 11

crwdns2936753:030crwdne2936753:0 40

crwdns2942667:0crwdne2942667:0 52,319