crwdns2933423:0crwdne2933423:0

Nexus 6P Daughterboard/Charging Port Replacement

crwdns2942213:0crwdne2942213:0

crwdns2936621:0crwdne2936621:0

  1. Nexus 6P Daughterboard/Charging Port Replacement, Daughterboard/Charging Port: crwdns2935265:01crwdnd2935265:01crwdnd2935265:02crwdne2935265:0 Nexus 6P Daughterboard/Charging Port Replacement, Daughterboard/Charging Port: crwdns2935265:01crwdnd2935265:02crwdnd2935265:02crwdne2935265:0
    • Remove SIM card tray.

  2. Nexus 6P Daughterboard/Charging Port Replacement: crwdns2935265:02crwdnd2935265:01crwdnd2935265:03crwdne2935265:0 Nexus 6P Daughterboard/Charging Port Replacement: crwdns2935265:02crwdnd2935265:02crwdnd2935265:03crwdne2935265:0 Nexus 6P Daughterboard/Charging Port Replacement: crwdns2935265:02crwdnd2935265:03crwdnd2935265:03crwdne2935265:0
    • Heat up back glass panel.

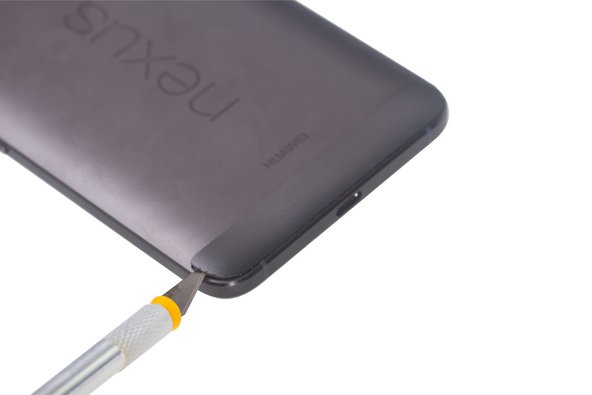
    • Use hobby knife to open a gap and cut the fierce sticker underneath rear glass panel.

    • The back glass panel is easily shattered and the adhesive underneath is fierce. So be careful to pry this part.

  3. Nexus 6P Daughterboard/Charging Port Replacement: crwdns2935265:03crwdnd2935265:01crwdnd2935265:03crwdne2935265:0 Nexus 6P Daughterboard/Charging Port Replacement: crwdns2935265:03crwdnd2935265:02crwdnd2935265:03crwdne2935265:0 Nexus 6P Daughterboard/Charging Port Replacement: crwdns2935265:03crwdnd2935265:03crwdnd2935265:03crwdne2935265:0
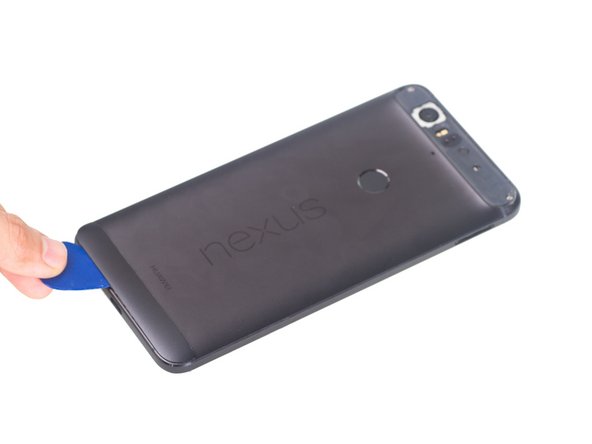
    • Heat up bottom plastic panel.

    • Use hobby knife to open a gap and insert guitar picks to cut adhesive underneath.

  4. Nexus 6P Daughterboard/Charging Port Replacement: crwdns2935265:04crwdnd2935265:01crwdnd2935265:03crwdne2935265:0 Nexus 6P Daughterboard/Charging Port Replacement: crwdns2935265:04crwdnd2935265:02crwdnd2935265:03crwdne2935265:0 Nexus 6P Daughterboard/Charging Port Replacement: crwdns2935265:04crwdnd2935265:03crwdnd2935265:03crwdne2935265:0
    crwdns2935267:0crwdne2935267:0
    Heavy-Duty Suction Cups (Pair)
    $14.95
    crwdns2942207:0crwdne2942207:0
    • Twist off 6 Phillips screws together.

    • Insert guitar picks and plastic opening tool to separate front assembly from back cover.

    • Attention: These two parts fit tightly.It is the toughest part to separate. You can also try using heavy-duty suction cup to disassemble them.

  5. Nexus 6P Daughterboard/Charging Port Replacement: crwdns2935265:05crwdnd2935265:01crwdnd2935265:03crwdne2935265:0 Nexus 6P Daughterboard/Charging Port Replacement: crwdns2935265:05crwdnd2935265:02crwdnd2935265:03crwdne2935265:0 Nexus 6P Daughterboard/Charging Port Replacement: crwdns2935265:05crwdnd2935265:03crwdnd2935265:03crwdne2935265:0
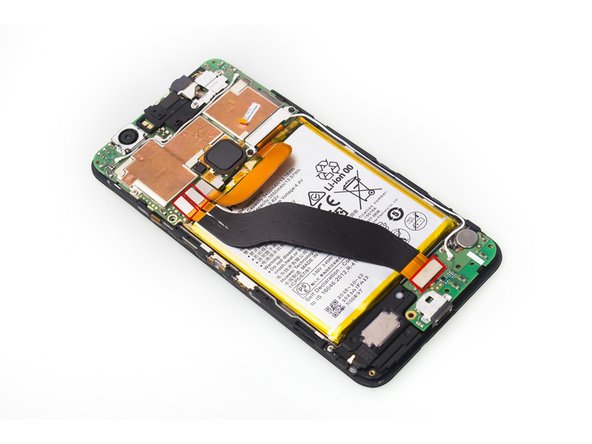
    • Unscrew one Phillips screw.

    • Remove metal bracket securing flex contactors.

    • Release 3 flex contactors and remove it .

    • This flex is used to connect motherboard and daughterboard.

  6. Nexus 6P Daughterboard/Charging Port Replacement: crwdns2935265:06crwdnd2935265:01crwdnd2935265:03crwdne2935265:0 Nexus 6P Daughterboard/Charging Port Replacement: crwdns2935265:06crwdnd2935265:02crwdnd2935265:03crwdne2935265:0 Nexus 6P Daughterboard/Charging Port Replacement: crwdns2935265:06crwdnd2935265:03crwdnd2935265:03crwdne2935265:0
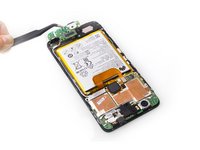
    • Disconnect signal cable contactor and twist off one Phillips screw.

    • Remove daughterboard.

  7. Nexus 6P Daughterboard/Charging Port Replacement: crwdns2935265:07crwdnd2935265:01crwdnd2935265:01crwdne2935265:0
    • Here is the daughterboard. The charging port is attached here.

crwdns2915888:0crwdne2915888:0

To reassemble your device, follow these instructions in reverse order.

crwdns2935229:023crwdne2935229:0

Witrigs

crwdns2935283:011/24/15crwdne2935283:0

69 451 crwdns2915208:0crwdne2915208:0

crwdns2935297:0378crwdne2935297:0

crwdns2944067:013crwdne2944067:0

Do you know the part number of the daughterboard, or where I can buy a replacement?

Ezequiel Arneodo - crwdns2934203:0crwdne2934203:0

Global Direct Parts seems to have OEM parts. Don't go with eBay and stuff. The ones I saw are cheap knockoffs that don't work right (even when they say OEM).

Sunny Wu -

Do we need more adhesive or everything will stick back with heat?

Will Taylor - crwdns2934203:0crwdne2934203:0

I have replaced my battery. You most likely will need more adhesive. I just plan on using some double sided tape as the original glue was too tough in case I have to open it again. You can just buy a case for it after. It will keep everything nice and tight on there.

Sunny Wu -

To replace the daugherboard, step #5 can largely be skipped - just remove the cable from the daugherboard and move on to step #6. This phone is a true PITA to take apart.

ashlux - crwdns2934203:0crwdne2934203:0

crwdns2917038:0crwdne2917038:0

crwdns2936625:0crwdne2936625:0:

crwdns2936751:024crwdne2936751:0 0

crwdns2936753:07crwdne2936753:0 2

crwdns2936753:030crwdne2936753:0 6

crwdns2942667:0crwdne2942667:0 18,186