
Nexus 6 Battery Replacement
crwdns2944107:0crwdnd2944107:0Marina Moorecrwdnd2944107:0crwdnd2944107:0crwdnd2944107:011crwdnd2944107:0crwdne2944107:0
crwdns2944111:0Mud 25, 2024crwdne2944111:0
crwdns2915892:0crwdne2915892:0
crwdns2942287:0crwdne2942287:0If your phone won’t turn on or stay on, even after charging it, you may consider replacing the battery. This guide will show you how to remove the battery of the Nexus 6 in order to install a new one.
If your battery is swollen, take appropriate precautions.
crwdns2942213:0crwdne2942213:0
crwdns2943213:0crwdne2943213:0


crwdns2943215:0crwdne2943215:0


crwdns2944105:0crwdne2944105:0

-
-
With a SIM card eject tool (a paperclip will work as well), push down on the hole at the top of the phone until the SIM card holder releases. This should not take much pressure.
-
Remove the SIM card and the SIM card holder.
-
-
crwdns2935267:0crwdne2935267:0iOpener$14.99
-
Lay out a soft cloth on your workspace to prevent scratching the screen in this and future steps.
-
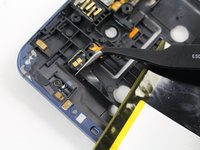
Pry open the back casing using the soft plastic opening pick.
-
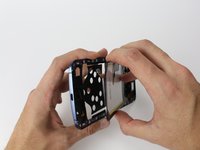
Carefully pull the back casing apart from the rest of the phone with your hands. Because the casing is glued to the rest of the phone, this step may require some force. Don't be alarmed if the casing flexes a bit.
-
-
-
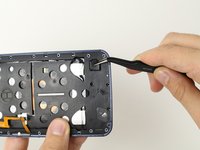
Remove the twenty-two 2.3 mm T3 Torx screws with the T3 Torx Screwdriver.
-
-
crwdns2935267:0crwdne2935267:0Tweezers$4.99
-
With tweezers, remove the rubber protector on the lower part of the phone.
-
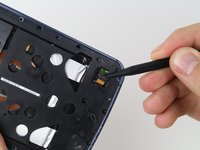
Disconnect the battery connector by gently prying it straight up with a spudger, on the side opposite the cable.
-
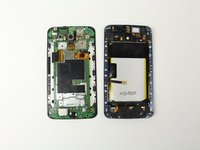
Completely separate the battery side from the motherboard side by gently pulling the sides apart with your hands.
-
-
crwdns2935267:0crwdne2935267:0Tweezers$4.99
-
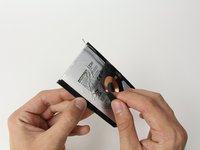
With your hands, pull the battery away from the rest of the casing.
-
Using tweezers, unplug the battery connector. Pry up underneath the hard backing plate, taking care to not peel the cable off of the backing plate.
-
Measure the location of the charging coil on the old battery and transfer those measurements to the new battery. Carefully peel off the charging coil.
-
Transfer the charging coil to the new battery. For the four-wire connector on the other side, measure the location of the contacts/pins on the phone itself and transfer it to the backside of the battery.
-
-
-
Plug in the charging cable. If you get the charging symbols but cannot turn on the phone, ensure that the side buttons are connected. Peel up the rubber cover plug and push the connector into the receptacle.
-
If wireless charging is not working, ensure you're trying it with a phone that is fully booted and operational.
-
If wireless charging is still not working, take it all apart again and carefully transfer the location of the four pins on the phone side to the charging coil connector on the other side.
-
If the two sides are difficult to close and screw back together, bend the battery so that it is more or less curved - matching the previous battery. There shouldn't be any force necessary to keep the halves closed together.
-
If the glue on the back cover is weak, try warming the adhesive with a hair dryer before reinstalling. You can purchase replacement covers (with new adhesive) that are rather inexpensive.
-


To reassemble your device, follow these instructions in reverse order.
After completing this guide, calibrate your newly-installed battery.
To reassemble your device, follow these instructions in reverse order.
After completing this guide, calibrate your newly-installed battery.
crwdns2935221:0crwdne2935221:0
crwdns2935229:0107crwdne2935229:0
crwdns2947821:0crwdne2947821:0
crwdns2947823:0crwdne2947823:0


crwdns2915084:0crwdne2915084:0

Cal Poly, Team 70-3, Forte Winter 2015 crwdns2935289:0Cal Poly, Team 70-3, Forte Winter 2015crwdne2935289:0
CPSU-FORTE-W15S70G3
crwdns2931471:04crwdne2931471:0
crwdns2935297:030crwdne2935297:0
crwdns2947412:043crwdne2947412:0
There's a *lot* of glued down parts. Don't force them apart. Use a hot-water bottle or similar to loosen the glue. Good luck!
Intriguing. I bought my nexus 6 thinking I would never be able to replace the battery, but this looks doable, albeit not without some risk of damaging the device.
Hi David, Im in the same process and what I found is a lot of glue on the back, rather than that is fairly easy. :)
My battery side board has been broken! It did not hurt to work properly, but you guys MUST be careful of taking it apart!
Also T3 screws are so weak, Unscrew carefully and use a good T3 screw drivers otherwise they will be stripped!
half of mine stripped, possibly from using cheap drivers that came with the replacement battery. now i have a new battery that I cannot use because I cant get the remaining screws out. It didnt help that the youtube video I watched didnt have me using the correct size driver. He had me use a T4…Plus I believe someone already tried to get the screws out before. It was a used phone when I got it. The video I watched also had me disconnect the flex cable and now I cannot get it to connect good again so the power button and volume buttons are messing up and sometimes the phone wont charge. Which, again I think the cable was messed with prior. I am thinking a new battery was never my issue to begin with. I am wondering if it was a bad cable all along. This simple project turned into a huge headache for me. I wish I would have seen the 2nd video I found first because he did it without disconnecting the flex cable.
And +1 for Terence Eden's comment.
ONLY T4 Screwdriver
I have trouble getting through the day with my 2 year old battery. Will a fresh one help or is it the phone?
It sounds like it might a combination of both. Make sure you're updated to the latest Android software and then from there it may also be useful to look into a new battery. 2 years is quite a high amount of cycles for a phone battery and in a phone that large, it requires a lot of power. So I would suggest a software update and a battery replacement and I'm almost certain you will see a usage time increase!
Hello,
Do we need to replace the rear cover by a new one once the old one has been unglued?
Thank you!
Hi Oliver.
I've just followed this guide and the rear cover fits back fine. It'll help if you warm the cover so the glue rebonds. I have mine in a tight fitting case, so this'll help as well.
Thank you for your answer Matt :)
What a crock, the case is glued together!
I'd like to see a full video of the process by the 'Marina Moore (and 7 other contributors)'.
This not an easy job as depicted by the process described above.
As explained to me the glue softening process takes 20-30 minutes and is required twice because the mother board is also glued to the case.
If you are in Orange County, CA, Call Android-Genius in Newport Beach. Not cheap but better it's done by a pro.
Only the back plate was glued quite so much, and it didn't take too much time to remove.
The only other place where glue was an issue for me, was when the double stick tape stayed on the battery, rather than it staying on the induction coil. But I was able to carefully peel it off to reuse.
I watched a couple youtube videos, but other than getting a visual of the process, I would never suggest any of them as they all skipped steps or left things unsaid. This tutorial covered most things and was all I needed to finish the job.
I'm just a housewife by the way, although I admit not typical. I'm self-taught and have built two computers (one is a media center pc). But I'd never worked on a phone before. I think if someone is confident, and very careful, this is very doable.
Hardest part was getting the back cover off. Other than that it was pretty easy. Though the adhesive came off the contact for what I assume is wireless charging and now that doesn't work. I can probably go back in and align it properly but for now it's not that big of deal. Word of advice, unplug the battery connector before removing the battery. I kind of ripped it out accidentally and thought I'd torn it but it went back in no problem. Hoping the new battery will help my random reboots. My old one was a little warped. Thanks for the guide!
Screw are fine, it's just a mistake in the guide - you need T4 screwdriver!
Thanks so much to everyone who contributed to this guide. I've never even rooted my phone, let alone disassembled it.
Everything went very smoothly and my new battery has been working just great for over a month.
I love my Nexus 6, especially since Nougat was made available. Now that the OS will last another two years, I have a battery to match (and a spare, too) thanks to this helpful guide. Thank you all.
A couple tips for readers:
* I used a microwavable heating pad to loose the glue on my phone's case back. It took 10 minutes.
* When you remove the connector in Step 4 (the one under the rubber flap), it might not be apparent that it slid out; it did not lift straight up. To reattach, lay the two halves flat beside each other, then slide together. I broke a tiny corner of the clip trying to push it down (still holds just fine).
* Due to the case's curve, the screws may not realign if you work in a circle (clockwise etc). Try reattaching them by alternating in the corners and mid-sides to start.
Thanks a lots, I was confused about my lovely nexus 6. I,m going to follow yr advise.
Thanks again.
I have followed the exact steps. Everything went smoothly until I try to turn on the phone. The phone won’t charge or boot anymore even with the old battery. I checked every connector. Any advice?
Hello,
Like you, I followed the step and now my phone won’t Start…
When I charge it, I see the phone which is saying to me that he’s in charge, but that’s all. Even after a night of charge the phone don’t start.
Any ideas everyone ?
You must reconnect the power button to the motherboard. See my comment further down the thread.
I Use T4 driver~ thx battery change
+1 on the T4 screwdriver. I did fine with T3, but only because I have a really good screwdriver set. I tried T4 after reading this guide and indeed it fits way better.
One little note - when starting to pry, start with bottom right (as the screen is facing you) corner. Be careful not to thrust your plunger into the middle, where the tiny mic hole is - the plastic body has a tiny bit of oval padding, probably to soften the mic sounds and prevent the case from covering the hole, if you go too hard you may strip that piece of padding.
I’m about to attempt this. What have others used for replacement adhesive? Some sort of 2 sided tape under the battery? What about replacement adhesive to hold the back case on again?
Maybe it’s because I got my phone when it first came out, but mine definitely had T3 screws. Make sure your screwdriver bits are good quality, I stripped a cheap bit aster 5 screws. Also, I did rip the thing for the wireless charging that wraps around the batters when pulling the back cover off. Make sure whatever you are sticking in there to peel the back cover off is between the cover and the plastic back, and not between the plastic back and the battery.
[|I was having trouble removing 3 screws and I ended up drill it to open. I broke the plastic cover and other connection came lose. I put everything together as best I could. My phone did not turn on after I put everything together. I put it on charge and I am hoping for the best. I used new battery and T 3 screw driver from ifixit.]
Update: After charging the phone for few hours it did not turn on. I opened the phone and re-check everything and no luck.
Tips from doing this once.
1. Make sure you have the right tools. T3 worked for me. But T3 was not the right torx size included in the free tools that came with the EZ30 battery kit I bought (Ebay vendor)
2. If you keep your Nexus 6 in a case and/or if it gets hot a lot in the past, then you will have very sticky cover removal, and possibly battery coil sticks as well. Be patient, and use plastic tools with sharp edges to get the initial ribbon edges, and slowly peel the rest.
For those who have completed this process, but cannot get their phone to turn on: The guide omits a crucial step in reassembling the phone - disconnecting and reconnecting your power button.
Short version: In the upper left corner of the phone (to left of rear facing camera), there is a black rubber boot. Pry this boot up, and press the connector there into place on the motherboard. Test phone now - power and volume buttons should work. Replace boot and reassemble phone.
Longer Version: Please look at the photo in Step 3 for reference. See the ribbon cable in the upper left part of the phone? This cable goes to the power and volume buttons. In the upper left, you can see the cable go under a black boot like the battery cable. Also like the battery cable, this ribbon cable for the power and volume buttons must be pressed back onto its connection on the motherboard.
For more on taking apart and reassembling this phone (including more disassembly than is necessary to replace the battery), see this video.
Made an account just to say this.
Thank you so much Robert. I couldn’t for the life of me figure out why my phone won’t boot despite seeing the charging indicator on the screen. You’ve saved this guy hours of troubleshooting. :)
dan t -
Any comments on how to position the charging coil contacts on the new battery? I did my best, fully extending the ribbon cable and making sure it was straight. Not sure if it works or not - it didn’t work, but then again, it didn’t work before I replaced the battery so it may be something else, or the charger.
Otherwise it was easy enough. Hardest part was getting the back cover off, especially where it was stuck to the flexible parts of the chassis and at risk of tearing a ribbon cable. The back certainly flexed quite a lot in the process, but once off it returned to its original shape, and was easily re-installed. Didn’t seem to stick on as well as the original adhesion; perhaps some thin 2-sided sticky tape would help if you keep your phone “naked” but mine is in a case so I’m less concerned about how well the back sticks.
Thanks for a great guide, and for it NOT being a video without written instructions and still photos (as many are). A video as a supplement is great, but as the only reference, it sucks.
You can buy replacement charging coils for cheap. I posted a comment after yours describing how to line up the charging coil’s connector on the backside of the battery.
Several items were missing in the instructions and that cost me a lot of time.
Step 4: There are TWO (2) plugs and connectors to be removed. NEITHER are ZIF connectors. They don’t have that flip-up gate and ribbon. They are both plug and receptacle. The one not shown is for the buttons on the side. To remove both connectors, pry up underneath them.
Step 5: The connector removed with tweezers is glued to a backing plate. Use the tweezers to pry under the backing plate. If you pull up on the wire you might peel the connector off of the backing plate.
Step 5: Removing and replacing the charging coil is not described sufficiently. The four-wire connector that faces inside the phone must be correctly positioned and the batteries do not have guides or markings. I used a post-it note as a tape measure. On the phone side of things, paste the note’s sticky strip at the edge of the bottom and run the strip up to and besides the pins for the connector. Mark both rows of pins with a pencil. Repeat the same measurement from the side edge. Transfer those measurements to the battery holder assembly, making a hash sign (#) marking the future position of the four pins. Then stick the connector to the battery, placing the connector pads at the four intersections of the hash sign.
Step 2: There is a plastic “cage” for the battery underneath the glued cover. Ensure that you’re prying between the cage and the back cover. The cover is very thin and it should be removed with nothing stuck to it except adhesive. The ribbon cable for the side buttons can get stuck there too. Work on the side away from the buttons first so that you can see that ribbon cable and not damage it.
Step 6: Use a hair dryer to heat up the back cover adhesive before sticking it back on. If it is weak you can either use a phone case or buy a replacement peel-and-stick back cover.
I bought a replacement battery from Amazon and it came with a great set of small torx screwdrivers. My screws were definitely all T4
Step 3: All the screws are black and there are exactly 22. Do not remove the silver screw near the buttons.
re the Torx screws and 3 or 4 I bought a set that only went down to 4 and it was fine. I am UK.
The middle picture in step 4 was awkward. The plastic bit came off on mine and I ended up separating the front and back just enough to get something in there and push the clip up. This was the only way I could do that step.
For the charging coil placement - visible marks were left where the arm that looped around to the back was stuck. And I stacked the old battery on top of the new battery and lined up the charging coil with the old battery, a family member then slid it out of the way and this worked easier than measuring etc.
The battery connector in step 5 was very solidly in place. I had to focus on the right hand side of the connector as it is shown in the picture and this is very well seated by the adjacent screw hole. Keep your nerve, its quite firmly on there and took some minutes to get off.
No major issues through this one
I have this phone and my daughter has this phone. I just replaced her battery. Stripped 3 of the T3 screws (my bad). Ended up being able to yank the battery out the chargeport end between black plastic and screen. I’m really surprised it worked and I didn’t destroy the phone.
I didn’t care for the part where you had to pull off the capacitor and reattach it to the new battery.
Fantastic guide. Enormous thanks to Marina Moore, iFixit, and commenters. Everything went fine here. Notes: Plastic camera lens cover came off with the back, thanks to strong adhesive nearby (only noticed when camera didn’t work, wouldn’t even open app, and back cover slightly seemed off, bulged; managed to get unstuck and place correctly, before back cover, camera now works magically). Used a T4 driver (not T3), fit perfect, no screw problems (using cheap kit, Inlife 81-part, 10-20 USD). Qi wireless parts are a total PITA, I just REMOVED ENTIRELY; couldn’t find much info on this, but seemingly no problems here. Battery seems to be fantastic, very noticeably longer runtime (purchased from iFixit, mfr LG Chem, almost identical to original). Awesome! My 2015-11 Nexus 6 is ready for another… decade?
Needs instructions about reconnecting power / volume cables at the middle connectors and at motherboard connector.
This Android Forums provided clue middle connector has is hinged and opens by lifting far side to allow reinserting power / volume tab.
There a cheaper batteries out there but replacement purchased here matched original battery. I am very pleased with iFixit replacement.