crwdns2933423:0crwdne2933423:0

Netgear Arlo Charging Port Replacement

crwdns2942213:0crwdne2942213:0

  1. Netgear Arlo Charging Port Replacement, Plastic Housing: crwdns2935265:01crwdnd2935265:01crwdnd2935265:01crwdne2935265:0
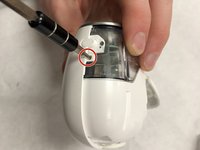
    • Remove the 2 (3.5mm) housing screws with a J0 screwdriver.

  2. Netgear Arlo Charging Port Replacement: crwdns2935265:02crwdnd2935265:01crwdnd2935265:02crwdne2935265:0 Netgear Arlo Charging Port Replacement: crwdns2935265:02crwdnd2935265:02crwdnd2935265:02crwdne2935265:0
    • Slide the unlocked battery cover forward to remove 2 (3.5mm) screws, that are behind the cover.

  3. Netgear Arlo Charging Port Replacement: crwdns2935265:03crwdnd2935265:01crwdnd2935265:01crwdne2935265:0
    • Open the battery cover and remove the 2 (3.5mm") screws from under the cover.

  4. Netgear Arlo Charging Port Replacement: crwdns2935265:04crwdnd2935265:01crwdnd2935265:03crwdne2935265:0 Netgear Arlo Charging Port Replacement: crwdns2935265:04crwdnd2935265:02crwdnd2935265:03crwdne2935265:0 Netgear Arlo Charging Port Replacement: crwdns2935265:04crwdnd2935265:03crwdnd2935265:03crwdne2935265:0
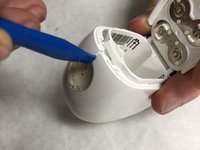
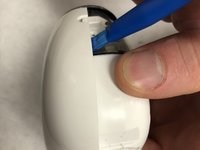
    • Use a plastic opening tool to start separating the plastic housing from the front side of the battery cover.

    • Next, start separating the plastic cover from the rear of the plastic housing, and work your way down the seam line.

    • Make sure the plastics snaps on the front of the plastic get unhooked from the grey plastic ring around the front of the camera.

  5. Netgear Arlo Charging Port Replacement: crwdns2935265:05crwdnd2935265:01crwdnd2935265:03crwdne2935265:0 Netgear Arlo Charging Port Replacement: crwdns2935265:05crwdnd2935265:02crwdnd2935265:03crwdne2935265:0 Netgear Arlo Charging Port Replacement: crwdns2935265:05crwdnd2935265:03crwdnd2935265:03crwdne2935265:0
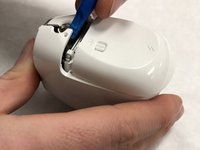
    • Remove the screw (3.5mm) near the sync button holding the opposite side of the camera on.

    • Remove the second screw (3.5mm) on the back of the camera to remove the second housing.

    • Once the screws are removed use an opening tool to pry back the second plastic mount.

  6. Netgear Arlo Charging Port Replacement, Lens Assembly: crwdns2935265:06crwdnd2935265:01crwdnd2935265:01crwdne2935265:0
    • Remove 4 (6mm) large screws with a J00 screwdriver.

    • There are 2 on each side. This will allow you to remove the clear housing from the white housing.

  7. Netgear Arlo Charging Port Replacement: crwdns2935265:07crwdnd2935265:01crwdnd2935265:02crwdne2935265:0 Netgear Arlo Charging Port Replacement: crwdns2935265:07crwdnd2935265:02crwdnd2935265:02crwdne2935265:0
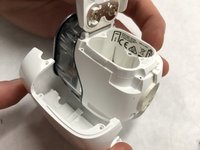
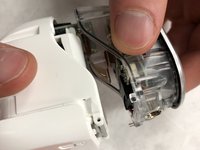
    • Once screws are removed, pull apart the clear housing.

    • Remove rod from camera cover.

  8. Netgear Arlo Charging Port Replacement: crwdns2935265:08crwdnd2935265:01crwdnd2935265:03crwdne2935265:0 Netgear Arlo Charging Port Replacement: crwdns2935265:08crwdnd2935265:02crwdnd2935265:03crwdne2935265:0 Netgear Arlo Charging Port Replacement: crwdns2935265:08crwdnd2935265:03crwdnd2935265:03crwdne2935265:0
    • Remove Large ribbon cable first to disconnect front of camera from main body.

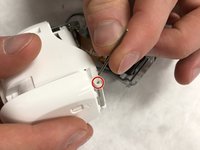
    • Remove 4 (3.5mm) small black screws from motherboard of the camera unit.

    • Remove smaller ribbon cable from underneath yellow tape.

  9. Netgear Arlo Charging Port Replacement: crwdns2935265:09crwdnd2935265:01crwdnd2935265:01crwdne2935265:0
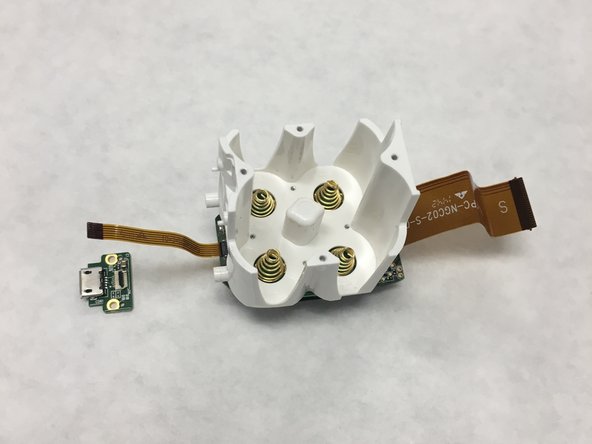
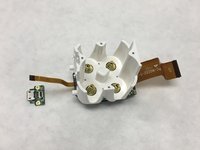
    • Once all ribbon cables are removed, remove the motherboard and camera assembly by pulling up on the black camera motherboard.

  10. Netgear Arlo Charging Port Replacement, Charging Port: crwdns2935265:010crwdnd2935265:01crwdnd2935265:01crwdne2935265:0
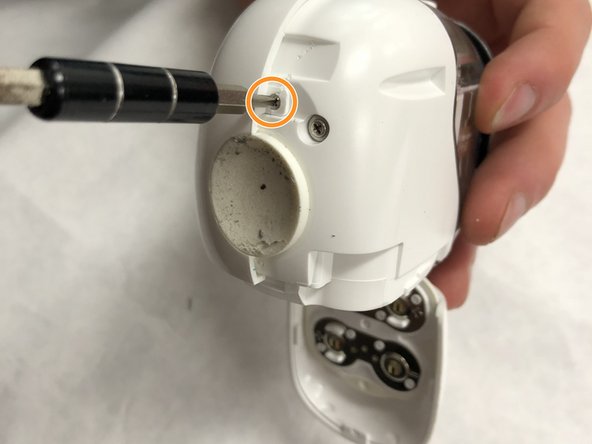
    • Remove the 2 (.135") housing screws with a JIS00 screwdriver

  11. Netgear Arlo Charging Port Replacement: crwdns2935265:011crwdnd2935265:01crwdnd2935265:01crwdne2935265:0
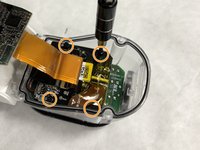
    • Remove 4 (.135") screws on the inside of the battery compartment using the JIS 00 screwdriver.

  12. Netgear Arlo Charging Port Replacement: crwdns2935265:012crwdnd2935265:01crwdnd2935265:01crwdne2935265:0
    • Slide the two halves apart

  13. Netgear Arlo Charging Port Replacement: crwdns2935265:013crwdnd2935265:01crwdnd2935265:01crwdne2935265:0
    • Remove the 2 (.135") screws holding the charging port on using the JIS 00 screwdriver.

  14. Netgear Arlo Charging Port Replacement: crwdns2935265:014crwdnd2935265:01crwdnd2935265:02crwdne2935265:0 Netgear Arlo Charging Port Replacement: crwdns2935265:014crwdnd2935265:02crwdnd2935265:02crwdne2935265:0
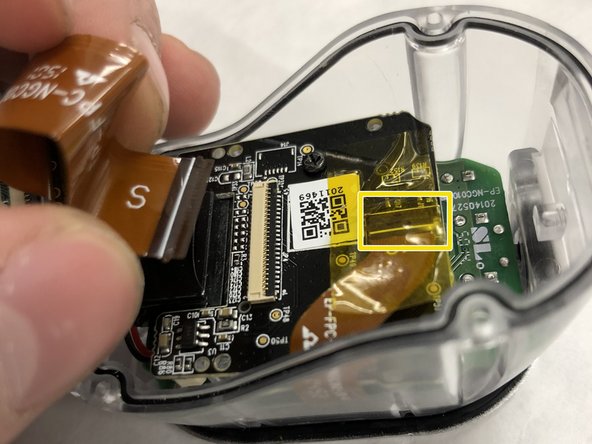
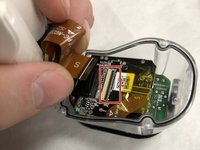
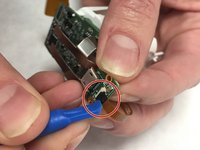
    • Remove the ribbon by prying the black ribbon holder up using the opening tool.

    • Pull the ribbon away from the charging port.

crwdns2915888:0crwdne2915888:0

To reassemble your device, follow these instructions in reverse order.

crwdns2935229:02crwdne2935229:0

Brian Johnson

crwdns2935283:003/21/18crwdne2935283:0

187 crwdns2915208:0crwdne2915208:0

crwdns2935295:0crwdne2935295:0

crwdns2915084:0crwdne2915084:0

IUPUI, Team S2-G1, Freund Spring 2018 crwdns2935289:0IUPUI, Team S2-G1, Freund Spring 2018crwdne2935289:0

IUPUI-FREUND-S18S2G1

crwdns2931471:02crwdne2931471:0

crwdns2935297:04crwdne2935297:0

crwdns2944067:04crwdne2944067:0

Great thanks where did you get the replacement cable please thanks Mike

mikewalters1951 - crwdns2934203:0crwdne2934203:0

where did you get the replacement cable please thanks  BOB

robertwatkins61 - crwdns2934203:0crwdne2934203:0

Any hints on where the new port came from? I have the baby monitor and the port is cheap rubbish and needs replacing. Thanks

David - crwdns2934203:0crwdne2934203:0

crwdns2917038:0crwdne2917038:0

crwdns2936625:0crwdne2936625:0:

crwdns2936751:024crwdne2936751:0 2

crwdns2936753:07crwdne2936753:0 10

crwdns2936753:030crwdne2936753:0 47

crwdns2942667:0crwdne2942667:0 5,202