crwdns2933423:0crwdne2933423:0
crwdns2947577:0crwdnd2947577:0crwdne2947577:0

Nespresso Pixie Internal Diffuser Replacement

crwdns2942213:0crwdne2942213:0

    1. Nespresso Pixie Internal Diffuser Replacement, Internal Diffuser: crwdns2935265:01crwdnd2935265:01crwdnd2935265:01crwdne2935265:0
      • Unplug the machine from any outlets.

      • Remove the water tank by pressing the top button and pulling outwards.

      • Make sure there is no fluid left in any part of the machine.

      crwdns2952109:0crwdne2952109:0

      crwdns2917038:0crwdne2917038:0

    2. Nespresso Pixie Internal Diffuser Replacement: crwdns2935265:02crwdnd2935265:01crwdnd2935265:02crwdne2935265:0 Nespresso Pixie Internal Diffuser Replacement: crwdns2935265:02crwdnd2935265:02crwdnd2935265:02crwdne2935265:0
      • Use a Torx T5 screwdriver to detach the lever of the machine on both sides.

      crwdns2952109:0crwdne2952109:0

      crwdns2917038:0crwdne2917038:0

    3. Nespresso Pixie Internal Diffuser Replacement: crwdns2935265:03crwdnd2935265:01crwdnd2935265:01crwdne2935265:0
      • Remove the drip tray using your hand.

      crwdns2952109:0crwdne2952109:0

      crwdns2917038:0crwdne2917038:0

    4. Nespresso Pixie Internal Diffuser Replacement: crwdns2935265:04crwdnd2935265:01crwdnd2935265:01crwdne2935265:0
      • Use your hand to remove the black drip tray grill behind the drip tray.

      crwdns2952109:0crwdne2952109:0

      crwdns2917038:0crwdne2917038:0

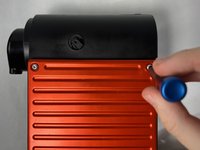
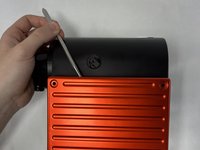
    5. Nespresso Pixie Internal Diffuser Replacement: crwdns2935265:05crwdnd2935265:01crwdnd2935265:02crwdne2935265:0 Nespresso Pixie Internal Diffuser Replacement: crwdns2935265:05crwdnd2935265:02crwdnd2935265:02crwdne2935265:0
      • Use a Torx T4 screwdriver to unscrew each screw on the faceplates.

      • Remove the faceplate using a metal spudger.

      • Be sure to start in both corners to separate the pieces.

      crwdns2952109:0crwdne2952109:0

      crwdns2917038:0crwdne2917038:0

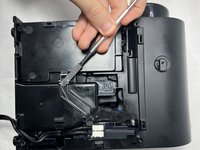
    6. Nespresso Pixie Internal Diffuser Replacement: crwdns2935265:06crwdnd2935265:01crwdnd2935265:01crwdne2935265:0
      crwdns2935267:0crwdne2935267:0
      Tweezers
      $4.99
      • Locate the two springs in each top right corner and use a set of tweezers to remove them.

      • Be sure to set the machine in an enclosed container when this is done so as to not to lose the springs.

      crwdns2952109:0crwdne2952109:0

      crwdns2917038:0crwdne2917038:0

    7. Nespresso Pixie Internal Diffuser Replacement: crwdns2935265:07crwdnd2935265:01crwdnd2935265:01crwdne2935265:0
      • Take off the white plastic bits using a metal spudger.

      crwdns2952109:0crwdne2952109:0

      crwdns2917038:0crwdne2917038:0

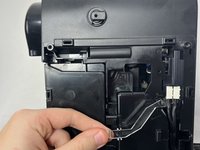
    8. Nespresso Pixie Internal Diffuser Replacement: crwdns2935265:08crwdnd2935265:01crwdnd2935265:02crwdne2935265:0 Nespresso Pixie Internal Diffuser Replacement: crwdns2935265:08crwdnd2935265:02crwdnd2935265:02crwdne2935265:0
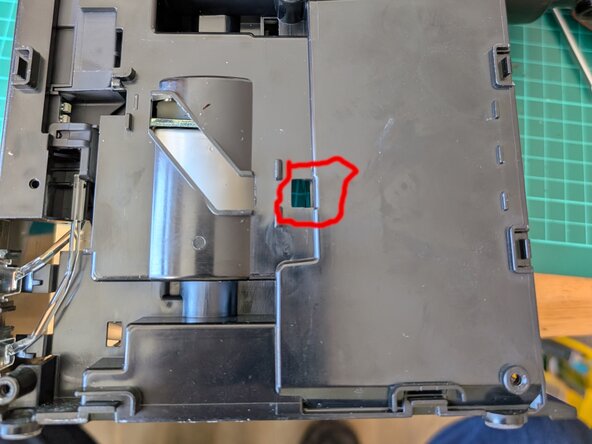
      • Remove the clear plastic bits using a metal spudger.

      • Be sure to pull it out using the hole in which it is indented.

      crwdns2952109:0crwdne2952109:0

      crwdns2917038:0crwdne2917038:0

    9. Nespresso Pixie Internal Diffuser Replacement: crwdns2935265:09crwdnd2935265:01crwdnd2935265:01crwdne2935265:0
      • Use your hands to remove the cables that give power to the machine.

      crwdns2952109:0crwdne2952109:0

      crwdns2917038:0crwdne2917038:0

    10. Nespresso Pixie Internal Diffuser Replacement: crwdns2935265:010crwdnd2935265:01crwdnd2935265:01crwdne2935265:0
      • Use your hands to remove the water spout.

      crwdns2952109:0crwdne2952109:0

      crwdns2917038:0crwdne2917038:0

    11. Nespresso Pixie Internal Diffuser Replacement: crwdns2935265:011crwdnd2935265:01crwdnd2935265:02crwdne2935265:0 Nespresso Pixie Internal Diffuser Replacement: crwdns2935265:011crwdnd2935265:02crwdnd2935265:02crwdne2935265:0
      • Seperate both halves of the machine using both a spudger and your hands.

      • Once you have unclipped the side at the top, middle of the side and base. You can push with a screw driver through the hole on the reverse side to help remove the plastic side.

      • Be sure to take your time and start in the middle. Note that it is incredibly well secured.

      crwdns2952109:0crwdne2952109:0

      crwdns2917038:0crwdne2917038:0

    12. Nespresso Pixie Internal Diffuser Replacement: crwdns2935265:012crwdnd2935265:01crwdnd2935265:01crwdne2935265:0
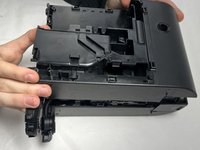
      • Use your hands to pull out the first lever housing in the spot shown in the picture.

      crwdns2952109:0crwdne2952109:0

      crwdns2917038:0crwdne2917038:0

    13. Nespresso Pixie Internal Diffuser Replacement: crwdns2935265:013crwdnd2935265:01crwdnd2935265:01crwdne2935265:0
      • Pull the brewing mechanism apart from the remaining plastic barrier.

      • Once it is separated, pull off the other lever housing in the same way as was described in the previous step.

      crwdns2952109:0crwdne2952109:0

      crwdns2917038:0crwdne2917038:0

    14. Nespresso Pixie Internal Diffuser Replacement: crwdns2935265:014crwdnd2935265:01crwdnd2935265:02crwdne2935265:0 Nespresso Pixie Internal Diffuser Replacement: crwdns2935265:014crwdnd2935265:02crwdnd2935265:02crwdne2935265:0
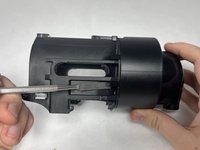
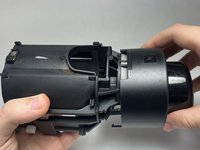
      • Use a spudger to unclip the clips holding the black case in place.

      • Pull the brewing chamber outwards from the machine and then pull it downwards to detach it.

      crwdns2952109:0crwdne2952109:0

      crwdns2917038:0crwdne2917038:0

    15. Nespresso Pixie Internal Diffuser Replacement: crwdns2935265:015crwdnd2935265:01crwdnd2935265:02crwdne2935265:0 Nespresso Pixie Internal Diffuser Replacement: crwdns2935265:015crwdnd2935265:02crwdnd2935265:02crwdne2935265:0
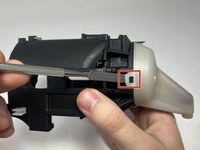
      • Pry off the clips holding the inner white chamber in place in the machine.

      crwdns2952109:0crwdne2952109:0

      crwdns2917038:0crwdne2917038:0

    16. Nespresso Pixie Internal Diffuser Replacement: crwdns2935265:016crwdnd2935265:01crwdnd2935265:01crwdne2935265:0
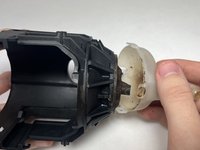
      • Use a spudger to take off your diffuser plate.

      • Insert your new diffuser plate.

      crwdns2952109:0crwdne2952109:0

      crwdns2917038:0crwdne2917038:0

crwdns2915888:0crwdne2915888:0

To reassemble your device, follow these instructions in reverse order.

crwdns2935221:0crwdne2935221:0

crwdns2935227:0crwdne2935227:0

Drew

crwdns2935283:011/05/23crwdne2935283:0

281 crwdns2915208:0crwdne2915208:0

crwdns2935295:0crwdne2935295:0

crwdns2935287:0crwdne2935287:0

UMass Dartmouth, Team 2-2, Gulbrandsen Fall 2023 crwdns2935289:0UMass Dartmouth, Team 2-2, Gulbrandsen Fall 2023crwdne2935289:0

UMASSD-GULBRANDSEN-F23S2G2

crwdns2931471:04crwdne2931471:0

crwdns2935297:036crwdne2935297:0

crwdns2947410:01crwdne2947410:0

I’m sorry but this tutorial should be removed. You’ll just going to broke parts by following that.

biorn - crwdns2934203:0crwdne2934203:0 crwdns2950251:0crwdne2950251:0

crwdns2917038:0crwdne2917038:0

crwdns2936625:0crwdne2936625:0:

crwdns2936751:024crwdne2936751:0 7

crwdns2936753:07crwdne2936753:0 65

crwdns2936753:030crwdne2936753:0 257

crwdns2942667:0crwdne2942667:0 5,891