crwdns2915892:0crwdne2915892:0
Have you ever brought nail clippers on a trip, only to find that they had fallen apart in your bag. Before buying a new pair, try fixing them with this simple guide. As long as you have all three necessary parts, if you follow these easy steps your nail clippers will be as good as new.
-
-
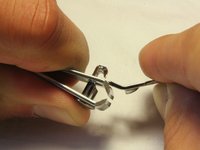
Insert the rod through the bottom hole of the clipper body, and continue through the top hole.
-
The side of the rod with the notch should be inserted first.
-
-
-
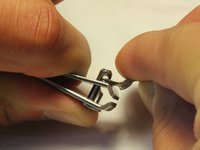
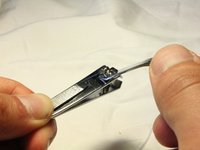
Compress the body of the clippers to reveal the notch.
-
-
-
-
Rotate the rod until the notch opening faces away from the body.
-
This allows for easier completion of the following step.
-
-
-
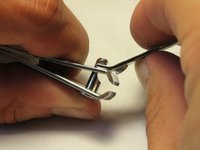
Place the hole of the lever into the revealed rod notch.
-
Release the compressed nail clipper body to lock the lever into place.
-
-
-
Swivel the lever into its normal position, and test the nail clippers' functionality.
-


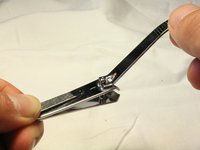
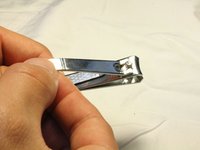
If you follow these steps, your nail clippers should be back to working order.
crwdns2935221:0crwdne2935221:0
crwdns2935229:089crwdne2935229:0
crwdns2935287:0crwdne2935287:0

Cal Poly, Team 30-5, Green Spring 2015 crwdns2935289:0Cal Poly, Team 30-5, Green Spring 2015crwdne2935289:0
CPSU-GREEN-S15S30G5
crwdns2931471:05crwdne2931471:0
crwdns2935297:032crwdne2935297:0
crwdns2947412:032crwdne2947412:0
Thank you so much ! My fingers are arthritic and I was frustrated until I found your instructions.
Thank you. Knew it was simple! Love this website.
This is the dumbest “repair guide” I have ever seen. It is not a repair, because they are not broken, it’s a re-assembly.
That's why it says reassembly 🤨
Thank you so much!!!! I could only find one pair in my house and was feeling desperate. This is the best guide to repair and I’m glad you posted under broken nail clippers because that’s what I considered mine to be and how I looked it up.