crwdns2933423:0crwdne2933423:0

Mr. Coffee DRX5 Warming Plate Replacement

crwdns2942213:0crwdne2942213:0

  1. Mr. Coffee DRX5 Warming Plate Replacement, Warming Plate: crwdns2935265:01crwdnd2935265:01crwdnd2935265:03crwdne2935265:0 Mr. Coffee DRX5 Warming Plate Replacement, Warming Plate: crwdns2935265:01crwdnd2935265:02crwdnd2935265:03crwdne2935265:0 Mr. Coffee DRX5 Warming Plate Replacement, Warming Plate: crwdns2935265:01crwdnd2935265:03crwdnd2935265:03crwdne2935265:0
    • Use a Phillips #1 screwdriver to remove the two 9mm screws and the three 11mm screws on the bottom of the coffee maker and remove the bottom plastic cover.

  2. Mr. Coffee DRX5 Warming Plate Replacement: crwdns2935265:02crwdnd2935265:01crwdnd2935265:01crwdne2935265:0
    • Slide display out of the way.

  3. Mr. Coffee DRX5 Warming Plate Replacement: crwdns2935265:03crwdnd2935265:01crwdnd2935265:03crwdne2935265:0 Mr. Coffee DRX5 Warming Plate Replacement: crwdns2935265:03crwdnd2935265:02crwdnd2935265:03crwdne2935265:0 Mr. Coffee DRX5 Warming Plate Replacement: crwdns2935265:03crwdnd2935265:03crwdnd2935265:03crwdne2935265:0
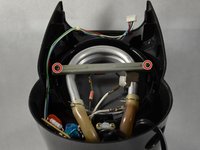
    • Using a Phillips #1 screwdriver, remove 12mm screws from heating element bracket and remove bracket.

  4. Mr. Coffee DRX5 Warming Plate Replacement: crwdns2935265:04crwdnd2935265:01crwdnd2935265:01crwdne2935265:0
    • Pull heating element out of the way.

  5. Mr. Coffee DRX5 Warming Plate Replacement: crwdns2935265:05crwdnd2935265:01crwdnd2935265:01crwdne2935265:0
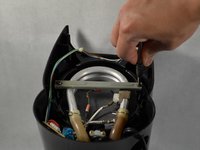
    • Twist warming plate clockwise so that the tab is out of place. Remove warming plate.

crwdns2915888:0crwdne2915888:0

To reassemble your device, follow these instructions in reverse order.

Michael Chhim

crwdns2935283:003/21/17crwdne2935283:0

205 crwdns2915208:0crwdne2915208:0

crwdns2935297:02crwdne2935297:0

crwdns2915084:0crwdne2915084:0

UMass Dartmouth, Team S2-G2, Isaacson Spring 2017 crwdns2935289:0UMass Dartmouth, Team S2-G2, Isaacson Spring 2017crwdne2935289:0

UMASSD-ISAACSON-S17S2G2

crwdns2931471:03crwdne2931471:0

crwdns2935297:05crwdne2935297:0

crwdns2917034:0crwdne2917034:0

Interesting that you can take the thing apart, do nothing else but put it back together again, and it’s supposed to be fixed? What about the step of replacing the broken part? I don’t see mention of that.

destravlr - crwdns2934203:0crwdne2934203:0

crwdns2917038:0crwdne2917038:0

crwdns2936625:0crwdne2936625:0:

crwdns2936751:024crwdne2936751:0 0

crwdns2936753:07crwdne2936753:0 1

crwdns2936753:030crwdne2936753:0 11

crwdns2942667:0crwdne2942667:0 593